Independent Stampin'Up! Demonstrator!

Hey friends!
I've been a demonstrator with Stampin'Up! since 2011. I'm located in Bozeman, Montana, but have customers all over the country. I have a very fun and active downline called "Big Sky Stamper Stars" and we get together in person and online to share what we love. My blog posts feature what I'm up to recently and I try to share new product information, tips and tricks and creative inspiration. You can shop from this site or find out more information about our products and becoming a demonstrator! Thanks for stopping by!

Tuesday, July 30, 2019

Here's to Strong Women

Hi Stampers!
I've missed you!  I was out last week, even though I scheduled a few blog posts, to a family reunion in Minnesota with some fun stops on the way to see more family and friends. The highlights were many including seeing a new generation of kids belonging to my nieces, long overdue conversations with my BFF from high school, glorious weather while we were boating on a lake and all the love from all the people. It was awesome in so many ways. 

One of the things that struck me is that I am related to some incredible women. They are strong, confident, smart and determined. They've made some choices for their future and are doing all in their power to succeed, on many levels. I was so impressed and inspired. I thought today was the perfect day for this particular stamp set, "Here's to Strong Women" as I'm still marveling at all the conversations I had. I made these awhile back but am honored to share them with you today in honor of some special women!


As you maybe can tell, I especially wanted to pair this stamp set with images from the Silhouette Scenes set. I thought they evoke the same kind of feel - confidence and strength! I added in an extra die or embossing folder here and there but mostly tried to make the sentiment speak loudly and clearly! For most women, they are so busy taking care of those around them in so many ways, it is hard to step back and even think about ourselves. Wouldn't cards like these be a great encouragement to the women you admire!  I'm going to go back to this set quite often!

We are almost at the end of the Bonus Days promotion!  Have you taken advantage of it?  For every $50 you spend with Stampin'Up! in July, you'll get a coupon code worth $5 towards any purchase in August. It's fun and it's easy to redeem.  If you've never placed an order, it's quite easy. You can do it yourself online (click on shop now on the right margin) or you can contact me directly and I'll get an order placed for you. It doesn't matter where you live, as long as it's in the US. If you've been watching my blog for awhile now, maybe there's something you'd like to try. I'll help anyway I can! My supplies are listed below if you're interested in these cards in particular!

After being gone for about 10 days, I've had a lot of catchup to work on in my stamp room!  Stay tuned for some all new samples and news coming up in August!  We are very close to the release of the Holiday catalog and I will try to stun and amaze you with some sneak peeks!

Happy Stampin'!
Sarah

Thursday, July 25, 2019

Pressed Petals Suite

Hi Stamper Friends!
I want to follow up on a sneak peek I posted in a blog last week featuring a card we did at a class. It featured the "Pressed Petals Suite" and before you say, "I don't want any more floral stamps in my life", check this out!  It's really pretty and the best part of it is what goes with the stamps. They are wonderful and have a unique font, but the real stars of this suite are the Designer Series paper, the dies and the coordinating products that embellish your projects. There's even a wonderful journal for you to decorate and then gift or use yourself. Wow!  I played with this set the other day and had some fun! What you'll see in the following photographs is a combination of Designer Series Paper, die cuts with coordinating dies and DSP, embellishments and stamping to create several different cards.


I think most of the cards are self-explanatory as to how I made them and I've shared my supplies below. I did pull from some other SU products to create some of these designs. They are so heartwarming and beautiful. I guess there is room for more floral stamps in my life after all! I wish I could show you a wonderfully decorated journal that comes in this suite but I haven't bought it yet! I've included it in my supply list in case you're interested.  Be sure to check out the online store! There's tons of products conveniently sorted into categories for all types of shoppers. If you are an avid stamper, you can get everything you need in every category!  If you like to journal or draw, check out our pens, markers and coloring tools such as an Aqua Painter, blender pens and watercolor pencils. If you are a scrapbooker, you won't believe the quality of our paper, both card stock and our exclusive 12 x 12" Designer Series Paper. If you are new to this sport, check out the kits and see if stamping might be right up your alley! I really didn't know anything about it until I tried it 8 years ago and wow,   I discovered a passion! Please let me know if you have any questions. I love to help and am usually available!

Keep on Stampin'!
Sarah


Tuesday, July 23, 2019

Time for Tags - A special Hostess set!

Hey Stampin' Friends,
I'm here today with a fun stamp set that is unique for two reasons. First, it is a Hostess - only set which means you have to submit an order over $150 to be able to buy it with your hostess dollars. It is about half the price of normal stamps and it's your reward for hosting a large party with a big order, or putting in a big order all by yourself!  Admit it - who doesn't do that once in awhile!

Anyway, the second reason this stamp set is unique is because the designs and sentiments have a vertical orientation rather than horizontal. I can't tell you how many times I get part way through the design process and realize I don't have room for a big ol' horizontal greeting and wished I had more skinny vertical options. I love this set for that reason alone. It also coordinates with a new punch called  the Timeless Label punch, also somewhat skinny and long!

Just for fun, I chose five different colors and did a card featuring each of the stamps with some background stamping as well. Here are my results:


This first pictures shows all the cards grouped together and here they are individually:


As you can see, I also used some embossing folders on some card stock to step up my design just a little bit. I also used our wonderful linen twine, which goes with just about everything.  I've listed my supplies as well as my color choices below in case you want to reproduce these cards. What an easy set to work with and not too much coloring that takes a lot of time to complete. These would all make great, quick Make-n-Take cards at an event, a buffet or just for fun, especially with new stampers.

Let me know if you have any questions or would like more information about Stampin'Up! We are a great company and if you like to craft, you should hear more about us!

Have a great day!
Sarah

Monday, July 22, 2019

Swirly Frames

Hi Stampin' Friends!
You would think I would eventually run out of things to show you or things to talk about... not yet!  I have something kinda funny to confess today. I actually won the stamp set I'm going to show you awhile back... possibly more than a year ago even. I don't remember now and it must not have made a big impression on my because I have ignored it for all these months. Then, I saw something on Pinterest (of course) that caught my attention, jogged my memory and started the ideas buzzing around in my head. The set is called "Swirly Frames" and it is just that... sketches of all sizes and shapes of frames to use around a design, some paper, a sketch, whatever.  Feeling up to a challenge, I sat down and played with it last week and really had fun!  I had no idea this set was so versatile!


I thought I would start easy with the big rectangle frame and try to make a picture. I used  the "Let It Ride" stamp set for the trees and horses and then used my Stampin'Blends markers for the grass and sky. Before I adhered the piece to my card, I ran it through my embossing machine with the "Subtle" embossing folder. If you don't have that folder, get it!  You will find a reason to use it every time you step into your crafting space, I promise!


For this card, my inspiration was the sentiment, especially the "messy" part. I was trying to figure out how to make a cute card that has a "messy" theme - sorta an oxymoron, right? I thought maybe stamping the circle swirly frame in several colors, overlapping each other would create that effect. I added some random silver metallic thread and retired washi tape to complete the look. I love this card!  It was easy and fun. My squiggles were hand drawn with a StampinWrite Marker too!


For my final go round, I wanted to use the square frame which has an inner space of about 1-1/4". I actually stamped close enough to each edge to be able to punch out the center with my 1-1/4" square punch. I then used this piece as a template on my blank card base and stamped my flowers. I removed the frame template piece, colored the flowers with Stampin' Blends, then put the frame piece on but raised it up with dimensionals!  This almost created a shadow box effect on all the flowers and I really loved it!  My flower colors feature some new In Colors as well!

I'm going to keep this "Swirly Frames" stamp set close by and play with it some more!  What a fun idea to incorporate with other stamp sets!  I've listed my supplies below so you can get what you need to make some of these cards if you like. I would love to have your Stampin'Up! business if you don't already have a demonstrator. I teach local classes in the Bozeman, MT area but try to coach, mentor, advise and help when I can via online and social media options. I would love to meet you and share in your creative journey!  Contact me today!

Now I'm thinking I should spend some time ferreting out what other stamp sets I have and haven't touched yet!  You never know....

Happy Stampin'!
Sarah

Friday, July 19, 2019

Stargazing

Hey Friends,
I don't know about you, but one of my favorite things, especially on a clear night, is to stare at the stars. They are so vibrant some nights. We live out in the country far enough that there aren't city lights or street lights to dim their brightness and especially in the winter, they can be magnificent.  I've noticed I pay more attention to them with the passing away of my parents. It's not that I think they are stars but I do find myself pondering the heavens and what that must be like, as well as the hope of an eventual reunion with them.

I knew I would want to get the "Stargazing" stamp set sooner or later!  It's has some great star stamps that I think are beautiful for use throughout the year but I am looking forward to making some Christmas-themed designs with them as well.   Here's what I came up with for my first go-round:


This galaxy swirl of stars is probably my favorite stamp in the set. I wanted to get some different colors on there so I used my dauber to apply ink, starting in the center with Daffodil Delight, then some Pacific Point and finally some Night of Navy. I couldn't believe the wonderful results when I stamped!  With this technique, no two galaxies would look exactly the same but it was really fun. I dressed the card up with some random, mostly retired, ribbon as well.


The above little experiment went so well, I decided to go for it with something else. With the second swirly stars stamp, I used Versamark and our new Shimmer Black embossing powder to heat emboss the stamp on 3 separate pieces of Whisper White card stock, all cut to the same measurement of 4" by 1.75".  After they had fully dried and set, I sprinkled some new Pigment Sprinkles on each one and then spritzed them with water. They did explode and bleed just like I was hoping!  Again, with this technique, every time you try it, you will get slightly different results.   I used the Gorgeous Grape, Bermuda Bay and Granny Apple Green sprinkles.


For my last card, I wanted to use the sentiment above and try to create a night sky without using dark blue or black or silver or gold glimmers.  I'm not completely sure I achieved that, but I really like this card!  You might recognize the girl silhouette stamp from  the See A Silhouette stamp set. Boy am I using those a lot!  I just love them!  In case you're wondering, I freehand drew the grey line for the ground and then just colored a bit with my gray watercolor pencil and a blender pen. By the way, the moon stamp coordinates with our Twinkle Builder punch that came out last year! Bonus!

This was so fun to play with and it ended up being perfect for trying some different techniques with. I don't ever want to be in such a big hurry that I can't experiment, try new things and even risk failing! I think that's what furthers your craft and your artistic eye. The more you try, the more you learn.

Thanks so much for stopping by! My supplies are listed below and I'm always available to answer questions, solve some problems or encourage you in your creative adventures!  Meanwhile, keep looking up at those beautiful stars!

Happy Stampin'!
Sarah

Thursday, July 18, 2019

On To Adventure!

Hi Friends!
Wow, I'm going to have control my enthusiasm a little. I haven't had this much fun with a stamp set since like yesterday!  I wanted to buy the "On to Adventure" set featuring happy retirement themes because I am hopeful this is in our future, someday!  I also happen to have a lot of friends and now some family members that are hitting these years and it's fun to celebrate what a milestone that is, especially after years of working so dedicatedly!   I wanted to try and use all the stamps and I decided to feature Designer Series Paper as my background and just a little bit of coloring with Stampin'Blends to accent my color scheme. I love how these turned out! I'm hard pressed to pick a favorite!


Obviously, a very popular retirement theme is golf - like in "now I have time to golf as much as I want"!! My parents were avid golfers and I know they enjoyed their sport even more in their retirement years. Can you guess what embossing folder I used to make my golf balls?  It's the Falling Snow folder that recently retired! Perfect dimpled dots for golf balls!


Another frequent theme is time for hobbies, passions and well, maybe just some extra time! I would guess most recent retirees are doing a little dance when they get up in the morning as they don't have to get ready to go to work!  This card makes me smile and I'm hopeful I can incorporate lots of bliss in my retirement years.  In case you're curious, the swirl of stars is from the new Stargazing set!


And, what would retirement be without travel?  The cruises, the road trips, the exotic locations, the grandchildren?  It's hard to be a seasoned traveler until you retire unless you do it for work and face it, that's not the same! These two lovebirds are ready to go on that next trip!

These will be some of my favorite creations until something else takes their place!  I've listed my supplies below so you can copy and recreate these designs with your own stash of supplies.  Meanwhile, take time to adventure!

Happy Stampin'!
Sarah

Wednesday, July 17, 2019

What's a typical card class like? What do you make?

Hey Stampers!
Good to "see" you here!  I love having people stop by, hopefully to be inspired and get some ideas. One way to learn more and more about rubber stamping is to attend a class and get your hands inky!  I hold several classes each month and am hoping to launch into the online world of virtual classes soon. People seem to learn best and a visual approach combined with a hands on approach and that is what a card class offers.  I had two classes yesterday, both doing the same thing and want to share our projects with you today!

I usually have a purpose in mind with any class. Sometimes it could be a "beginner" class and I want to introduce them to the basics in a non-overwhelming way. Sometimes it has a particular theme like birthdays or Christmas and that is what the cards are focused on. At least once a month, I offer a
"anything goes" class where I highlight new products and new techniques, showing the participants things they don't necessarily already have and maybe would like to get. It's fun to test drive something before you buy it isn't it! Yesterday's classes were that sort of class.

We started with the wonderful Magnolia Lane Suite in the Annual Catalog. This suite has probably gotten more social media attention than any other but I hadn't yet used it in a class. I wanted to feature the great big Magnolia blossom and some of the gorgeous Designer Series Paper that goes with the suite. The card we made is a non typical fold with an extra flap. The card stock was cut to 4" x 12". It was scored at 5-1/2" and 11".  Here are some pictures showing each layer.


Outside view of card. The Magnolia blossom is attached to the small 4" x 1" fold on the left front with tear tape. This is blossom is fun to color and easy to cut out with the coordinating dies.


This is the first inside layer with the sentiment "Thanks" hidden behind the blossom when it is closed.  My first piece of Designer Series Paper is this stripe design.


This is the view when you open the "Thanks" layer to the right. I used more Designer Series Paper, added a sentiment and then attached a white piece for an area to add a handwritten greeting.  This was a simple design format but really showcases some great surfaces for DSP and sentiments.

The next card we made is from the Pressed Petals Suite. This set has some great Designer Series Paper as well and also includes some great embellishments. Here's our card:


The music paper forms the background with a floral relief cut "frame" over it. This was made by using one of the coordinating dies that come in the set. Rather than cutting the outside edge as most dies do, this die only cuts the inside edge and you then use the reminder after you take out the "middle" part that was cut away. It's a great frame!  You can also see the wonderful adhesive metallic flower in the center of the paper punched flower and the Washi tape petals tucked in as well.  This suite is particularly gorgeous with all its details. Be sure to check it out in my list of supplies below!

Our final card was a truck card. We all live in Montana and pretty much everyone owns a truck except the people that own a Subaru. I knew my class attendees would love this card!


I've shown this card on my blog before but I wanted to use it for a class. We used the Stampin' Blends alcohol markers to color and the die cut "buttons" are from the Arts and Crafts die, also a new set with this annual catalog.  This card was fun to make and will be easy to send!

Thanks for stopping by and seeing what a class might be like. I try to change up the days and times of the week I hold classes to make it convenient for all sorts of schedules. Summer is a little tough as everyone is so busy but when we can, we still love to get together to stamp!

For more information on my classes and other links, you can go to my website:

BIG SKY STAMPIN'

It's a one stop hub for all my Stampin'Up! related news,  events, online store and social medial links. I hope you'll visit it and add it to your bookmarks so you can find me again in the future!

That's it for today! Hope you have a great one!  Happy Stampin'!
Sarah


Tuesday, July 16, 2019

Beautiful Friendship

Hi Friends!
What is one of the pieces of life's puzzle that we cherish so much, through all our years? It's friendship, isn't it!  We start making friends at an early age, often with siblings or cousins and move on to school mates and neighbors. We have friends that last our whole life and friends that we met just a few days ago but feel like we have known them for much longer. I think God gave us friends and made us to crave friendship as a way to enjoy life, journey through both the joys and sorrows of our days and help us focus on others rather than ourselves. There's much more to it but I imagine you can join me in cherishing the friends in your life.

Today's stamp set that I'm featuring is called "Beautiful Friendship" and it has some lovely sentiments with great fonts as well as some beautiful flower and leaf stamps that are the "Distinktive" style of stamp which create a layered look to the ink. This gives a depth and texture to your stamping that is a result of the way the stamp is carved and not because of any special technique that you had to learn or master.  I really liked this stamp set because of the flower that looks like a hydrangea. That was one of my grandmother's favorite flowers and every spring I love seeing the blue and purple hydrangeas that remind me of her.  The rose stamp is also so pretty.

Here are some ideas playing with this fun stamp set!


I've learned that one of my customers' favorite colors is purple - in all its shades!  I decided to use our three shades of purple for this card. I began with our new background stamp, "All Wired Up" which is a chicken wire motif. I did have to stamp off the ink on my grid paper first as it was too dark with my first attempt at this card. I then used Highland Heather for the flowers, Mossy Meadow for the leaves, Purple Posy for the sprig stamp and Gorgeous Grape for my sentiment. All of these purple shades compliment each other and don't fight for color tone. Since I chose to make this card with Very Vanilla instead of Whisper White, I needed to "darken" up the white part of my gingham check paper (retired from the recent Occasions catalog). I used a sponge brayer and applied some Crumb Cake ink lightly to make the start white more off white. That's a great trick when you don't want your design to feature white.


This card features the hydrangea stamp that caught my eye. I stamped it three times with Purple Posy, Seaside Spray and Rococo Rose inks. In keeping with the lighter color palate, I chose Soft Sea Foam as my green color. For something a little different, I embossed the card base to give it some texture.


I'm sure the "Floral Essence" paper has caught your eye already!  It's gorgeous Designer Series Paper that features gorgeous florals with an impressionistic style like Monet or Renoir.  I used some of that as my background and then stamped up this great card using Crushed Curry, Mossy Meadow and Rococo Rose. It's really a pretty color scheme and the sentiment is perfect.

Here's a look at the stamp set so you can see it in its entirety:


And here are some ideas from the Stampin'Up! artists to inspire you:


Again, I've put my supply list at the bottom of this post so you can easily order any of the products I used to create these cards. It's fun to embellish, die cut, watercolor, etc but it's also fun to just stamp and this stamp set is perfectly suited to that. I hope you'll consider adding it to your stash.

I'm off to some classes today! It's a chance to share what I love and celebrate the friendships I have with so many of you. Thanks for stopping by and taking a peek at my work! I truly appreciate your interest!  Leave me a comment and let me know how I'm doing!

Happy Stampin'!
Sarah

Monday, July 15, 2019

Back On Your Feet

Hey Stampers!
Are you a fan of puns? Are you a fan of cute animals?  You will really like what I'm sharing today!  How many times have you wanted to make a project and wished you had a stamp of a sloth? Never? haha!  Well, now you can have that and more with this cute stamp set featuring some very sweet animals in less than stellar shape. Sometimes life is like that... just a mess with an accident, injury, illness, bend in the road, etc.  We hate when life's unexpected events slow us down and get us off track. Here's a way to brighten someone's day who is in that place and I think it will be sure to put a smile on their face. Check these adorable cards out!


How sweet are those?  The animals are just perfect for capturing the sense that all is not as it should be and "I'm here for you".  I had fun making these cards and coloring the animals with our Stampin' Blends alcohol markers. These are a dream to color with. The ink goes on so smoothly and with two shades, light and dark, of every color, you can easily create a dimensional effect with your blending. I also tried to incorporate some fun new Designer Series Paper in these cards as well from the Mosaic Mood pack and the Garden Lane pack.  If you want to make any of these cards or are so excited you can finally get a stamp of a sloth, click on the supplies below and you'll be directed to the online store for easy shopping!  It won't take long to get to $50 and then you'll earn a Bonus Days coupon as well! For every $50 purchase in July, you'll earn a coupon code good for $5 toward a purchase in August.  That makes July a great time to place an order!  Let me know if I can help please...

Okay, I'm off to run a few errands and then prep for 4 classes I have this week!  I love my job and I love to share stamping with all of you!

Happy Stampin'!
Sarah

Sunday, July 14, 2019

August Paper Pumpkin Kit - plus add-on!

07.11.19_TH_SHAREABLE_GIFT_OF_FALL

Hi Friends!
Many of you have asked about Paper Pumpkin, Stampin'Up's monthly subscription "creativity in a box" kit. I promote it throughout the year and enjoy ordering a kit myself. I love the unique designs and products that are not found online or in any of our catalogs and are exclusive to Paper Pumpkin offerings.  Most of the kits are card-related but sometimes, there are tags, goodie treat bags or gift bags, etc.  In the past, they have let the entire kit be a surprise but the last few months, they've been giving us a few hints as to what is coming up!

The August Paper Pumpkin kit presents a new opportunity altogether!  The kit itself has everything you need to make 6 gift bags and 12 gift tags, all fall-themed with rich, vibrant colors and gorgeous fall leaves.  In addition, if you prefer to mostly make cards, you can purchase an inexpensive add on kit which includes 24 cards and envelopes to stamp and decorate with your Paper Pumpkin kit supplies. What a fun way to make your kit go further and help you out with some card making as well!

Here are a few things to remember:
1) You need to sign up for Paper Pumpkin by August 10th to take advantage of the August kit.
2) The purchase of the add-on kit is a separate purchase so let me know if you want one of those too, or order it from the online store after August 1st. The order number is  #152885.
3) If you've placed any orders in July of at least $50, you will receive Bonus Days coupon codes that could apply towards your August order, including this add-on kit. If you have a couple of codes, you can get the add-on-kit for free!

I hope you want to try Paper Pumpkin and will jump in on this special offer for August!  Here's a link that will get you signed up and on your way!

https://whttps://www.paperpumpkin.com/en-us/sign-up/?demoid=2094978

As much as I love summer, it's always exciting to see fall products hit the store as that is my favorite coloring palette and themes!  I can't wait!

Happy Stampin'!
Sarah

Saturday, July 13, 2019

What can I buy with $50?

07.01.19_BONUS-DAYS_DEMO-MAIN_EN

Hey Stampin' Peeps!
I have a little extra time this morning and am posting on my blog for a change, on the weekend! I hope some of you are around but I suspect most of you are out playing now that it's summer and finally warm.  Summer is very short in Montana so we cram a lot into our 6-10 weeks, whatever we get, depending on the year haha!

Since our Bonus Days promotion is going on, I thought it would be helpful to give you some ideas of what you could purchase with $50 and earn a Bonus Days coupon, good for $5 in August, on any order. Here are some fun suggestions!

1) Buy a kit!  These are featured on pages 200-203 in the Annual Catalog and include some all-inclusive kits (everything you need) as well as one kit where the supplies and stamps are separate products.  The all-inclusive kits are around $35 and you could add a pack of Stampin'N Write markers for some extra ink color and reach your $50 purchase. Did you know you can ink up stamps with the brush end of a marker? Works every time!

2) If you're a seasoned stamper, buy a bundle!  Many of our stamp/die bundles are right around the $50 threshold and if you're just a tad short, you can add a pack of dimensionals or a Snail adhesive to get you over the $50. Stamp and die bundles are the future!  We can make some really amazing projects with the intricacy of stamping and die cutting with products that coordinate so well.

3) If you're not into accumulating a lot of stuff, how about a prepaid Paper Pumpkin subscription?!  You can get a three month subscription for $63 and earn your Bonus Days Coupon that way. Paper Pumpkin is a "one-stop creativity box" that is delivered to your door every month with all you need to make a special, unique project. It's great if you love to craft but don't have time or money to dive in whole heartedly!

4) Short on ink?  Why not purchase a whole color family of ink pads?  They are about $67 and you'll have 10 new colors of ink at your fingertips! You don't have to buy ink as a color family set and you can buy only the colors you want or need individually.

5) Need to beef up your stock of basics like adhesives, Whisper White and Very Vanilla card stock, envelopes, black Momento ink, Wink of Stella pen?  It's no running out of the basics when you are in the middle of something so make sure you have all you need for the next few months!

Those are some of my ideas off the top of my head. I don't have to tell you it's easy to spend $50 with Stampin'Up!  Now is just a great time to do it with the added incentive of the Bonus Days promo.  Check out the online store here and see what catches your fancy!

Online Store - shop here!

Let me know if I can help! I'm usually always available or will be shortly after you contact me. Have a great weekend and enjoy summer!

Blessings,
Sarah

Friday, July 12, 2019

Magnolia Lane Suite

Happy Friday Stampers!

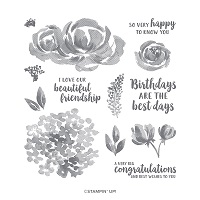
Just like that, another week has flown by! I don't have a real busy weekend ahead of me so I'm enjoying some extra stamping time lately. Way back in April or May, I blogged about a really spectacular suite that is in the Annual Catalog. This suite has gotten a ton of attention on Pinterest as well and if you are a fan of any home decor TV shows, magazines or even departments in Target, you've heard the word "magnolia"!  Thanks to Chip and Joanna Gaines, the stars of Fixer Upper, this word has worked its way into our vocabulary and automatically garners interest. Stampin'Up! jumped on the wagon with their "Magnolia Lane" suite. This suite really makes a statement with a huge magnolia stamp and other coordinating sentiments and floral/leaf images.  Today I want to go deeper with this wonderful set.

The predominant image is a great big magnolia flower. I don't believe magnolias are able to grow in a northern climate like Montana so I just have to admire them on paper! This set is fun to stamp with and even more fun to color!  Take a look at my first go round with it:


Believe it or not, I colored this flower with my Stampin' Blends alcohol markers and then die cut it out. Isn't it gorgeous? The key to coloring this flower is leaving plenty of uncolored "white" space so it really looks like a magnolia blossom.   Here are some more ideas, using the stamps and dies from this bundle:


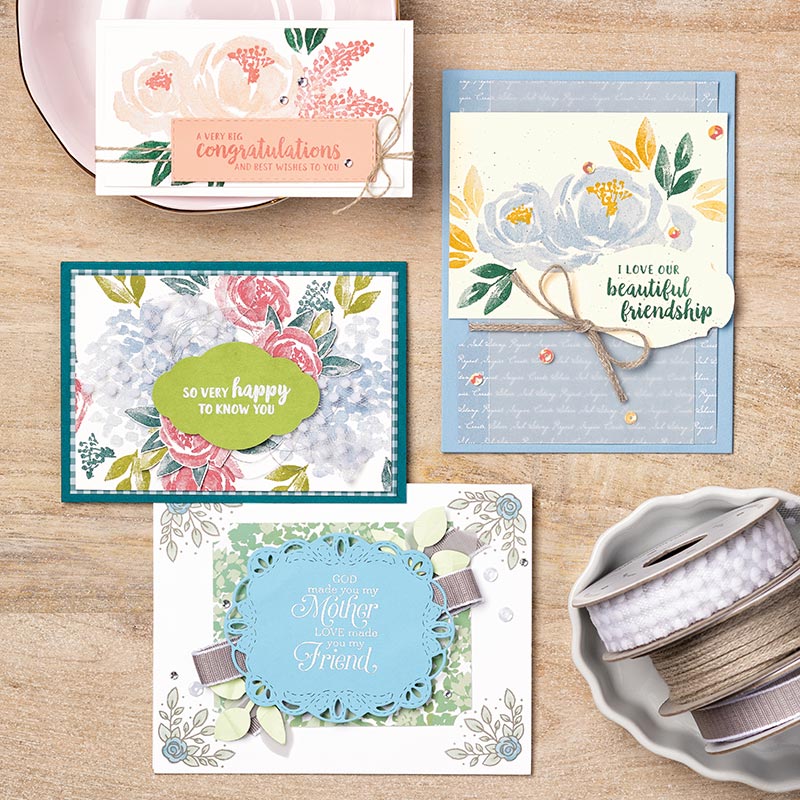
This card above features the exquisite Magnolia Lane Designer Series Paper. I love the color scheme with Petal Pink, Mossy Meadow, Early Espresso and Black. At the time I made this card, I did not have a Petal Pink Blend marker so I used the Ivory tone and it worked really well.


Take a close look at these flowers - they aren't stamped, they are actually die cut from the coordinating Designer Series Paper!  I love when Stampin'Up! does that, giving me more ways to use a die and the paper. Did you notice the Buffalo Check background?  That is timeless!


For this card, I also used my Stampin'Blends markers, but I stamped the flower blossom in Crumb Cake. I wanted to create a more watercolor effect, which I think I achieved. Overall, this is a duller color tone than the other card at the top of the blog so I don't care for it as much.


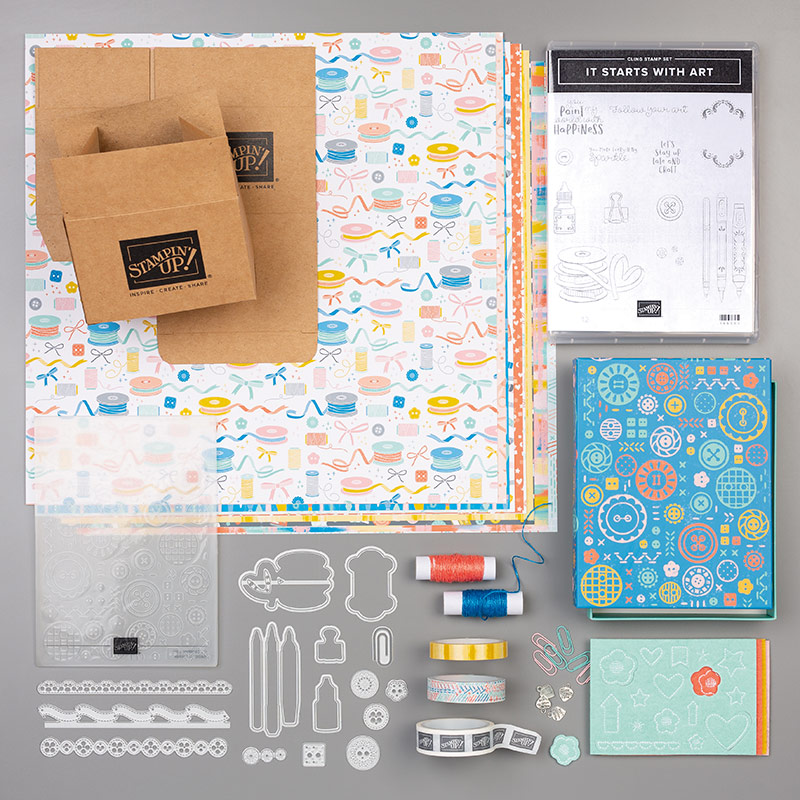
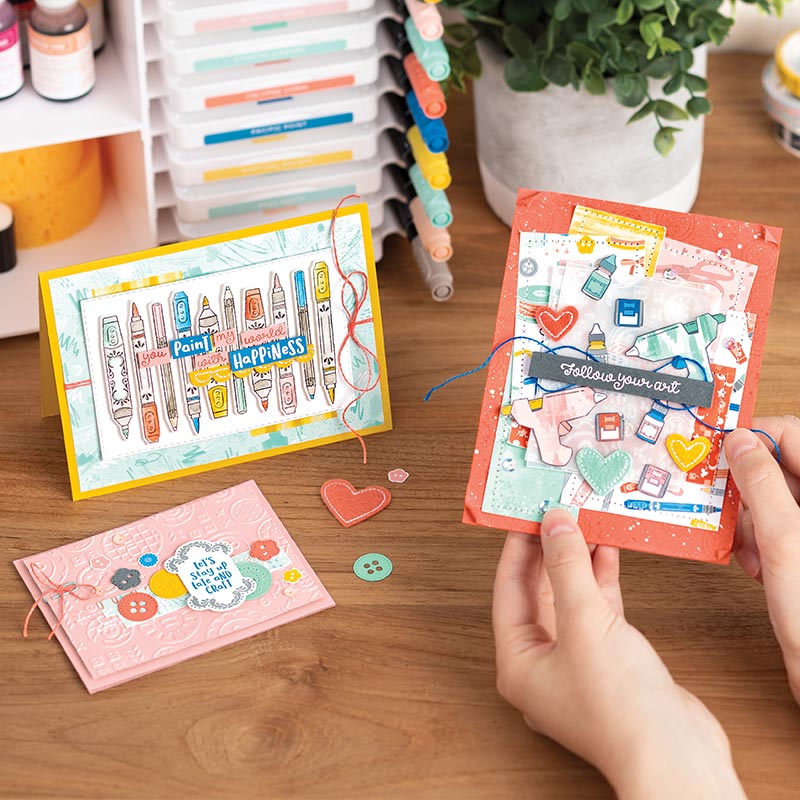
Finally, I wanted to play with the dies and see what they could do. There are some flower and leaf cut outs as well as some flower background pieces. There are more fabulous products with this suite, including some Memories and More cards, cork embellishments, beautiful ribbon and a big magnolia blossom embossing folder. I need to revisit this whole ensemble and try out some other ideas!

One of the best things about Stampin'Up! is the product coordination by theme and color. All of that helps you put together a project that is pleasing to the eye and has components that go together.

I've listed my supplies below, as well as all the products in this suite. You can click on any of them and it will take you to the online store. If you're a fan of flowers, this bundle really packs a punch!

Don't forget about our current promotions!  You can purchase a Starter Kit during July and August and get extra value for your dollars. For $99, you can pick out $155 worth of SU products and you'll also receive a $10 coupon good towards another order the month after you sign up. That's as good as the sign up special we usually run during Sale-A-Bration in the winter. If you've ever thought about joining, I would highly encourage you to do so. Most people, after signing up, wish they had done so sooner. Additional benefits include a 20-25% on all products, early access to new catalogs and products, access to demo-only Facebook groups, forums, magazines and emails. If you love to stamp, join the rest of us that have found a great home in the Stampin'Up! community. My team, the Big Sky Stampin' Stars, would love to welcome you to our group. We are fun, creative, welcoming, helpful, encouraging and extremely talented! Talk to me today about joining us!

The other promotion is called "Bonus Days". For every $50 purchase made in July, you'll receive a coupon code good towards $5 off any order in August. There are no limits to the number of coupon codes you can earn and there is no minimum purchase to use them on.  Who doesn't like to save a little money buying stuff that you are going to buy anyway?!!

Finally, I would like to make a more personal appeal for my business.  Each year, Stampin'Up! offers the opportunity to earn an Incentive Trip to some place fantastic. This year, the trip is an all expense paid week in Maui. It takes an incredible amount of hard work to earn the trip and I've never been so close. Earning the trip requires a combination of strong sales, mentoring the team of people under you and providing the best customer service possible.  If you have been thinking about buying some stamp supplies or even trying this hobby out as a customer or demonstrator, I would be so grateful for your business. Our Stampin'Up! year ends September 30th so I still have some time to make it across the finish line. I would love to share my passion for the art of stamping with you - contact me!

Thanks so much,
Sarah

Thursday, July 11, 2019

Follow Your Art Suite

Hi Stampers!
Today I have a fun suite to share that features the theme of crafting!  We are probably all interested in crafts or you wouldn't be checking out my blog. Crafts in general are an interesting aspect of life. It can mean so many different things to so many different people. It's a form of art and a form of work requiring some talent and skill, albeit mostly learned and acquired, not necessarily something you are born with. It requires an eye for color, detail, design and texture but you can also ignore any rules and do what you think will work for you. Most people are drawn to the process of making something whether we make a quilt, a garden, a piece of furniture or a dinner. We like to take raw materials and fashion something from them. I always tell people it's as much the process that is so gratifying as it is the final product!

Stampin'Up! has a really cute bundle of products that celebrate crafting, several kinds and also combines nicely with a stamp set that has been in the annual catalog for a couple of years. This suite is called "Follow Your Art" and it couldn't be anymore special! I had some fun with this set when I first got it back in April and wanted to give you more specific details about it! Here's my work:


One of the components of the suite is some great, colorful Designer Series Paper. It features many crafting motifs and one is pictured in this card.  I had a smile on my face as I made this card, remembering the days of glitter glue and puff paint with my daughters!


This card was a Make-N-Take at OnStage in Salt Lake City, designed by SU demo Wendy Cranford.  This evokes a bit more of a sewing theme although we certainly use plenty of ribbon in paper crafting.


For this card, I used one of the stamp images from the older stamp set called "Crafting Forever". I have used this pot of paint brushes many times!


There are several pen and pencil images in the new suite and dies to cut them out, which is really handy!


Of course, buttons are a staple of many crafting projects!  This card features the embossing folder which is a background of different sizes of buttons as well as a die that cuts out a row of buttons. I couldn't believe how easy this die was to use and how easily the paper came out of the die!  I'm really impressed with our new dies!


Here we have several paper clips and paper holders. The paper clip die was a tad bit of a pain, but all it took was some patience to get the paper out of the die without ripping it!  I adhered them with some Tombow multipurpose glue.


Finally, this card features the cute embellishment kit that coordinates with this set. I did some random background stamping as well with stitched designs from a retired set that I can't recall right now!

What makes this set so special is all that you can do with it for your own projects but also to celebrate your crafty friends. Any card or gift made with these products will show you care!  My supplies are listed below as always! Purchase of the bundle plus one additional product like the Washi tape or embossing folder qualifies you to earn a Bonus Day coupon too which is a win-win! I hope you'll add this to your stash of favorites!

Here's a great look at all the products in the suite. You can purchase the whole suite using #152181, for $87.75.


And here are some ideas using these products from Stampin'Up's concept artists!


I love what I do and I love to share what I do!  I would love to be your demonstrator if you don't already have one and would love to talk to you about joining my team and becoming part of the "Big Sky Stampin' Stars"! Now's a perfect time to join with extra products added to the Starter Kit. The Holiday catalog is just around the corner and when you're a demo, you get to see it early and order early, all with a discount on every order!  Contact me for details. It's easy and is set up as a "try it and see if you like it" opportunity with no strings attached - really!

I'm off to my happy place until I have to go to my not-so-happy place, the dentist. I'm sure some post dental appointment stamping will cheer me up!

Happy Stampin'!
Sarah