Independent Stampin'Up! Demonstrator!

Hey friends!
I've been a demonstrator with Stampin'Up! since 2011. I'm located in Bozeman, Montana, but have customers all over the country. I have a very fun and active downline called "Big Sky Stamper Stars" and we get together in person and online to share what we love. My blog posts feature what I'm up to recently and I try to share new product information, tips and tricks and creative inspiration. You can shop from this site or find out more information about our products and becoming a demonstrator! Thanks for stopping by!

Thursday, June 27, 2019

Celebrate with Cake!

Hi Stampers!
I'm back today with something for everyone, even those of you who have never even tried stamping! You would be surprised how easy it is. This is one of those hobbies that doesn't take a mini-lifetime to learn or get good at. It is also one of those hobbies that take forever to finish your project. Does instant gratification sound good to you? Well this is about 5 minute gratification!

Stampin'Up! has released some new "welcome to stamping" type kits that are perfect for newbies who either haven't done this before or people who don't have a large stash of supplies and aren't sure they want a large stash of supplies!  These are simple kits that include everything you need and get you going right off the bat.

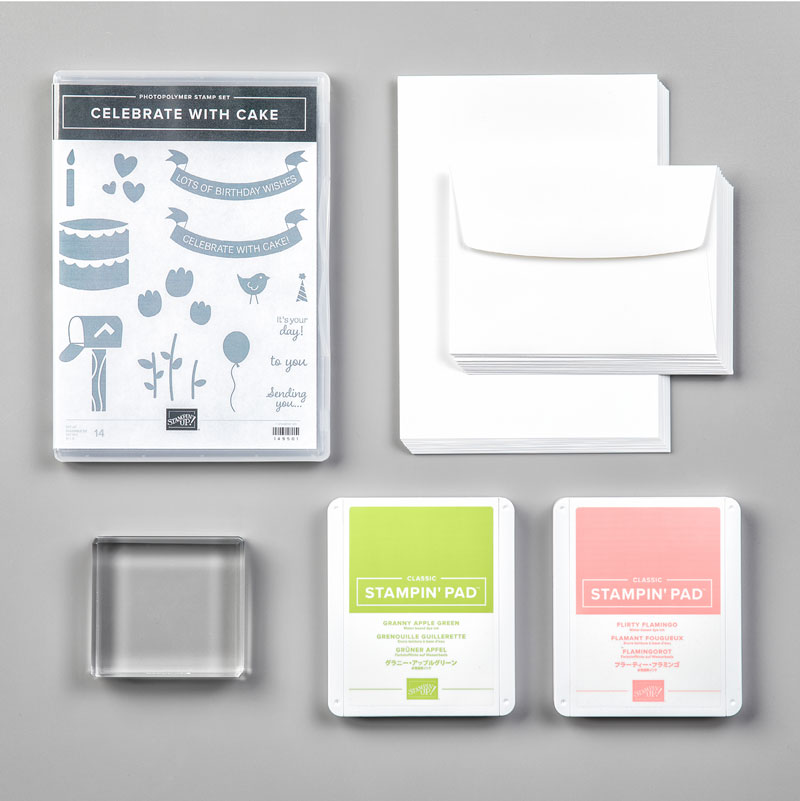
Today I want to share the "Celebrate with Cake" kit that includes a stamp set, notecards and envelopes, two ink pads and a stamp block. I used this stamp set to create some cards this week and forced myself to only use ink, stamps and paper - no extras, no doodads, nothing. Here's what I did:


As you can see, I did not limit myself to only two colors of ink, but only because I have all the colors! It was fun to figure out how to combine the stamps, make each card unique and still pretty.  This was actually really fun and I was surprised how much I liked the cards even though they aren't full of layers, textures, trinkets, ribbons and bows!  Here's a look at the kit:


If you'd like to buy this kit or any of the others that Stampin'Up! has, just click on the supply list below and you'll end up at the store! Wouldn't it be fun to hand stamp some birthday cards for your friends and family? I hope you'll consider stamping as your next hobby, one that doesn't cost an arm and a leg and gives your almost instant rewards plus the satisfaction of actually finishing something you started!

Have a great day!
Sarah

Wednesday, June 26, 2019

Bird Ballad Suite

Hi Stampin' Friends!
When I first saw the new 2019-2020 Annual Catalog, I couldn't believe all the new suites of products! Stampin'Up! is known for many things but one thing for sure is the coordination of their products from color palette to style. Once you get a thread of an idea or even an entire vision, it's easy to use bits and pieces of the suite to create some amazing projects. That is what I did this week with the "Bird Ballad" suite. For a class idea, I'm going to offer a suite class once a month, using all the products and giving the participants a chance to really play with the suite and hopefully decide they need one of their own!

Yesterday was my "Bird Ballad" class and I wanted to share what we made!  The first thing was a home decor item featuring an embroidery hoop. The hoop is 6" wide which was a perfect scale for the stamps that we used.


This was a fun and relatively easy project to create. First, we stamped on our background paper which was from the "Wood Textures" set of DSP that recently retired. I kept it simple by just stamping and not trying to color the birds. In my first attempt I colored the birds and decided I didn't like the busy-ness of it.  We also used the "To A Wild Rose" bundle for the flower, leaves and sentiment. This was the perfect match!  Curious about the colors?  We used Petal Pink, Blushing Bride (actually the darker color on the flower) and Pear Pizzaz with Early Espresso as our dark brown tone.  Here's a view from the side so you can see the dimension.


It was fun to add some ribbon, thread and trinkets.  By the way, the background paper was glued to the embroidery hoop with our Tombo multipurpose glue.

We also made some cards to further explore more of the Bird Ballad Designer Series Paper and the Bird Ballad suite products.


This card shows a good way to see both sides of a paper. We die cut an oval with the "Stitched Shapes dies and then flipped the oval to the other side for the card. The "frame" piece was popped up on dimensionals as well.


This card got a lot of ooo's and aahhh's because of the laser cut paper on the card. This comes as a set of ten cards in a cute tin, including envelopes, that you can decorate and gift to a friend! We adhered the DSP from the "Garden Lane" set to the laser cut front. The back of the DSP then shows when you open the card.  We colored with Stampin'Blends and to get a good blend on the birds, I actually started with the Calypso Coral light marker on the bird breast and then blended the Crumb Cake around it.


This card was just a simple friendship card that features some more of the gorgeous Bird Ballad Designer Series Paper.

We sure had fun playing with this suite!  I haven't decided which suite I will feature in July - there are so many to choose from! If you aren't able to attend my classes locally but want to make what we did,  you can order the entire Bird Ballad suite (#152190 . $94.75) online and I will send you the instructions and extra supplies you need to make these projects!  I'm wanting to expand my customer base beyond my local area so this is a way to spread some creativity a little further! You can go to the "shop now" link to order this suite and any other supplies you might want. Don't forget to order ink!

Thanks for stopping by! It's always fun to share what I'm up to and I can't wait to turn to another suite next month! Stay tuned!!
Happy Stampin'
Sarah

Tuesday, June 25, 2019

New Promotions and Updates Galore!!

Hi Stampers!
It was hard for me to figure out how to name my blog post today!  Stampin'Up! kinda exploded this morning with lots of news and updates and it's a challenge to adequately cover it all!  Here's my attempt!

07.01.19_TH_SHAREABLE_EXTRAEXTRA_CA

*** EXTRA! EXTRA! RECRUITING PROMOTION . From July 1st through August 31st, Stampin'Up? will make signing up as a demo even sweeter!  For $99, you can purchase a Starter Kit which is made up of whatever SU products you want up to $155 in value!  That's an extra savings of $30 over the normal deal.  That's the first EXTRA!  The second EXTRA! includes a $10 coupon code good towards any order the following month, i.e. if you sign up in July, your coupon code is good in August. If you sign up in August, your coupon code is good in September!  There are so many advantages to becoming a demonstrator and just a few misconceptions.
ADVANTAGES:   -- 20-25% discount on your purchases always
                               -- Early preorders before new catalogs come out to customers
                               --  Access to demo website with news, training, inspiration
                               --  Quarterly magazine for demos only, full of creativity and ideas
                               --  Opportunity to earn extra income, free stamp promotions, incentive trips
                               -- Become part of my "Big Sky Stampin' Stars" team of demos and participate in                                 get togethers in person, online and through a private Facebook group.

MISCONCEPTIONS:       --  You can be your best and only customer. You don't have to sell SU                                             products to others to take advantage of the discounts and other benefits.
                                           --  You can continue or quit as a demonstrator, no questions asked, at any                                   time. There is no further obligation after purchase of the Starter Kit, however to                                    stay active as a demo, you need to meet a quarterly minimum of $300 in orders. 
                            --  You do not need to hold classes or be a blogger!  You can tailor what being a SU                                 demo means to you to suit your needs, desires and personality!
                          __ You don't have to live in Montana to be part of my team!  I have members as far                                aways as Oregon and Nevada!

I would love to chat with you about this amazing opportunity and add you to my team!  Contact me anytime and we will talk and see if this is perfect for you. I'm friendly and chill and promise to not twist your arm ;)

SHAREABLE_1_THUMB_EN

*** BONUS DAYS IN JULY AND AUGUST
This is a promotion Stampin'Up! is bringing back again this year. Many of my customers have participated in the past and it's an easy one to take advantage of!  For every $50 purchase in July, you will receive a Bonus Days coupon code via email good for $5 to be redeemed in August on any order. There are no other restrictions so if you wanted to order something for $8 and use your $5 coupon, you can!  I highly recommend you print out the emails with your coupon codes at the time you receive them so you can easily add them to an order in August!   More ways to save on your favorite SU products is always good!

Clearance Rack

CLEARANCE RACK UPDATE
The Clearance Rack will be updated with STAMPS on the 26th, tomorrow. SU has never put stamps on the Clearance Rack but they are this time!  Check back tomorrow online and see what's there. Go to the "shop now" link at the right >>> and click on Clearance Rack.

STAMPIN' TRIMMER BLADES
A limited supply of Stampin' Trimmer blades are going to be made available at 10 a.m. Thursday, the 27th. These will sell out quickly and you'll be limited to three packs. The trimmer has been discontinued and a new trimmer is on it's way in the future. More details about that when I know them!

HOLIDAY CATALOG IS COMING!!
If you do not live in the Gallatin Valley area and would like a Holiday catalog, please contact me and I'll get one mailed to you. If you currently shop with another demonstrator, please ask them for a catalog. These cost money to me and I'm happy to provide them to my customers. If you would like to start shopping online with me, let me know and I'll get you one as well as an Annual Catalog, both in print!

Whew! I think that is enough news for today!  I'll be back soon with my regular posts featuring cards and projects with all new products from the Annual Catalog.  Hope you have a splendid day!
Sarah
Monday, June 24, 2019

Bloom and Grow

Hi Friends!
Welcome to another new week. Lets hope it's full of fun and creativity - at least that's how I like to start my Mondays!  We had a crummy weather weekend, at least part of it, so it was good to get some things done around the house. Today the sun is out and the rain is gone so summer is back on.

Today I want to share a great stamp set that comes with coordinating dies to help you cut it out without the "fussy" part and scissors. It's a somewhat unique set that is great for coloring or not and can be used as a border or not and more!  Let me show you what I mean:


This stamp set has three unique flower clusters that are super fun to color or leave alone.  I combined this set with some other ones to create some unique occasional cards. I'm having a hard time deciding which is my favorite!  It's also fun to emboss the base layer and let that showoff the flower clusters even more.  I've colored all of them in the examples above and not colored the following examples:


These cards were made when I first got my new In-Colors for this year. I wanted to focus on each color alone and used the "Bloom and Grow" set to help me do that. Have you noticed the sentiments that come with this set?  They are wonderful, as well as some of the leaf and flower sprigs. I'm not completely sure if we can have too many floral and leaf stamp sets, but this is sure a great one and I'm glad I got it.

Interested in having a bundle of your own?  You can by clicking on any of the products listed below. It will take you to the online store and you're all set to load up your shopping cart and get an order sent directly to you. You can also contact me if you'd like me to place an order for you. If you don't currently have a Stampin'Up! demonstrator and live in the United States, I would love to be yours! I offer great customer service, attention to detail and lots of creative inspiration and help.  Don't know where to start?  Take a look at the kits or consider getting what you need for a specific project!  I can help tailor an order to fit what you want to do and I promise to not talk you into a bunch of products that you don't need or won't use. All of our products are wonderful but they aren't all required for beginners! Contact me today and we'll figure out what works for you!

Thanks for stopping by! It's always a pleasure to share what I'm up to with you whether online or in person!  Have a great Monday!
Sarah

Friday, June 21, 2019

See a Silhouette part 2

Hi Stampers!
I thought I would blog first thing this morning but ended up at a lumber yard/hardware store picking out stuff for an addition we are putting on the front of the house. We need more of an entry way which will in turn allow me to have a pantry rather than a coat closet in my kitchen! Whooppee!

Here are the rest of the cards that I've made so far with the "See a Silhouette" suite. It's really fun!


After my Daisy Lane class, I had this Daffodil Yellow background piece leftover after everyone punched out their daises!  It was easy to put some See a Silhouette Designer Series Paper behind it and I love how it turned out!  The dandelion die is part of this See a Silhouette die set as well as the word "inspire".


This is my second idea with leftovers!  After I had cut the word "adventure" from a card I featured yesterday, I saved the negative piece of white card stock and mounted it on DSP. This time, I cut the dandelions from white glimmer paper!


This last card features the big branch/leaf die that's included. I also fussy cut some leaves and then used the "To A Wild Rose" bundle for the stamp and sentiment die. I love these rich blue, green and gold tones.

This is a great set to have fun with. If you buy the stamp and die bundle, be sure to add on the Designer Series Paper! It's so vibrant and easy to create beautiful art with.

Hope you have a good weekend here! We got snow in the mountains but not yet in the yard so hoping my flowers survive our most recent winter squall.  Montana ain't for sissies!

Happy Stampin'!
Sarah

Thursday, June 20, 2019

See a Silhouette Suite - Part I

Hi Stampin' Friends!
OK.... I thought I had figured out my favorites from the new catalog and then BAM!  I worked with some new stuff yesterday and now I'm in love with something else. How can I be so fickle? Is that a good or bad thing? Do I need help?  Do I want to hear your answers? hahaha

Have you seen the "See A Silhouette" Suite in the new catalog on pages 133-134? They are so pretty and vibrant!  The paper is amazing, like the most luxurious Batik fabric you could ever touch, only paper. I had so much fun.... Here's what happened!


This suite was so spectacular that I'm going to have to spread it out over two blog posts!  Today I'm focusing on the silhouette stamps that are the cutest thing ever. I love the emotion they evoke, that time of childhood and young love when everything seems possible.  I couldn't wait to let the gorgeous Designer Series Paper inspire my color palette and tried to feature it on all of these cards.  This suite also has some black and white shimmer embossing powder that I used on the first card. That was fun! There are good sentiments that coordinate well with the silhouette stamps as well. I kept my techniques pretty simple except for the first card where I did some double and triple stamping after inking up to get the different shades of Seaside Spray behind the silhouette image. All of my supplies are listed below and tomorrow, I'll show you more of what I did with the dies that come in this suite! They are equally incredible!

We are looking at a winter storm warning in our area for the next couple days, including the possibility and likelihood of snow. I'm going to huddle in my stamp room and pretend it's summer and live in happy land until that storm goes away. I hope you have great plans for your weekend! Keep on stampin'!

Sarah


Wednesday, June 19, 2019

More Daisies!

Hi Stamper friends!
I'm back today with another card made using the Daisy Lane bundle. I wanted to share it with my post yesterday, but was saving it until after a couple of classes had made it. I didn't want to spoil the surprise of it for them!  This is a fun bundle to either use for stamping or punching or both! Here's my card:


What I love about this card is the color scheme and also using the embossing folders in a way that enhances the overall design.  I wanted to incorporate three of the new In Colors because they are so gorgeous, especially together!  I used Rococo Rose, Seaside Spray and Purple Posy for my daisies. I punched two  of each and then layered them with a mini dimensional. The brick embossing folder and frame die and embossing folders are both new and they worked perfectly as a background for my daisies. Did you notice the coordinating colored faceted dots in the center of the flowers?  This was a fun card to make as it used some new products in a non over-the-top way!

I've been sharing stamping with some new customers lately and am reminded of how easily they can get overwhelmed. Punches are a good tool to start with and it also helps to keep the visual non cluttered so they can see what happens next as they look at the sample. It's so fun to reach out to new stampers and watch their excitement grow!

Thanks for stopping by and taking a peek. My supplies are listed below and I'd love to chat if you have any questions about Stampin'Up!, our products or stamping in general.  You will soon enjoy making something hand made and blessing someone else with your creation. Nothing beats it!

Happy Wednesday!
Sarah

Monday, June 17, 2019

Daisy Lane and more!

Hi there Stampers!
It's the start of another great week. I'm always a little glad when Monday rolls around because that means a whole new slate of ideas, classes, projects and fun. I'm toning things down a little bit in the summer as far as classes because everyone's schedule is full of vacations, camping, hiking and more around here. Our summers are very short so we pack a lot in!

Tonite I'm hosting a class based on the Daisy Lane Bundle!  Each participant will receive their own stamp/punch bundle and we'll make three cards using the set. I'm excited to show them this fun bundle and do some stamping with them!

I wanted to share what we will be making. These ideas almost jumped from the ink to the paper by themselves. The possibilities are truly endless and I always have more ideas than I need!  Here's what we are doing:


If you look carefully, you'll note there are two sizes of daisies. The larger one has been part of our lineup for a couple of years now. The smaller one is the "Daisy Lane" bundle and it is a real charmer. I like it especially on the first card where I punched my background paper. You can get more daisies in the surface because the size is smaller.  I've used some fun background Designer Series paper in these cards as well. The linen look paper is from the "Pressed Petals" specialty DSP and the floral and stripe patterns are from the Bird Ballad DSP. My last card contains retired colors and paper but it is so pretty with the fern-like leaves, that I wanted to do it in this class.  The third card is a classic vintage style card with torn and burnished edges (dauber plus brown ink). This is still one of my favorite looks when creating a card or home decor project.

Daisies are an easy motif to use for any occasion and these are especially fun to work with. Our punch bundles are a bit more economical than our die bundles so if your budget is a concern, this is a good way to go! My supplies are listed at the bottom of the post and a click on any of them will take you right to the online store! I'm happy to answer any questions or give you some product advice if needed as well.

Okay - back to the stamp room for more fun today!  Hope your Monday is fabulous and the rest of the week is even better!
Happy Stampin'!
Sarah


Thursday, June 13, 2019

Pretty Peacock

Happy Thursday Stampin' Friends!

And just like that, another week is almost over. The time is going fast so far this "summer". I put that in quotes because it is still June and anything can happen in Montana with our summer. It's supposed to be 80 degrees the next couple of days but then it's still in our snow window which includes the whole year except the middle of July haha!

I've been busy prepping for a load of classes coming up and also watching the construction progress on our entryway addition to our house. It's exciting to finally see that commencing. It will give us a new entrance to our house with some wonderful space. In the meantime, we are making do with alternate ways to get in the house!

If you've had a chance to look at the 2019-2020 Annual Catalog, I'll bet one of the bundles that caught your eye because of its sheer beauty is the "Pretty Peacock" bundle. The color palette is gorgeous with Blueberry Bushel, Pretty Peacock and Old Olive. It is so rich and vibrant. I recently had some fun with this set and want to show you what I came up with .


This is a card I made for a recent swap I participated in with my friends. Our "challenge" was to make something with some new products from the new annual catalog so that was pretty broad and easy to accomplish. I had just received the "Pretty Peacock" bundle so wanted to try it out.  The picture doesn't really do the vibrant colors justice.


This is what it looked like after stamping. I stamped the full peacock stamp in Pretty Peacock ink. I then used the partial "feathers" stamp to stamp on top of this with Blueberry  Bushel to add some royal blue tones. After that, I stamped with the partial "feathers" stamp with Versamark ink and then heat embossed some gold powder on it.  I purposely misaligned the gold so the Blueberry Bushel would still show through.  After my heat embossing had set, I spritzed the whole thing with water so the ink would run. That's how I got the effect in the top picture. I did use watercolor paper which is always the best bet if you are going to be using water as part of your application. I then had to let the piece dry completely before I finished up the card with some die cut pieces of gold foil and coordinating card stock.


This card shows off the lovely foil and Designer Series paper that is part of this sweet. They are all gorgeous and it's hard to choose what to use! The peacock die was a dream. It cut so well and I was able to brush out the little pieces easily with my die brush.


For this card, I wanted to try my hand at coloring the peacock feathers. I actually googled it so I could get the coloring more accurate. I used my Stampin'Write markers for the feathers and my Stampin'Blends for the peacock's body.  The sentiment seemed perfect for this peacock. They can be such "show offs"!!! It's from the "Stitched All Around" stamp set.


I also wanted to see what the peacock would look like with heat embossing so I did that on some "Woven Threads" Designer Series Paper and loved the outcome.

This was a fun set to play with and I think the results were fairly dramatic, again featuring the extremely bold colors. My only difficulty will be deciding which one to offer in a class. Maybe I'll have to do a Peacock class and we will make them all!

Are you a peacock fan? You can get your own set by clicking on any of the supplies below which will take you to the store. It's a fun bundle that will give you hours of creative pleasure!

Please contact me if you want more information on these products or any questions about Stampin'Up! I love what I do and love to chat about it!

Have a great, creative day!
Sarah

Tuesday, June 11, 2019

Butterfly Wishes

Hi Stampin' Friends!
I'm keeping it simple this week with some stamp sets that are stand alone products. That means they aren't part of a suite and don't have dies associated with them. This is what attracts a lot of people to Stampin'Up!'s link of products, great variety from simple to complicated!  I always like to come back to just stamping as that reminds me of what I love so much about this hobby. It's creative, quick and very satisfying to do.

I'm sharing the "Butterfly Wishes" stamp set today. These are "Distinktive" Stamps that are carved in such a way to create a dimensional image through layering of color. Believe it or not, you only ink these stamps up once and just stamp. The way the stamp is carved does all the work!  Here are some fun examples!


For this card, I grabbed some Designer Series paper from the "Follow Your Art" set. I wanted a very subtle background to stamp on and Coastal Cabana was the perfect color. I used Soft Suede ink for my branch and Coastal Cabana on everything else.  If you want to fancy something up just a bit, add some ribbon or metallic thread and you are all set!


I wanted to make a card in one of our In-Colors for my next idea. It was hard to choose but I settled on Rococo Rose. All of the new In-Colors would work with this idea!  There is coordinating Designer Series Paper that features a great gingham check and the coordinating In Color ribbon is perfect with a Crumb Cake strip and lacy Rococo Rose edges. I hope you notice the Rococo Rose gems I used on a couple of the flowers. We also have a pack of In-Color "Faceted Dots" for those!


This was actually the first card I made, simply to check out all the butterflies and see what they would look like. I grabbed some random colors and just stamped. There is nothing added to this card so it qualifies for #simplestamping and is easy to make. You could easily change up the greeting for any occasion.

I hope you enjoyed my "Butterfly Wishes"!  It's so great to have so many new products to explore and see what kind of creative ideas they bring out of me. I most often start with a stamp set and then drift into a color scheme and then start creating. Creativity is not exactly a hard science and we all approach it differently. What inspires you?  What gives you your first spark of an idea?  Color? Paper? Pinterest?  They all count!

Let me know if you want to embark on this fun hobby yourself. It doesn't have to cost an arm and a leg to make some hand stamped cards for all the special people and occasions in your life. It also doesn't require any special skill or talent. Honestly, you learned all you needed to learn to get started in Kindergarten. It starts with stamping, cutting and gluing and ends with something beautiful that you made!  Contact me for more details! It's a great and purposeful way to spend some of that extra time you have!

Happy Stampin'!
Sarah

Monday, June 10, 2019

Over the Moon

Hi Friends,
I'm back on another Monday, ready to hit the ground running. Well actually that's not true. The first thing I did this morning was take a nap. That's my son's secret to a successful day haha! I misread my clock this morning and while I thought it was about 6:45, it was actually 5:45. I couldn't figure out why I was still so tired so after breakfast, I took a nap. By then I had figured out my time fiasco!

Needless to say, I'm all goofed up today. You would think I partied all weekend and was hungover or something. That would be difficult as I only indulge in an annual glass of wine at Christmas and an annual beer sometime in the summer!  Anyway, I'm in a whimsical mood today and what better to create art with than cows!  Here ya go!


I used a lot of stamp sets on this card including "Over the Moon", "Broadway Birthday", "Wonderful Moments", and "Birthday Backgrounds".  I was so overjoyed to discover the balloons fit in the cow's hoof!!


I wanted to try and color the cow somewhat... It's pretty minimal ;)


And of course, as soon as I saw this sentiment, I thought of our Twinkle Builder  punch!

We have lots of cows around our part of the country so I think I'll be using this set a lot as well as sell a few to some ranch and farm friends! I enjoy creating some ideas that don't involve a more elegant or serious style of design. It's okay to be goofy now and then!

Have you dived into the new Annual Catalog yet? You can see all the goodies for yourself in the PDF file. Click on the link at the top right column. If you see something you have to have, click on "shop now" and you'll be at the store! Keep watching my blog for all the latest with Stampin'Up! as this new catalog year gets into full swing! You're only problem will be deciding what to order first!

Thanks for stopping by!
Sarah

Friday, June 7, 2019

Outside the box and not following the directions

Hey Stampers!
I especially want to talk to all you "rule followers" out there... I am one in real life, I have to admit, for the most part. I'm not talking about that little speeding warning I recently got in Idaho or things like that!  I'm talking about the things where we just do the predictable and expected, the things that we've been shown how to do and then just do them without giving it much thought.  Today is going to really shake you up!

I love Stampin'Up!'s Paper Pumpkin monthly kits. They are full of all the supplies you need to make a project like cards, gift packaging, tags, etc. They even given you more than you need so you have extra stuff to work with down the road. Several times I've collected all my parts and pieces and made some hodgepodge cards that turned out amazing. Today I want to show you what I did with the May "Hugs from Shelli" kit. I ended up with three kits. I got mine in the mail and then Donna Griffith, from Stampin'Up!, recently attended my team meeting in May and she brought two more kits for the ladies to each assemble a card with. As you might guess, I had lots of pieces and parts left over!  Yesterday, I sat down and made 2 dozen cards from the leftovers, yes.... 2 dozen. First, I cut up the cards to separate the front and back and then used that as my first layer on a standard card base of 5-1/2" by 4-1/4".  After I had done that, I realized that the envelops which came with the set were no longer useable for these cards so I used the envelopes too. Here are some fun pictures from my experiment!


The following three cards are actually using the envelopes that came with this kit!  I embossed them to give them some texture and then added some embellishments and a greetign.


I don't use the smaller note cards a lot but go through a lot of thank you and birthday cards so this was a way to expand what I could make. I still have a dozen envelopes left over to use for some more ideas.

See, that wasn't painful at all. Out of the box and not following directions can be an awesome happenstance that makes your day!

Would you like to get a Paper Pumpkin coming to your house every month?  It's easy!  Follow this link and sign up here:

Paper Pumpkin Link

You can pause or cancel your subscription at any time and there's even time to still get June's kit if you sign up by the 10th! Here's something else to check out!

\\https://www.youtube.com/watch?time_continue=4&v=FtP99Cemux0

Hope you have a great weekend!  We have a forecast for rain so that means more stamping time for me!

Happy Stampin'!
Sarah