Independent Stampin'Up! Demonstrator!

Hey friends!
I've been a demonstrator with Stampin'Up! since 2011. I'm located in Bozeman, Montana, but have customers all over the country. I have a very fun and active downline called "Big Sky Stamper Stars" and we get together in person and online to share what we love. My blog posts feature what I'm up to recently and I try to share new product information, tips and tricks and creative inspiration. You can shop from this site or find out more information about our products and becoming a demonstrator! Thanks for stopping by!

Friday, October 30, 2015

Elegant Ornaments

This week, I finally got to try some new framelits that I had purchased from the Holiday catalog, the "Delicate Ornament Thinlits". They are a little tricky to use as far as getting all the "hanging chads" out of their holes, but they were fun nonetheless. I decided to order the Precision Base plate and see if that makes the process easier. I will report back!  Here's another card from the Black, Gold and White class I have been hosting this week.


This card oozes with elegance and style. I just love it!  If you think you could never do something like this, I would love to show you how easy it is!  I have another class series coming up next week featuring an "Old Fashioned Christmas".  Watch for details!

Have a great weekend!
Sarah
Built for Free Using: My Stampin Blog

Thursday, October 29, 2015

The true reason for the Season!

I have to admit I like just about everything about this time of year. I even like cold weather and snow which is convenient since I live in Montana!  All of the Christmas imagery speaks to my heart and you will see much of it in my work as I'm drawn to those stamps that evoke strong tradition, memories and faith. I love it when we get new stamps reflecting the true Reason for the Season, the birth of Jesus Christ. Two of the cards we will be making this week use these new stamps sets and I am so excited to share them with you!  Here's one for today:


Lots of things are wonderful about the products I used, but how I altered them makes this card!  The music paper is part of a new Designer Series Paper called "Home for Christmas". For you musicians out there, this is legit sheet music that can be played on a piano. I know, because I tried it!  I stamped directly on the DSP paper with our wonderful new dark black archival ink.  Secondly, I used a wooden snowflake embellishment as a "star". Before I adhered it, I inked it up directly on the ink pad with some shiny gold ink.  This was a fun and easy card to make that also speaks the greatest truth of all.

Have a great Thursday!
Sarah

Built for Free Using: My Stampin Blog

Wednesday, October 28, 2015

So many possibilities!

Ever since I decided to do a Black, Gold and White card class for Christmas, I am coming up with soooooo many possibilities that it's hard to narrow down my choices!  I love color in general, so this is a stretch to limit myself and stick to the theme.  Today I will be finalizing my choices, but here's another one in the running to make the class:


This features the same edgelits as yesterday, only the tree motif. The gold cord is a new product, the velum gold snowflake paper is a new product and I used some heat embossing with gold embossing powder for the sentiment.

I still have a few seats left in all three sessions, so if you are interested, let me know!  The details:
Thursday, 10/29, 6:00 p.m.
Friday, 10/30, 9:00 a.m.
Saturday, 10/31, 9:30 a.m.

The cost is $20 and we will be making 5 cards plus 2 gift enclosure cards. Come and join the fun!

Happy Stampin'!
Sarah

Tuesday, October 27, 2015

Oh what fun!

Dashing through the snow, in a one horse open sleigh, o'er the fields we go, laughing all the way...

Now, does that bring some Christmas spirit into your heart?  Even if you despite the Christmas decorations in the stores in August, you gotta admit, Jingle Bells is a favorite song!  I combined this very phrase "Oh, what fun"  with  the Sleigh Edgelits to create this Black, Gold and White Card. What do you think?


There are all kinds of things to love about this card and you can make it at my class this week!  See yesterday's post for details regarding times and dates!  I can't wait!

Have a great Tuesday!
Sarah
Built for Free Using: My Stampin Blog

Monday, October 26, 2015

Black, Gold and White

Okay, I'm officially moving on to Christmas!  I have purchased some of my favorite Christmas goodies from the Holiday Catalog and am ready to play!  I'm hosting a Christmas Card class this week featuring Black, Gold and White!  This was inspired by a Designer Series Paper product and vellum paper product in our catalog, Winter Wonderland!  They are gorgeous!  The DSP paper has somewhat of a glossy sheen to it and just screams "classy"!!  Here is one of the cards I've come up with so far:


The class will be focused on this color scheme and all things Christmas!  Dates and times are:
Thursday, 10/29     6:00 p.m.
Friday, 10/30       9:00 a.m.
Saturday, 10/31      9:30 a.m.

We will be making 5 cards and 2 gift enclosure cards (3 x 3") for $20.  I do need reservations for this class and seating will be limited to 7 participants per session.  I hope you can come!  Check back on the blog as I will feature cards from this class all week!  Also, see the supply list below for a closer look at this gorgeous paper!

have a great day!
Sarah


Built for Free Using: My Stampin Blog

Friday, October 23, 2015

More custom ink pad cards

I'll have to admit that I was a little surprised after making my custom ink pad with felt and reinkers, that the ink kept lasting!  I made quite a few cards and eventually sealed the homemade ink pad in a ziploc bag to use again another day. See yesterday's post for more details about that process! We will see if that works!  Here are some more cards I made. I used a retired stamp set on the "Thanks" card and some retired paper on the other.  Here they are:


I love the gorgeous fall colors captured with just four different ink colors and then combined on paper.

Remember today is the last day to order stamps at 15% off!  What a great deal and perfect time to pick up some standard sentiment stamps like "Teeny Tiny Wishes" or "Any Many More", or some everyday well used ones covering birthdays, new babies, weddings or sympathy.  Check out the store for all the options and order online. It will be at your door before you know it!

Always glad it's Friday!
Sarah

Thursday, October 22, 2015

Lovely Fall Birthday

There's a technique I was introduced to awhile back that I hadn't had a chance to try yet, until now!  It's making your own ink pad using regular white felt sheets from the fabric store and reinkers!  I chose some fall colors and added drops of ink to 4 layers of white felt. I tried to add the ink blots next to each other, but not overlapping so my colors wouldn't run together. I think chose some stamps featuring leaves and went to town!  Here's the result:


I love the leaves!  This looks just like the mountain scenery I see every day and boy was it fun to make. The other fun technique I did was to use an embossing folder as a stamp. You'll have to look really close, but I used my honeycomb embossing folder, inked it up with Sahara Sand and placed my card into the folder and just rubbed it with my hand.  I wanted a very faint look, but not plain background. It's a great way to get more mileage out of an embossing folder.

We are making this card and more at my class tonight (6:30 to 8:30 p.m.) and tomorrow (9:00 to 11:00 a.m.). I still have some seats at the table so let me know if you want to come!  You'll love it!

Happy Stampin'!
Sarah

Wednesday, October 21, 2015

Four years... today!

It has been four years since I signed up as a Stampin'Up! demonstrator!  I originally just signed up for the discount I could get on products. I loved so much of it and was completely smitten with this new hobby and of course, funds are always limited. I figured out I could earn more free stuff if I hosted classes and people ordered stuff. Well, what I didn't expect was to make so many new friends, learn so many new techniques and have so much fun!  I look forward to each opportunity I have to stamp with some old friends and some new friends.  My personal circumstances and life have changed quite a bit in the past four years (caring for my parents while giving up many of the previous activities I was involved in) but my little Stampin'Up! business has been a refuge for me. It's a place to go to create, relax, think, make and pass on to others. It's fed that part of me that likes to be productive and make things for others.

If you've ever thought about becoming a Stampin'Up! demonstrator, I'd love to talk to you! There are lots of good reasons to join, but you'll have your very own that work for you.

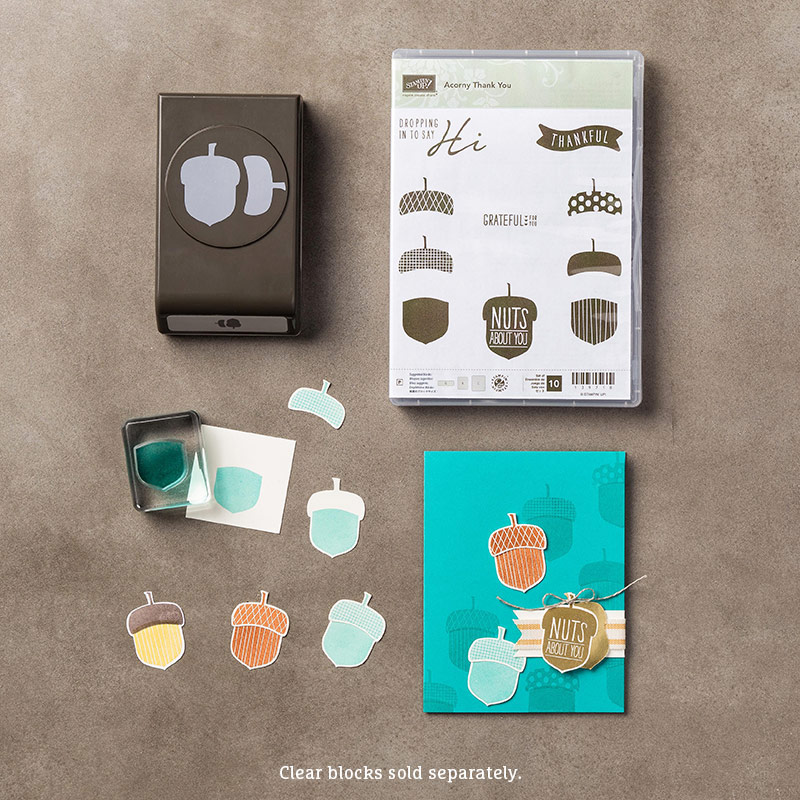
To those of you who have come to my classes and/or bought some things, THANK YOU!  I have been able to expand my supplies and stamp collection and even take in some conventions and classes because of your support!  I hope to keep on going for many years to come!   Here's a thank you card, just for all of you wonderful people:


There is still room in my Thursday evening monthly card class (3 cards for $10) and my Friday morning class. Let me know if you can come!

Truly Grateful,
Sarah

Tuesday, October 20, 2015

Sponging and Daubing

One favorite technique of the ladies in my classes is always sponging and daubing!  It's often a final touch that we add to the edge of a piece of paper, often in a brown, to make the paper look "distressed" or even burned or worn. It's super easy and provides that last element that steps a project up to the next level.  For this card, we did the daubing first!  I chose some gorgeous rose patterned Designer Series Paper and then used a dauber and Blushing Bride pink ink. With gentle, circular motions, I "daubed" all the roses pink.   Here's the card:


I chose to stop there, but you could certainly daub on some green leaves and even another color background. With this particular technique, the key is choosing a light enough colored ink that doesn't cover up the printed detail of the flower design.  One other thing about this card I want to point out is the black glimmer paper!  that's a new product in the Holiday catalog, under the Halloween suite. I just used a tad as the bottom layer of my sentiment piece, but I love the sparkle! My supplies are listed below if you want to try some daubing of your own!

SALE**SALE**SALE**  Just an FYI, all stamps are 15% off this week!  That includes both catalogs so if you have a wish list, now is a good time to get some more stamps!  Check out the shop now link to the right!

Happy stampin'!
Sarah
Built for Free Using: My Stampin Blog

Tuesday, October 13, 2015

Cheers to the new Mr. and Mrs.

Time for another wedding card! Although the vast majority of weddings seem to happen in the summer here in Montana, there are other times of the year that people "get hitched".  It's fun to make wedding cards and especially experiment with different color schemes. Here's my card:


I resorted to some retired and non-Stampin'Up! items to make this card but you can still get the floral paper (#138440) and the embossing folder (#133520) !  This is a fun design if you have some patterned paper that you would like to show off, as well as feature your sentiment front and center. 

I've just updated my calendar again with TONS of classes in October and November!  Take a look at it on my SU website and be sure to RSVP if you would like to come to any of them. We are going to have a blast!

Happy Stampin'!
Sarah

Friday, October 9, 2015

Some guys are just classic, right?!!

For about a year now, the "Guy Greetings" stamp set has been a favorite of mine. I used many of the stamps for Valentine's Day and Father's Day last year and many birthday cards.  I love it!  It appeals to my quirky sense of humor and fits several guys in my life. Guys are guys... aren't they?  Here's my latest card using this versatile set:


While the stamped images are what you are drawn to, I hope you notice the brick wall behind it all!  We have a new brick wall embossing folder and man is that fun to use!  It's a big one, 6 x 6" so you can use it vertically or horizontally on a card. To get the look of grout between the bricks, I used the edge of a dauber and some white craft ink... very light touch. I actually had to use scissors to cut out the guy, but that's good practice for me. Don't want to forget my scissor skills with all the fabulous tools we have to avoid fussy cutting with scissors!

This card and more are available to make on my card buffet! Hours are 9 to 1 today and tomorrow! Hope you can swing by my house and have a creative time out!
TGIF,
Sarah
Built for Free Using: My Stampin Blog

Thursday, October 8, 2015

Thanks for Thanksgiving

My Fall Card Buffet starts today! I hope you are able to come and make a card or even a few! It's a great opportunity to spend some "me" time, bring a friend if you want, and create a handmade card to share with others who will treasure it because it is handmade and it came from you! I have 25 options of cards including all sorts of occasions. The hours today are 5=8 p.m. Friday and Saturday, the hours are 9 a.m. to 1 p.m. Here's an exampled of what awaits!


Hope to see you today!
Happy stampin'!
Sarah

Wednesday, October 7, 2015

Cheers for Beers ??

One of the images that caught my eye and imagination in the new Holiday Catalog from Stampin'Up! was the antler motif!  My theory is that it is the new "mustache" -like motif that has been around the past few years. I'm not sure what stampers in Hawaii will do with antlers, but I had an idea right off the bat. Why not be ridiculous and put antlers on a bear!  A neighbor told me that others have done that and it's called a "beer". Okay... so I'm not original with the concept, but my card is original!


I used several stamp sets for this card and some great paper from the Winter Wonderland Specialty Designer Series paper featuring antlers.  I thought this would make a great card for  a birthday or any other reason to celebrate and would make a guy chuckle or roll their eyes, depending on how serious they are about hunting... haha!

Don't forget my buffet is tomorrow, Friday and Saturday!  This cheers for beer card is one of your choices!  Hours:  Thurs 5 to 8 pm., Fri  9 a.m. to 1 p.m., Sat  9 a.m. to 1 p.m.  Hope you can make it!

Cheers,
Sarah
Built for Free Using: My Stampin Blog

Tuesday, October 6, 2015

New Baby cards!

Guess what one of the best reasons to send a card is... a brand new baby!  What a special joy to new parents and family and what a great way to commemorate it!  There's a great new baby stamp set in the Annual Catalog called "Sweet Li'l One" and it is just that... SWEET!  Here are some cards I recently made:


These cards are basically the same, with a different color scheme for the boy and girl. I also got to use my new star shaped punch... bonus!  Tags are hot design elements and this card went together in the blink of any eye.  What do you think? (Note:  I used up some retired and non-SU supplies. I picked some close choices for my supply list below!)

Happy Stampin'
Sarah
Built for Free Using: My Stampin Blog

Monday, October 5, 2015

Playing with Paper Pumpkin

I'm a big fan of the Paper Pumpkin kits!  I have found that if I don't care for the planned project, I can easily use the "parts" to do something creative that I do like!  August's kit was fine, but I wanted to add a little something to the cards that were part of the kit. I added some washi tape and a brad, and then cut the cards in half  and mounted them on my own card stock, thus getting twice as many cards!  Here are some samples!


Chalkboard art is all the rage and it's easy with stamping to get that look. I used black paper and a white craft ink. I even smeared it just a tad to make it look really chalky!  Here's one more card, I think from the May or June kit where I adapted some of the parts and added some of my own.


If you are interested, Paper Pumpkin is a monthly subscription kit that is $19.95 and that includes shipping. There will be a project inside with all the supplies including unique stamps and ink.  I've got quite a collection of stamps and ink that I have saved from my kits and find myself going back to them quite often!  Check out this link if you are interested:

Paper Pumpkin info

Well, I have more prep to do for my card buffet, coming up in just 3 more days!  Hope you can come!

Sarah

Friday, October 2, 2015

Dropping by to say "Hi"

Here's the final card we did at my September card class... using the "Acorny Thank You" stamp set and coordinating punch. Acorns are hot for fall decor and themes!  This set is a must have if you like them!  Here's the card:


There are several stamp options for the acorns as well as more sentiments. Here's the stamp set:


When you have a fun set like this, the ideas practically jump off the ink and onto the paper themselves!  All supplies for my card are listed below in case you are interested.

I'm busy with preparing for my upcoming fall Card Buffet next week!  I hope you can come. It will be Thursday from 5-8 p.m., Friday from 9 a.m. to 1 p.m. and Saturday from 9 a.m. to 1 p.m.  As of last night, I'm up to 14 card boxes that are ready for you. It's a fun event where you come and make the cards you need/want at the pace that suits you. All cards are $3 each and you can make as many as you want!  There are some Halloween, Thanksgiving, general fall/blessing, baby, birthday, wedding, anniversary, sympathy and more!  I will have a special offer for all orders placed during the buffet and other treats and fun. Don't miss it!

Yay... it's Friday!
Sarah
Built for Free Using: My Stampin Blog

Thursday, October 1, 2015

Fun Fold Fall card

I'm sure there is a name for this type of fun fold card, I just don't happen to know it. I didn't really invent it as I've seen others like this, but I didn't have directions and figured it out myself, so that counts for something, right?  My first attempt was badly asymmetrical and I was not happy with it at all. I then had some 10th grade geometry float to the forefront of my brain and remembered something about 90 degrees and equal sides of a triangle. I won't even attempt to explain any of that, but I did figure out what I wanted!  This fold allows the stamped image to be on the front of the card or inside. Here are a couple of pictures to demonstrate what I mean:


This was a fun card to make and it features some beautiful fall-themed paper as well as the "Lighthearted Leaves" stamp set!  This set has endless possibilities including coloring with a permanent ink stamped image (Stazon or our new Archival Black ink) and heat embossing with gold or silver or white!  I'm not done playing with this set. Even better, the stamped leaves match the Leaflits Framelits!  Lots to love!

This is an example of what we do at my monthly card classes!  Come and check them out. Watch this blog for details and you can always check my calendar. 

Happy Stampin'!
Sarah

Built for Free Using: My Stampin Blog