Independent Stampin'Up! Demonstrator!

Hey friends!
I've been a demonstrator with Stampin'Up! since 2011. I'm located in Bozeman, Montana, but have customers all over the country. I have a very fun and active downline called "Big Sky Stamper Stars" and we get together in person and online to share what we love. My blog posts feature what I'm up to recently and I try to share new product information, tips and tricks and creative inspiration. You can shop from this site or find out more information about our products and becoming a demonstrator! Thanks for stopping by!

Thursday, October 31, 2019

All That Shimmers and Sparkles

Hi Stampin' Friends!
I don't know about you but this is the "blingiest" time of year for me. You see, normally, I'm not a real blingy girl. I wouldn't say my style is drab, but it sure isn't all the glitz. I admire people that can wear all the jewelry, makeup and bling, I just don't know how to do that! The reason I get excited about bling this time of year is CHRISTMAS!  It seems like a natural design motif to jazz up everything you are making and Stampin'Up! makes it easy with all their shimmer and sparkle products. I decided to challenge myself to use them all in a card class and am so excited to share with you what I did. Overall, Stampin'Up! has lots of bling- products including:
- Rhinestones, pearls, other stick on embelishments
-Glimmer and foil paper
-Embossing powder and glitter
-Puff Paint and Crystal Effects
-Shimmery White card stock
-Ribbon and twine
-Sequins

and probably more!  If you stop to think about it, there's a lot of ways to add some sparkle to any project of yours. It was a fun challenge to try and use as much as possible with these cards!


Have you tried the Snow Globe bundle yet? It is super fun and really a crowd pleaser for your avid crafters. They love to be challenged and this will give them a huge sense of accomplishment.  As far as the sparkle and shine effect, I used silver foil paper, silver Delicata ink for the snowflakes inside the snow globe, sequins and glitter, Shimmer white paper for the trees, Mercury Glass acetate paper, Seaside Spray shimmer ribbon and Silver embossing powder for my sentiment!


For my second card, I used the same set of background papers, Feels Like Frost DSP. It is absolutely wonderful and so inspiring to use!  For Sparkle and Shine, I used some Red Glimmer Paper as an accent,  drops of Shimmer Crystal Effects over the background, Puff Paint at the base of the snowman with pinches of Ice Crystal glitter on top BEFORE I heated the Puff Paint so it would stick in and shiny charcoal buttons from the Snowman embellishment kit.  Don't you just love the snowman and the builder punch?  What a fun product to play with!


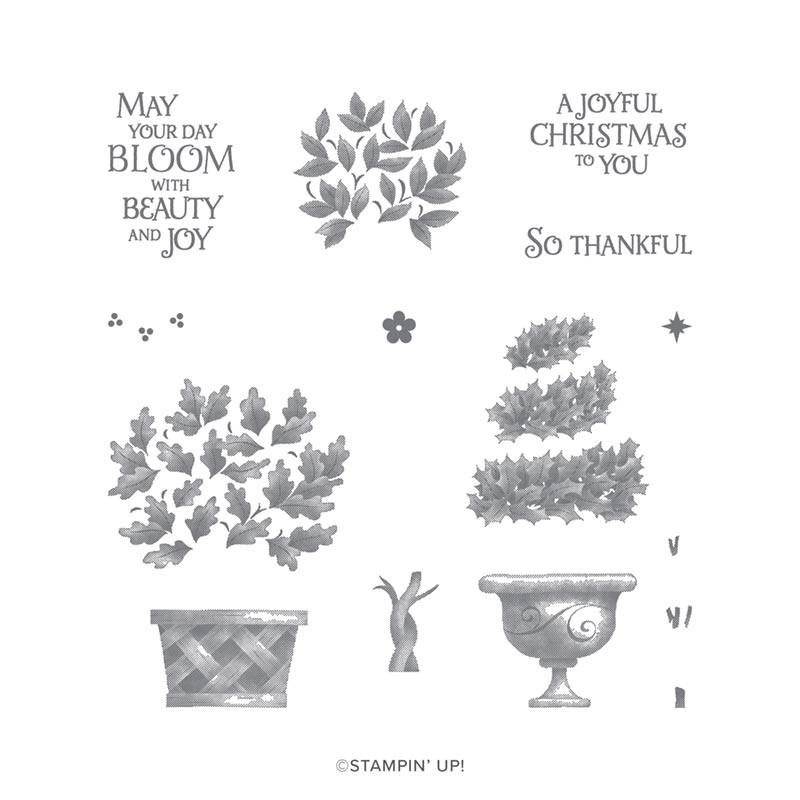
For this card, I used the gorgeous Noble Peacock foil papers that come in the colors of Blueberry Bushel, Pretty Peacock and Old Olive.  We used the "Gather Together" leaf dies which are amazingly simple to use and create a great leaf impression. The ribbon is a retired Pear Pizazz shimmer ribbon and my background paper is the stunning Shimmer White cardstock with the Birch background stamped in Crumb Cake ink. The Stitched Shapes dies always come in handy for sentiments! I thought it needed just one more touch of bling and added some rhinestones to the top of the leaves. Have you every wished for some larger, bolder sentiments?  I used "Everything Festive" here and it really helped me out!


This card is from the beautiful "Christmastime Is Here" set of products which will be released tomorrow. Watch for more information then on my blog about it!  The Christmas Rose is gorgeous and was stamped using the Stamparatus. I added some gold shimmer ribbon, some gold enamel dots that sparkle and shine and a little bit of gold embossing accent in the center of the rose. This DSP also has a metallic gold design running through the Cherry Cobbler background. Prior to embossing, I also added some Wink of Stella to the rose!

That's it!  I think I used a dab of everything we have that sparkles and shines. What a fun concept and now I have some really special festive cards to send to somebody extra special!  I've listed my supplies below and a click on any of them will take you to the online store. It's also so fun to share what I'm up to and would love to hear any comments  or questions you have! And now, I have a little glitter mess to deal with, haha!

Happy Stampin'!
Sarah

Wednesday, October 30, 2019

Christmas with Magnolia Lane

Hi Stampers!
It's still super cold around here but my creative energy is hot, haha!  Hot probably isn't the best description but I have been busy churning out lots of new ideas and working on a few custom orders. When the weather outside is frightful, it is delightful to stamp as much as I can!

I spend some time on Pinterest during my week, looking at card designs and ideas. I rarely copy anything exactly as I prefer to come up with my own ideas but there was a general idea that I hadn't thought of that inspired me lately. I saw that some enterprising stampers had colored their "Magnolia Lane" Designer Series Paper to look like Christmas flowers, specifically, kinda like poinsettias. I was intrigued with the concept and then thought what if I made several Christmas cards with the Magnolia Lane DSP?  Well, I did and I want to share them with you today!


This card features metallic copper and Petal Pink to contrast with the Magnolia Lane paper that I colored with my Cherry Cobbler Stampin' Blends. The black and red contrasting colors are so dramatic and festive. I got the idea of inserting some Petal Pink in the form of ribbon and cardstock, from the little sprigs in the paper that are Petal Pink. My sentiment and copper foil leaf branches are from the Christmas Toile bundle. I also stamped with our Copper Delicata ink. If you look really closely, after I colored all the flowers, I inked up my Crackle Paint background stamp with the copper Delicata ink as well and stamped all over the whole piece. It added some copper accents and "glammed" it up a bit. I love this card!


For my second card, I used the green stripe paper in the Magnolia Lane DSP and added some Cherry Cobbler stripes using a Stampin'Write marker and a ruler. It's easy to turn a stripe into a plaid with markers! I also added some bling with the Real Red glimmer paper available in the Holiday Catalog this year and then returned to a favorite set, "Dashing Deer" for my deer die cut in Early Espresso cardstock.  I love the Cherry Cobbler stripe ribbon offer in the Holiday Catalog as well! My sentiment is from the "must have" stamp set, "Itty Bitty Christmas".


Here is another take on a different sheet of Magnolia Lane DSP and Stampin' Blends Cherry Cobbler markers.  The gold foil branches are from the "Peaceful Boughs" dies and the sentiment is in the "Memories of Home" stamp set.


Finally, I grabbed another sheet of "Magnolia Lane" DSP, this time a brown leaf pattern. I wanted to make a non-blingy card that was a bit more rustic in nature. I used the wreath dies from the "Tidings All Around" suite and I actually cut two of them, with one of them layered on top of the other with mini dimensionals. It's hard to see the two layers in the picture but it is a really effective 3D look in real life. My sentiment is from the "Itty Bitty Christmas" set again.

I have to say, that was really fun and another trip out of the box for me. I think there's even more you could do with the Magnolia Lane DSP for a Christmas theme, but that's what I tried so far. How fun to use Stampin'Up! products in new and innovative ways!

Speaking of Magnolia Lane DSP, did you know that you can buy the standard paper pack of 12 sheets, double sided, six different designs but beginning November 1st, you can also buy a large multi-pack of four of the designs!  You get 20 sheets for $17!  That allows you to have lots of paper for multiple projects or enough to do a large volume project. Here's a picture of the designs.

06.04.19_O1_MAGNOLIA-LANE-BULK-DSP

This is a great savings if you need a larger than usual volume of Designer Series Paper for one of your ideas.  Look for it in the online store under "Paper". There's a link to the online store on the side bar of this block and a click there will take you to it, or you can click on my supply list below and access the store that way.

This was so much fun, I'm intrigued what other Designer Series Paper can be repurposed for Christmas. Guess I'll have to go check my stash!  Hope you have a fun and creative day!

Happy Stampin'!
Sarah


Tuesday, October 29, 2019

Holly Jolly Christmas!

Hi Friends!
My Christmas card production of samples is in full swing and it's so fun to be able to share my ideas with you. All of Stampin'Up!'s products are so pretty and also so coordinated! It's fun to see what you can do with the stamps and dies from any of our sets but "Holly Jolly Christmas" has to be one of my favorites!  Are you a fan of Santa Claus? I have quite a few of them that I use for decorating in my home and I love the nostalgic feeling I have towards them. They are all different and make me happy when I see them. I knew right away that I would want the "Holly Jolly Christmas" bundle because of the Santa!  There are some fun coordinating stamps and dies that accompany the big Santa too. Let me show you....


Here's the Santa image, colored with Stampin' Blends and then cut with the coordinating die. There are also some word dies including "Tis the Season" and "To Be Jolly". I added in a little bit of the "Night Before Christmas" Designer Series Paper which is perfect for this set and is part of the suite.


Here, I "built" a fireplace with some wood grain DSP and then hung my stockings with care ;) Did you notice the brick background? Another fabulous 3D embossing folder in the Annual Catalog called "Brick".


This card shows off some of the dies included with this bundle. The Santa with his sleigh and reindeer are just delightful. I cut them out with copper foil paper and added some more in the corner to highlight the words. The background paper is from the "Brightly Gleaming" Designer Series Paper and it is gorgeous with its own copper accents.


I had so much fun cutting out the Santa/sleigh/reindeer that I did it again, only this time with gold foil paper and made a little decor piece using a 6" embroidery hoop as my frame. The background paper is from the "Night Before Christmas" pack and actually comes that way. I didn't stamp those trees or stars!

This whole suite is so much fun and there are more products including a fun candy cane stripe ribbon, some "Memories and More" cards and coordinating Christmas cards with envelopes. If you love all the traditional Christmas themes, you'll love this set. Shop for it here:

Night Before Christmas products

I hope you are thinking about your Christmas crafting plans, including some cards or home decor. It's easy with Stampin'Up! and I'm here to help. Let me know if you have any questions or need some help with an order. What are you waiting for? ;)

Happy Stampin'!
Sarah

Wednesday, October 23, 2019

24 Hour Flash Sale on Stamps!!

24 Hour Stamp Sale

Hey Stampers!
This post is for all of you that can't get enough stamps! Now you can save 15% on many of the stamps in the Annual Catalog! You might need some for your own stash but don't forget about some wonderful stamps as gifts for your crafty friends! (Christmas is coming!!)  Here are some of my favorites:

-Waterfront . #146386
-Rooted in Nature . #148217
-Painted Harvest . #144783
-Very Versailles . #149275
-Let It Ride . #148765
-High Tide .  #143006

Click here and shop away!


Have fun shopping!

Happy Stampin'!
Sarah

Tuesday, October 22, 2019

Peaceful Boughs

Hey Stampers!
Can you guess what one of the most popular Christmas motifs is in stamping? It's so popular you'll see it in home decor, fabric, kitchen ware and even on clothes sometimes!  It's the pine bough! I think it's popular because it's so versatile and so familiar. I would guess there are some sort of pine trees almost everywhere in the country and beyond. We are surrounded by deep forests of pine trees here in Montana and they are also in every town and along the countryside. I love the smell and look of pine boughs and the warm Christmas memories I have of my mom carefully attaching real, as in not fake,  pine boughs to our staircase every Christmas.

The 2019 Holiday catalog is no exception and there is a magnificent stamp/die bundle called "Peaceful Boughs". I like this set so much because the dies work really well and the scale of the boughs and pine cones is great!  You can stamp or cut (or both) your boughs and pinecones and go to town on your idea involving pine!  I had some fun with this set a few weeks ago and wanted to share it today:


For my first card, I cut the large pine bough die out of Old Olive cardstock. Before I attached it to my card, I used an Early Espresso Stampin'Write marker to color the branch part of the die so it wouldn't also be green.  You can see that I used the pine cone dies as well as one of the sentiment dies to cut out my greeting. Before adhering everything, I daubed all the edges with a dauber and some Soft Suede ink for a more vintage, antiqued look.


My second idea is about 180 degrees different than the first idea!  Sparkle and shine were the themes of this card!  I stamped some of the bough stamps on some Blackberry Bliss cardstock with Versamark Ink and then heat embossed our Shimmer White embossing powder on them. The picture really doesn't do it justice but it's quite sparkly! I used some more bling with silver glimmer paper and some rhinestones. This is an elegant and more contemporary example of using this set.


For this card, I wanted to try inking up the pine bough stamps with Stampin'Write markers so I could get two colors on the stamp, Old Olive and Early Espresso. Here you can see I also stamped some pine cones and cut them out with the corresponding dies. The polkadot stamp is also part of this set so I scattered some of that all over the place in the background. My favorite linen twine completed the look.


And, back to bling!  This card features some die cut pine boughs and the Stained Glass dies that are in the Annual Catalog. These dies require a little patience to remove the paper from the die but overall, this was fun. I used Champagne Foil paper and Merry Merlot cardstock and ink.

I know I'll be hanging on to this set for at least one reason. We've had other pine bough dies in the past but they were difficult to use because it was hard to get the paper out of the die after cutting, without ripping the paper. This batch of dies are much easier to have success with so I'm a big fan.

A couple of awesome things are happening this week
24 HOUR FLASH SALE
Tomorrow, Wednesday, October 23rd, there will be a 24 hour flash sale on many stamps in the Annual catalog! They will be reduced for 15% for tomorrow ONLY!  This sale does not include any coordinating dies or bundles - just the stamps!  Check back tomorrow for the link to the sale or go to the online store (link is on the right side bar) and it will be the first thing that pops up!

HOLIDAY CARD BUFFET
I'm having my annual Holiday Card Buffet this weekend!  The fun starts on Thursday night at 5-8 p.m. and continues on Friday and Saturday from 10 a.m. to 2 p.m. This is an open house style event so you can come and go. It's at my house and I should have almost 20 card choices for you to make. Bring a friend and enjoy stamping, treats, prizes, displays and more! Contact me at scade403@hotmail.com if you have any questions or need directions to my house!

Thanks so much for stopping by!  Did you know you can follow my blog and get updates every time I post. You won't miss out and don't have to remember to find me!  Click on the "follow" tab to sign up!

Happy Stampin'!
Sarah


Monday, October 21, 2019

Happy 8 year Stampin' Up Anniversary to me!


Hi Friends!
I knew it was coming up but was unsure of the exact date... imagine my surprise when I discovered that my anniversary with Stampin'Up! is today - October 21!  I signed up as a demo in 2011 and it's been a wonderful ride ever since.  I went from signing up for the discount back in 2011 to having my best year ever in 2019 with doubling my team size, becoming Silver Elite for the first time, attending a Center Stage event and even earning the Incentive Trip to Maui for next July!  I am humbled and amazed at what being a demonstrator has brought into my life. I've met people that I would probably never have met if not for our shared love of stamping. I've renewed some old friendships with people that I knew years ago and now we like to stamp together. I've learned an entirely new art form with stamps, ink and paper that I had never dabbled in before. I've learned what I needed to know about social media and realize that you're never done learning with that! I've been able to make some very special cards, scrapbooks, decor pieces and party favors that make me so happy when I think of the event or the recipients. I've befriended others who were lonely and not sure what to do with their empty nest or different life due to retirement, moving or even death in the family.  My stampin' friends and I have marveled several times at what great therapy it is to get together, create something beautiful, laugh and cry together and just share life. There is no down side to my experience so far and I'm so looking forward to many more years. Thank you for any part you've played in my SU journey!  I am so grateful!

Just for fun, I want to share the first three cards I made after becoming a demonstrator and holding my first class. It's a testament to the ease of this hobby that I could design and make these when I knew next to nothing and even better, still appreciate them 8 years later!


I would love to have more people join me on this journey!  Contact me to get your own Stampin'Up! discount or just come along for the ride as a customer!  You won't be sorry!

Hugs and Blessings,
Sarah

Friday, October 18, 2019

Free Skate

Happy Friday!
Today's a day that can't make up its mind. If I look east out my windows, it's a gorgeous fall day with just a little dusting of snow on the mountains and oodles of pretty fall leaves decorating the landscape. If I look west out my windows, the sky is angry and gray and getting ready to usher in the next snow storm. That's life here in Montana!

Do you like to ice skate? Did you ever ice skate as a kid?  I did occasionally but never got real proficient. My kids got a little more exposure to it because the elementary school they went to actually had an ice rink on the playground all winter. It took a team of dedicated parents to maintain it but the kids really had fun at recess skating.

My share today is related to ice skating and the "Free Skate" bundle. It's such a sweet set and having dies to go with it really make it fun to create with.  Here are some of my ideas:


For my first card, I used the stamp set and dies in a pretty straightforward way. I used my gray Stampin' Blends to color the bases of the skates and blades.  Don't you love this color combination?  I can't get enough of the new In Color, Pretty Peacock. The Designer Series Paper is from the "Come to Gather" pack and I think wood grain and gingham are my two favorite patterns right now! I stamped some snow flakes on the wood paper and used the wonderful bow die from this bundle.  I also grabbed the coordinating ribbon and faceted gem that come in all the In Colors.


This card was not difficult, just time consuming as I had to lace each skate with some navy Baker's twine! The skates were made from a coordinating die that comes in the set and I cut them out of the platinum foil paper. My background is from the wonderful "Wrapped in Plaid" DSP. My sentiments fit perfectly in some of the Layering Squares dies.


I also wanted to try something besides a card. These skates are big enough that they can really make a statement on a package or gift bag. Another favorite of this bundle is the holly die. It cuts out super easy and will adorn anything! By tying the skates to the handle of the bag, it looks like they are the laces on the skates. I loved this! What comes to your mind when you see this bundle?

Some of my friends and I had a fabulous time last night at my first "Sip N Stamp" event. My husband has a monthly board meeting he has to go to on the 3rd Thursday of the month so I'm going to make this event a regular recurring thing on that night!  We had so much fun!  I had set out several boxes of things to play with like the "Everything is Rosy" medley which is on the Clearance Rack right now, the "Most Wonderful Time of Year" medley which is in the Christmas catalog, a couple of cards, a Paper Pumpkin kit and the cards and Memories and More supplies from the "Night Before Christmas" suite of products. It's fun to get a chance to fiddle around with some different things and then see if you'd like to buy them. Put November 21st on your calendar as that will be the next "Sip N Stamp"!

I have been focusing on Pinterest lately and doing some research as far as getting more followers and also how to get more attention for my pins. If you have never checked out my Pinterest social media, please do!  It's a handy way to see all my work and each pin directs you back to a specific blog post which covers the details of products and techniques I used.   Here's the link:

Big Sky Stampin' on Pinterest

I would be so grateful if you started "following" me and invite your stampin' friends to do so as well!

That's it for today!  I have a Holiday card buffet next week so I'm off to start getting ready for that! It's always a great time and I can't wait to see some of you! I'll post more but it's from 10 a.m. to 2 p.m. on Friday and Saturday, October 25th and 26th!

Happy Stampin'!
Sarah


Thursday, October 17, 2019

Monthly card class projects - Christmas and Thanksgiving!

Hey Stampers!
I want to share some projects from the monthly class we just had this week. These are classes held every month, usually the 3rd Tuesday of the month, with a dedicated group of stampers who love to try new things and work hard at their art!

It had been awhile since I did a "fun fold" card with these classes so we did an easel card. Here's a look and I'll explain a bit more below the pictures.


This is a very easy fun fold card and lends itself well to any stamp set or Designer Series Paper pack. It doesn't require any special paper or tools other than a scoring tool so that is nice as well. The base of the card is Garden Green cardstock, cut at 4-1/4" x 11". Starting from the left, I scored it at 1-1/4", 2-1/2", 4-1/4", 6, 8-1/2".  You fold it creating 3 "mountains". The last mountain, the tallest, supports the largest layer of the card which is 4-1/4" x 5-1/8". Once you have the base pieces, you can decorate and stamp as you please. I used the Toile Tidings DSP and combined it with the "Cup of Christmas" bundle of mugs. The cup stamps are unique in that they are reversible, so you can mount them either way, with the cup handle on the right or left. This is great for design choices! I used some stamps from the "Cup of Christmas" stamp set and added some sprig punches and enamel dot embellishments.


For our second card, we had some fun with the Snowman Builder Punch.  I wanted to feature a lot of Let It Snow DSP and also the embellishment kit that comes in that suite. Aren't the felt scarves so cute?  You'll see a nose, arms and some sparkly Washi tape that are all part of this embellishment kit as well. That is a separate purchase but well worth it! I used some of the red stripe paper behind my snowman (2" x 3") to break up the busy background and let him stand out a little bit.


And last, we made a simple Thanksgiving card from the "Day of Thanks" stamp set. This was featured a few days ago on my blog. Everyone was so impressed with the intricate drawing of the turkey they were able to stamp. Stampin'Up!'s quality of stamps is unparalleled in the industry. You can get such great detail as each stamp is carved meticulously and intricately out of red rubber or photopolymer.

I'd love for you to check out one of my classes if you live in the area. I offer them over different days and times and we are always up to something good!  You can check out my calendar here:

Big Sky Stampin' - Calendar

Once you click on that, just scroll down until you see the calendar. You can also RSVP for classes on this site.

Following up on yesterday's blog post, my "practice" session for my OnStage presentation went well and I get several more cracks at it before the real thing on November 16th!  Thanks for the good wishes and prayers to calm my nerves! Stampin'Up! is an incredible company to be a part of. I would love to share more about it with you if you are looking for a place to belong, feed your creative passion and even make some money if you work it as a business. There are tons of options so check in with me and we can see if it works for you!

Hope you have a great day and do something creative!
Happy Stampin'!
Sarah

Wednesday, October 16, 2019

Beauty and Joy

Hi Stampin' Friends!
Beauty and Joy - who doesn't need more of that in their life?!!  I hope that grabs your attention as I share the stamp set I've recently fallen in love with. I have to admit that this particular set was underwhelming my first 20 times through the Holiday Catalog. It just didn't catch my eye or get my creative mojo going at all. I had some hostess dollars from an order to use up and so was looking for something in the $15-$20 range and taking another spin through the Holiday Catalog. I decided to take a chance on the "Beauty and Joy" set because I like leaves and there were plenty of leaves in this set. I have to tell you, this set was so fun and so satisfying to just spend time stamping and not worrying about all the extras. I can't wait to show you how much fun I had!  Here goes....


For my first card, I did a take on one of the samples in the catalog. To achieve this look, you start at the bottom with stamping the planter, then the trunk and then the leaves. I'll bet you're wondering how I did those leaves aren't you?!! I mounted the leaf stamp on my block and then inked it up with Crushed Curry. Before I stamped, I daubed on (with daubers) a little bit of Cajun Craze and Cherry Cobbler. I didn't get too heavy handed because I wanted the Crushed Curry to still shine through. What do you think?  Isn't that the perfect and easiest technique for getting fall leaves with ink?!  I was so thrilled with the results.


For my second card, I was really curious about the three level leaf stamp and the little stem/trunk stamps that seemed to coordinate with it. I was right and it does! For this example, I actually stamped my leaves first, then placed the trunk(s) stamp in between the leaves and then placed the planter/pot. These stamps are red rubber Distinktive stamps that create the illusion of shading and depth. I am such a fan of these type of stamps because I feel like such an artist when I use them! I kept this card simple with a sentiment and some retired ribbon.


And, here's thinking out of the box!  There is a leaf stamp in this set that is sorta in the shape of a circle. I used one of my biggest layered circles dies and cut out a piece of Crumb Cake card stock. I then stamped the leaf stamp around the circle. I first did it like a compass, north, south, east, west and then filled in the spaces with more stamping. I loved my wreath when I was done!  I grabbed some dies from the "Free Skate" bundle to make my bow and holly border.  My sentiment is from the "Beauty and Joy" set and I used the Tailored Tag punch to cut it out. I embossed my background with the Pinewood Plank 3D folder and daubed the edges of everything with some Soft Suede ink. I still really love the vintage look and this was a perfect card for that style.

I want to show you the stamp set so you can see how I used it in my projects. You will want this one for your stash!

BEAUTY & JOY PHOTOPOLYMER STAMP SET

Isn't that a fun set?  Not too complicated but just interesting enough to give you some fantastic options when you just have time and energy to stamp. Our best stamping times don't necessarily result in an over-the-top, complicated card. Sometimes less is more and simple stamping can be so rewarding.  I've listed my supplies below so you can check them out and see if you'd love to have this set in your stash.  As with most of the Holiday Catalog products, they are only available now through January 2nd and then they are gone. If you think you want something, don't wait until the last minute!

I have a fun stamping-related day today!  I'm not sure if I've mentioned this but I was asked to be a presenter at the Las Vegas OnStage event, coming up in November. I have been working on my presentation and have a first practice session today via Zoom with Stampin'Up!  I'm nervous so any prayers and good wishes would be appreciated!  I'm also going to a soup luncheon/card swap today that is always fun. We make a packet of 3 cards and then swap our packets while enjoying some wonderful food. My downline, Elleen VanDyke, hosts this every year and it is a such a great time. I'm still drooling over the seafood chowder she made two years ago!

Thanks so much for stopping by and taking a peek at what I'm up to. I would love to hear your thoughts!  You can comment here or on my FB page and group. I read everything and it all helps me get even better at this wonderful hobby.  Hope you have a great day!

Blessings,
Sarah

Monday, October 14, 2019

Day of Thanks

Happy Monday!
Those weekends sure go by fast, don't they!  I love this time of year, when the weather cooperates, and the beauty of fall is at its peak. We get some fall leaf colors around here, nothing like back east, but at least a few pretty trees to remind us of the changing seasons. The fall season really reminds me of family and years gone by with Thanksgiving at my Grandma's, football games and marching band, hikes and hunting (not me but my husband!). My favorite Thanksgiving is a more recent one from 2012. That is the last time the extended family on my side was all together, including our parents who have since passed away. We gathered at our hometown, Rapid City, SD and had a wonderful time of connecting, laughing and enjoying the presence of everyone. Things changed quickly after that and while we still strive to be together when we can, it will never be with our parents with us again. That's a lot of nostalgia for a Monday so maybe I should get to what I want to share!

The stamp set I chose for today is called "Day of Thanks". It has the BEST turkey stamp!  If you want to go with a really traditional theme for your Thanksgiving greetings, this set is perfect!  Here are some ideas for you:


For my first card, I used the turkey stamp and some stamps from the "Gather Together" set including the wheat and "sprinkles".  My little bit of Crushed Curry DSP is from the "Come to Gather" Designer Series Paper.  My maple leaf brads are not Stampin'Up! but every now and then, I try to clean out my stash of random stuff and use it!


This is a straight up "Thanksgiving" Card!  I love the turkey and the script for the sentiment. I used the "Come to Gather" DSP again for this card.


Another motif in the "Day of Thanks" set is a great feather. I stamped it three times in Pretty Peacock ink on some "Come to Gather" DSP. I love this color scheme of Crumb Cake, Pretty Peacock and Early Espresso.


The last card uses the "Gather Together" bundle mostly, but I wanted to feature a wonderful sentiment from our featured set, "Day of Thanks". Isn't that perfect for your family and friends!  In case you are wondering, I sponged the ink on my leaf in various colors to give it a fall look, including Cherry Cobbler, Cajun Craze, Pumpkin Pie and Crushed Curry.

I'll bet most of you have a warm feeling in your heart when this time of year rolls around. It's cozy, welcoming and friendly and it's an easy theme to create with. You can buy either of these stamp sets in the online store as well as a full line assortment of Designer Series Paper, card stock and ink. Christmas cards are one thing, but how about doing some Thanksgiving cards this year?!! All my supplies are listed below and you'll find the online store to be very convenient to shop in. Thanks so much for taking a look!

And just because I'm feeling so nostalgic, I'd like to share a picture from that Thanksgiving in 2012 and the whole "clan"! This event became known as "Undlin Camp Turkey Day 2012"


Wishing you the gifts of fall....
Sarah


Friday, October 11, 2019

Tags Tags Tags bundle

Hi Friends!
Just like that, it's Friday!  This week was strange with all our snow but the sun is out today and I can almost pretend it is fall again. This is a great time of year for people who love to craft and specifically stamp. The upcoming holidays provide a lot of inspiration and especially as you think about gatherings with friends and family. It's always fun to provide a little treat, table decor or party favor that perfectly showcases your hobby and blesses the guests at the same time.

There's a new bundle in the 2019 Holiday Catalog that just made all of this easier!  It's called "Tags Tags Tags" and it's a unique stamp and die  set that create three seasonal tags all at once. One stamp covers Halloween, the second covers Christmas and the third covers Valentine's Day. I needed some tags for a Halloween class I'm doing next week and then decided it would be fun to play with the rest of the set and make some samples to showcase what these stamps can do. It's so easy to stamp once and die cut once and have 3 tags just like that!


For my first go, I made all tags. I used some "Monster Bash" Designer Series Paper for my backgrounds and kept it pretty simple.  Tags are an awesome way to use up some left over DSP and ribbon. Who doesn't have yards of leftover ribbon?!!


For my Christmas and Valentine's samples, I chose to showcase some of our packaging options that are available in the annual catalog. There are the awesome pizza boxes (which also come in gold foil), the clear 2" x 2" acetate treat boxes and the kraft paper pillow boxes. All are easy to assemble with no adhesives required and easy to fill with anything that fits. I used some ribbon in my Christmas box just to make it colorful as a sample! Aren't the tags cute?  My favorite ones are the Christmas ones.


Here are the Valentine examples. These are quite easy to make and you don't have to look far in your stash o' stuff to find bits and pieces of ribbon, paper, sequins, etc to decorate your box with.

Here's a peek at the bundle so you can see how all three seasonal stamps are die cut at once, after being stamped.


There are also some companion dies to cut little hearts, pumpkins and snowflakes for some extra decoration.  This is a very reasonably priced bundle at only $33.25 (#150667) and it will provide years of fun, every time these holidays roll around!

This time of year is a great time to gather some friends and have a Ladies Night out with some snacks, beverages and stamping!  I have lots of ideas of ways to do this with our kits and other supplies. The set I shared today could even be incorporated into a tag making class that would supply everyone with lots of tags for future use. Contact me for some ideas. We can put together a fun event that doesn't require a lot of prep or cost.  I'm sure you've seen or participated in some of the popular "Sip N Paint" classes around the country. Why not have a "Sip N Stamp" ??  It can be more affordable with just as much fun and not as intimidating to those who haven't every stamped before as a paint class might be to a novice painter.  In fact, I'm hosting one at my house next week, Thursday night. I plan to use some simple projects including these tags as well as some card kits and more. See my calendar for details (on the right) if you live in my area.

Thanks so much for stopping by!  Did you know it's an option to "follow" my blog and then never miss a post?  You can do that on the right side bar as well. I would love to be your creative coach and stampin' guru!  Contact me today and we will get you started on a fun, adventurous journey that will provide hours of enjoyment.

Happy Stampin'!
Sarah

Thursday, October 10, 2019

Let It Snow Bundle

Hey Friends,
So this morning, it's 15 degrees at my house and we have about 8" of snow and it's October 10th. Wow.... This is a little brutal for the season of pumpkins, football and candy corn, even in Montana!  The sun is supposed to come out and shine for a few days so maybe we can get fall back on track the rest of the week. I'm picking up my son and his new wife at the airport around midnight tonight and they have been on a beach for the last 5 days. Boy are they in for a surprise!

Since it's snowy and cold, I am really inspired to share the "Let It Snow" bundle with you today. I have to admit there were two things that drew me to this bundle right off the bat, 1) the gorgeous color scheme of the Designer Series Paper and patterns in it, and 2) the super cute "Let It Snow" embellishment kit. These are amazing little stick on accents that will delight you as you create your masterpiece!  I had a lot of fun with this whole bundle and have it here to show you:


I'm pretty sure one blog post won't cover everything this bundle as to offer but I'll start with some cards like the one above. First, there is a snowman builder punch!  You can stamp the snowman and then also punch a hat, nose and two twig arms.  For these merry fellows, I used some retired black glimmer paper for their hats and scarves and arms from the embellishment kit (see in supply list). The kit also has some white sparkly washi tape that I used for snow.


This card features some of the Designer Series Paper!  Using my Stitched Oval dies, I cut out the snowman from the DSP and also cut out the background snowy scene.  The smaller snowman was also part of the DSP and I fussy cut that guy out. The DSP has some sparkly snow already on it!


Here's a fun trick... cut out snowmen from the DSP with your snowman builder punch!  They are sized just right and fun to punch out. Here's a tip - I always cut around the snowman leaving about a 1/4" margin if possible from the 12 x 12" sheet of DSP and then use a punch. If you need something to hang on to while you are punching, add a sticky note to the edge of your DSP, allowing you to get the snowman centered in the punch.  This card also features hats and arms punched with the snowman builder punch and some more examples of the gorgeous DSP!


I couldn't resist making some 3"x 3" gift cards using the stamps and more of the DSP. I made my own cards by cutting a 12" x 12" sheet of Whisper White into eight 3" x 6" pieces, scoring each of them in the middle. You can buy the envelopes from our online store. I added some DSP to the flaps just for fun!

I've already made some more projects with this fun suite and will share them soon. Like I said, too many wonderful things for just one blog post!  Here's a peek at the entire suite and be sure to check out the products I used in this post in my supply list below. A click on any of them will take you to the online store!


Wow, that's a whole lot of fun, isn't it?!!  Stay tuned for the next time I play with "Let It Snow".  Are you tempted to play?  It's easy to jump in and a stamp/punch bundle is affordable and needs no extra equipment. Add some paper, ink and maybe the embellishment kit and you will have hours of fun and make tons of projects to delight your family and friends. This is the easiest hobby I've ever tried for beginners and it only gets better as you perfect your style. Talk to me today! I would love to share my passion for stamping with you.

Until next time,  Happy Stampin'!
Sarah

Wednesday, October 9, 2019

Christmastime is Here suite - video!

Hey Stampers,
I'm trying to get back to doing videos now and then and did one today!  It features the "Christmastime is Here" suite which is available now for demos and available November 1 for customers.  Check it out and reach out if you have any questions or want to know how to get yours!


Thanks for taking a peek!  Appreciate it!!
Sarah

Shine Bright Bundle

Hey Stampin' Friends!
We are in the midst of our second snow storm for the season so of course, I'm going back to some Christmas-related themes for my blog today!  This batch of snow is a bit much, even for us hearty Montanans. I-90 is closed in both directions not to far from us so I'm hunkered down for the time being. It's a good thing I have nothing on my schedule this week except stamping!

Are you a fan of the "stitched" dies that Stampin'Up! has been making in the past couple of years?  I sure am. They create a stitched line inside the cutting line that makes your paper look "stitched". It's a fun detail that adds some vintage to a project. For Christmas, the newest dies include the "Stitched Brightly dies". These are dies with a Christmas Tree, Star and evergreen bough motif, all with some stitched detail.  The stamp set that coordinates with these dies is awesome.  I want to share what I did with this set today:


For my first idea, I wanted a more rustic card so chose to heat emboss my sentiment with white embossing powder on a Soft Suede cardstock.  The background was embossed with the Pinewood Plank 3D embossing folder. I used the evergreen bough die with some Mossy Meadow cardstock and adhered some red foil paper behind it for the berries in the boughs.


For this card, I knew I wanted to use silver as my metallic component. I cut out the stitched star background on a piece of Pool Party cardstock. I adhered silver glimmer paper behind it to make the stars shine a little more brightly.  I used silver embossing powder and eat embossed the star stamp on some more Pool Party card stock and fussy cut the star out. Did you notice the embossing folder used on the silver foil paper?  That is a new folder called "Hammered Metal" 3D folder. It is really lovely!


Since the silver was such a success, I decided to try some gold embossing. This card features heat embossing with gold embossing powder. The tree and sentiment are both part of the stamp set. I layered this on some gold/vellum stripe paper that is retired SU product.  Black and gold are so elegant, aren't they?


My last card uses the Christmas Tree stitched die.  This creates trees reminiscent of a punch art style of technique. I used Shaded Spruce cardstock and mounted that on Whisper White Thick cardstock after I had used the die. I added some white flax ribbon and a couple of sprigs using a punch. The sentiment is also from this same bundle.

If you are a fan of stitched style dies, these would be good ones to add to your collection. The trees, stars and boughs could also be used for non-Christmas ideas as well. I've listed all my products in the list below and a click on any of them will take you to the online store. Online shopping is easy and no matter where you live, your order comes to you! For the month of October, all online orders will receive a special gift in the mail from me. I would love to be your Stampin'Up! demonstrator. I offer great customer service with quick response time, advice and mentoring as well as timely emails with news of upcoming promotions and specials.  You can contact me directly or place an order and I'll be in touch with you.

At some point today, I'm going to have to shovel but for now, I think I'll stamp!  Until next time,
Happy Stampin'!
Sarah