Independent Stampin'Up! Demonstrator!

Hey friends!
I've been a demonstrator with Stampin'Up! since 2011. I'm located in Bozeman, Montana, but have customers all over the country. I have a very fun and active downline called "Big Sky Stamper Stars" and we get together in person and online to share what we love. My blog posts feature what I'm up to recently and I try to share new product information, tips and tricks and creative inspiration. You can shop from this site or find out more information about our products and becoming a demonstrator! Thanks for stopping by!

Friday, March 31, 2017

Last Day to Sale-A-Brate!

Hi friends,
I have a quick post today as I'm getting ready for a class this morning. It's the last day of Sale-A-Bration and I just added some more Snail tape runner and Big Shot acrylic plates to my order!  It's a great time to get what you use all the time or any special items you've had on your wish list. I know you've heard it at least a few times from me, but for every $50 you spend, you can choose one freebie from the SAB brochure. All the details can be found by going to "shop now" on the right side of my blog. There is also a link to the SAB brochure if you want to see what's available for free!  Orders need to be placed by tonight to qualify.

I have a bright, fun card today that is versatile enough for any occasion!   I love the stamps that create a paintbrush stroke effect, since I am not a painter. It makes me feel like one when I stamp at least!  Here's my card:


I used the background paper to give me my color scheme, as I often do. It's so easy to figure it out that way! I love the simplicity and vividness of this card.

I hope you have a great weekend ahead of you!  Tomorrow we roar into April!

Happy Stampin'!
Sarah

Thursday, March 30, 2017

TBT- All About Girls

Hey Stampers!
It's Throwback Thursday and that's when I like to feature some retired products that didn't get enough lovin' from me when they were current. Anyone else deal with that problem??  I always have great intentions but then things get buried and unfortunately, out of sight, out of mind. I have a fun set to show you today that was from a couple of years back, as well as some old paper. I won't be creating a supply list because these are no longer available to purchase, but I thought you would like to see my ideas anyway!  Here they are:


The one technique I used which is somewhat current is that I colored the tutu and the apron with our watercolor pencils and then blended the color in with a blender pen. That is such a fun technique and I love how smoothly and quickly it spreads the color around. You don't have to be careful about coloring with the pencil because the color gets blended and your exact pencil stroke marks don't really show - great for being in a hurry!

Take a look at your retired products and see what's lurking around in your craft space. Perhaps there are some treasures like what I found!

It's the 2nd to last day of Sale-A-Bration!  Go to "shop now" on the right and take advantage of this once a year promotion. For every $50 you spend on any Stampin'Up! product, you can earn a freebie from the SAB brochure!

Thanks as always for checking in on me!  It's always fun to share what you love ;)

Happy Stampin'!
Sarah


Wednesday, March 29, 2017

Butterfly Birthday

Hi there Stampers!
Just curious... have you jumped on the Adult Coloring Book craze?  I have, in a very small way. I like to color a bit when I can't do other stuff, like on a plane, in a car, camping, waiting around, etc. I think stamping is way more fun and challenging, but coloring will do in a pinch. The reason I ask is that Stampin'Up! offered some coloring pages as one of the freebies for this year's Sale-A-Bration!  I got one pack just to try it.  Most of the sheets are an overall scene that would be difficult to slice up into a card back, but one sheet was an overall floral design that I new would work perfect for a card class.  Instead of actually coloring as it would have taken waaaaay too much time, we stamped a background stamp on the coloring paper to draw out the design a little better. Here's the card:


I used the "Watercolor Wash" background stamp with Peekaboo Peach ink. It's a great way to get some color on the background in an overall fashion.  I wanted to use some more of my copper foil paper for one of the butterflies and the fabulous Watercolor Wings set was used for the bigger butterfly.  That set never gets old to play with!  You can layer up to 3 different colors on a butterfly with the different stamps, although I only used two in this example.

I love all the nuances and variations of stamping.  You can go for any style, theme, color, mood, design and so on!  It's the easiest hobby that I have eve started and there have been many!!  Join me sometime and see what all the fun is about. I'd love to meet you and share in your creative journey!

Happy Stampin'!
Sarah
Tuesday, March 28, 2017

A New Baby - Every Happiness!

Hi there stampers!
It's a gorgeous morning here and I got to sleep all night without interruption so I am looking forward to an awesome day!  I have some fun classes planned later this week and will be figuring those out today and tomorrow. Lots of ideas, which to choose?  I have a great baby card today!  I love everything about it and especially that it is not specifically for a boy or girl, so could be made in advance of knowing and to have on hand. Here it is:


My color scheme was selected by using the "Cupcakes and Carousels" Designer Series Paper stack. Both the background banners piece and the "onesies" were made from this paper. I had some hangers on hand  in my retired products stash and thought they would work well here, almost like the onesies are hanging on the banners.  I added a little interest with putting some adhesives enamel shapes on the onesies as well.   I love this card and am looking forward to giving it to a Mama and Papa in celebration of their new little one.

Just a reminder that Sale-A-Bration goes for 4 more days, then gone until next year!  It's not too late to submit and order and earn free product for every $50 you spend or sign up as a demonstrator with Stampin'Up! and earn extra product and 2 free stamp sets.  It's easy to sign up, the rewards are numerous and you won't be sorry!  Contact me for all the details. My team is growing and we are always excited about someone else joining us in this fun crafting adventure!

Happy Stampin'!
Sarah

Monday, March 27, 2017

Using Ribbon

Hi Stampers!
I'm a bit late with my post this morning. I had my morning all planned out and then ended up at the vet's with a dog that decided he doesn't want to eat anymore. It's a long story, but I think he will be fine and hopefully will not be waking me up at 3 a.m. as he did today. So, even though it is 11 in the morning, I have been up for 8 hours already... Ugh....

This is a simple post, most pictures!  I wanted to share some fun ribbon I have had around my craft area for years and what I finally decided to do with it.  The themes practically make themselves with these bright ribbons!  Take a peek:


I used a variety of current and retired product. If you are curious about any specifics, let me know and I'll get back to you on that! These were fun, simple and dramatic in the result.  Just what I needed today!

I'll be back tomorrow... right now I'm off to finish up a few more things and then take a NAP!
Happy Stampin'!
Sarah

Friday, March 24, 2017

Blue and White - That's All!

Hi Stampers!
Yeah!  It's Friday!  Weekends almost always are something to look forward to and this is no exception. We have a son's college Senior Project to partake in on Saturday night and a daughter and son-in-law's choir concert on Sunday afternoon. Then there's some laundry and other chores haha!

I have a great card today for you blue and white lovers.  It's such a clean and crisp color combination and also evokes certain cultures and styles. I have more than a couple of shelves of blue and white dishes and other pieces that I enjoy so much.  My inspiration was the card fold design, called "Dutch Door". It features a top flap that opens up and two smaller side flaps that open out.   Here's the card:


I used the fabulous Floral Boutique Designer Series paper which is, you guessed it, all blue and white, specifically Night of Navy and white.  My oval floral design piece is cut directly from the DSP paper and framed with Night of Navy.  Curious about the inside?  Here it is:


I have a small ink blooper in the upper right hand corner and purposely left it there to show you that accidents happen... sometimes frequently!  My fix for this would be to cover that area with a new piece of perfectly stamped white card stock.  That's washi tape at the top of the inside and at the bottom, a perfect bloom of Night of Navy using the Stylish Stems framelits.  This style of fold for a card could be adapted to anything... any color, any theme. I will be doing it again.  The white card stock dimension is 4-1/2" x 8-1/2", scored at 5-1/2".  The Night of navy piece is 2-1/2" x 8-1/2", scored at 2-1/2" on each side.

Thanks for visiting my blog today. I hope I gave you some ideas for your own projects!  Papercrafting has become a therapy for me... a way to relax, be creative, step back from any life stresses and just soak in the gift of some free time. I love it!

Happy weekend!
Sarah

Thursday, March 23, 2017

Artistically Asian

Happy Thursday Stampers!
I have a really different theme today... Asian. I have to take Stampin'Up!'s word for it however, as I really don't know for sure!  There is a great nature set in the Annual Catalog called Artistically Asian that also includes some Asian lettering and words of faith and friendship. The sketches caught my eye and the words drew me in. Here's my first card experimenting with this set:


I decided to make the Asian lettering more subtle with Tip Top Taupe Ink and Crumb Cake Paper. I then used Crisp Cucumber as my green... that most difficult of green's to work with.  My background paper is from the Affectionately Yours set of Designer Series Paper which I have used often and featured many times on my blog. Finally, I love the saying... isn't that so true. Our friends are such an important part of our lives.

Here's my second attempt with this card:


This time, I used Rich Razzleberry  and Sweet Sugarplum ink. My background paper is from the Blooms and Bliss DSP pack. I will be coming back to this set and using it again. It would always be an option to not use the Asian lettering too and just use the sketches and sentiments in English, especially since there's some uncertainty on my part if I matched them up more or less correctly.

Enjoy your day, in all of its challenges, triumphs and same-o, same-o!

Happy Stampin'!
Sarah

Wednesday, March 22, 2017

The "other" side of Easter!

Hi stampin' friends!
I'm back today with the other side of Easter, the spring, bunny, chick, egg, daffodil side.  Easter is late this year and so maybe by the time it actually gets here it will truly feel like spring, but for now we have this winter hangover going on in Montana. At least we can dream of spring!

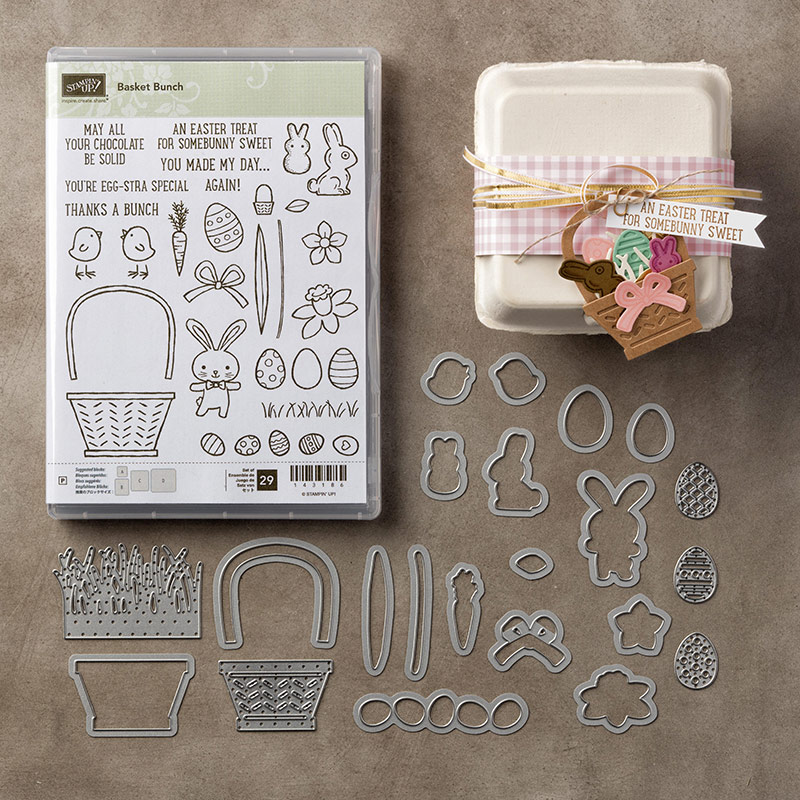
The spring and Easter offering from Stampin'Up! this year is jam packed with stamps and framelits to create almost anything you could ask for. I'm having fun playing with it!.I wanted to share a couple of cards with you today. Here's the first:


Just in case you aren't familiar with them, those are cute little Peeps in the Easter basket!  I used the fabulous glimmer paper from Sale-A-Bration (now unfortunately sold out and no longer available) for my Peeps and the rest is fairly obvious. We made this card in a class and as a bonus, I had purchased real Peeps in these three colors and had them out for a snack. A few people ate them and some declined. I think people either really love or really dislike Peeps!

My second card features a more traditional color scheme, the pastel Easter Colors:


And, of course, there needs to be a chocolate bunny somewhere, right? Dying eggs is a big party of our family's Easter celebration and eating chocolate is not hard to do. This bundle is chock-full of everything you need for spring and Easter. I barely scratched the surface! Here's a better look at the bundle so you can see all the details:


There are alot of eggs, chicks, flowers and more to satisfy the most demanding creating urge!

There's still time to get going on Easter-themed cards, table favors, party decor, basket tags, etc. All ordering information is supplied below. With the purchase of this bundle and some ribbon or adhesive, you will have hit the $50 mark and can earn a Sale-A-Bration freebie!  And, big news, SU has added some more products to the freebie list for the rest of the promotion, through March 31st. Here they are:

Image may contain: text
It's always a good time to rubber stamp and it's a great time to join up with Stampin'Up! as a demonstrator! I'd love to chat with you about the details and show you how to craft for fun and money!

Have a great Tuesday!
Sarah


Tuesday, March 21, 2017

He is Risen Indeed

Hi Stampers!
Today, I am turning my attention to Easter!  It's still about a month away, but I wanted to share some ideas so you had plenty of time to order supplies and make some cards for this most important holiday of the Christian faith.  Stampin'Up! always has some Easter themed stamps in the Occasions catalog and this year, the sacred ones were a home run in my opinion.  Here are my cards:


For the first card, I used a dauber and three different yellow/orange inks and sponged on Whisper White card stock to try to create a sunrise background.  I used my retired oval framelits to complete the card, including cutting the card itself with the biggest oval. I used the palm branch stamp around the outside edge of the front of the card and then again, in the center.

For my second card, I chose some retired watercolor-like paper to stamp on and added some branches from the Botanical Builder framelits. They are really ferns, but I thought they could pass for palm branches in a pinch ;)  I also used a little purple which is a popular Easter color.

Tomorrow, I'll feature the other Easter themes.... bunnies, Easter eggs, baskets, etc. and even some Peeps.  That is what is all the rage in the stores, however, I wanted to start with what Easter is really about, the death and resurrection of our Lord, Jesus Christ.

Thanks for stopping by!  The supplies are listed below if you want to get a start on some Easter cards this year!

Happy Stampin'!
Sarah

Monday, March 20, 2017

Workspace DIY project!

Hey Stampers!
I'm excited to show you what I was up to on Saturday, with the much needed assistance of my husband!  I've been wanting to re-do my actual desk area in my stamping room for a few years now, but never had the space and wasn't sure what I wanted to do. Well, we swung into action on Saturday and after a few back and forth's with ideas, got going!  I chose to use the cube/modular pieces that the  Michaels Store has, mainly because it's about 3 miles from my house and they had a good supply in stock and it was 40% off. I purchased 8 cubes, 4 open ones, 3 drawer ones and 1 paper slot one. The cubes are stacked two high and two deep on either side of the desk. We then found two 15" x 8' premade white shelves at Lowes for a desk surface.  The cubes were easy to assemble and we did in the afternoon with the NCAA basketball games on in the background. We measured the space and decided 5-1/2' would be a good length of desk for the room and my husband sawed the shelves down. He screwed them on in a couple places for some stability, shimmed the cubes where needed as they are sitting on carpet and then I had the fun of loading up my new desk!  I'll probably rearrange things multiple times but I love it so much already!  Here are some pics:


I'm just sure my rubber stamping skills will skyrocket at this point with my new work space so organized!
Thanks for taking a peek!
Happy Stampin'!
Sarah

Friday, March 17, 2017

Lucky You - St. Patrick's Day!

Hi Stampers!
Today is March 17th, St. Patrick's Day!  It's a big deal holiday to some of you and in some parts of the world and sorta "meh" to the rest of you.  For instance, here in Montana, it's all relative.  In Bozeman, where I live, there are pockets of celebration at some of the bars and the "Run to the Pub". in Butte, about an hour west, it's CRAZY CELEBRATION time!  I'm guessing that is true all over the country.  I do notice the day and try to wear green. I'm old enough to remember you got pinched on this day if you didn't wear green.  I have 3 Norwegian grandparents and one Irish grandmother so I always think of her. In an interesting aside about her, she was fair, blue-eyed and let all around her assume she was Norwegian for most of her life. She told me once that her future in-laws would not have allowed/approved her marriage to my grandpa if they had known she was anything but Norwegian. Once they had passed away and my grandpa had passed away, she didn't care if anyone found out she was actually 100% Irish!  Anyway, it's fun for me to reminisce about her as we were very close.

In honor of her and this special day for the Irish, I have a card featuring squiggly, swirly 4-leaf clovers. This was  truly a brainstorm as I was scouring my room for anything that would work to make an appropriate St. Patrick's Day card. Here it is:


I hope you can see where I got my 4-leaf clovers!  These are from the Sunshine Wishes framelit set and are meant to be flowers I think, however, there are definitely 4 petals and with a little imagination, there's clover!  I added a touch of gold with the doily and cord because some how clover, leprechauns and  pots of gold are all part of the trappings of this day. My sentiment is from the retired stamp set "And Many More".

I don't think I have any green beer on the agenda today, but I hope you have a great day, no matter what your St. Paddy's day plans!  Here's to the Irish!

Happy Stampin'!
Sarah

Thursday, March 16, 2017

Candles and Bows

Hi stampers!
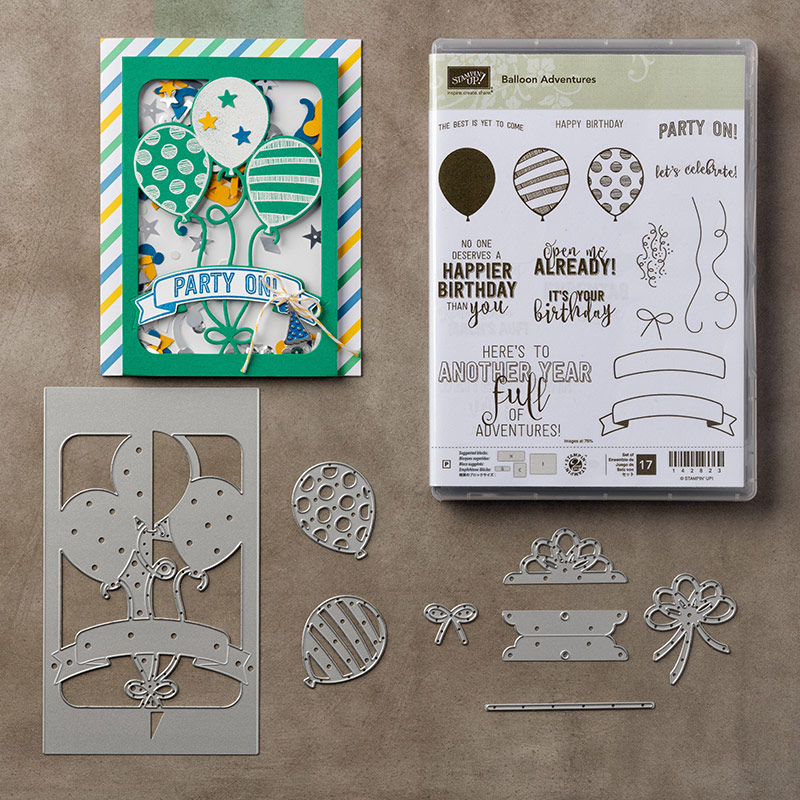
Part of the fun of my passion for papercrafting is thinking out of the box, or in today's case, thinking about boxes!  I am continually looking for ways to use what I have with a slightly different twist. I also like to take my original ideas that don't turn out like I thought they would and go further with them, Repurposing scraps, die cuts, pieces of this and that can yield results you hadn't thought of. My card today is one of those in a sense. I did have the idea of doing some birthday packages and featuring the wonderful bow in the Balloon Pop-Up Thinlits. My random piece is the gold foil candles on one of the packages. Here's my card:


My original design had the foil piece on the card background, in the right lower corner. I quickly realized the backgroud paper was waaaaaay to busy. I couldn't even tell there were candles cut out on the foil piece.  I kept working with it until I came up with putting it on a mostly Pacific Point colored Designer Series Paper. A solid color would obviously work the best, but this was close enough! Did you notice the great bows? The center one is a little different and is a framelit that makes a tag topper shaped like a bow. I just adhered it behind the package. The other two bows are stand-alone die cuts that are so pretty and eye-catching.

This is the time of year where I have mixed emotions with Stampin'Up!  We are getting close to the end of Sale-A-Bration which is always so much fun to take advantage of, on March 31st.  In mid April, we will find out the new In-Colors for 2017-2019 and get our first looks at the new annual catalog which will come out in early June.  In May, we find out what is retiring from the product line which always means saying goodbye to some favorite stamps, inks, embellishments and tools. There is alot going on!  If you have any questions, please contact me and I'll try to help. It can be confusing!
I'll do my best to keep you posted on all the latest news as it becomes available. It should be a fun few months!

Happy Stampin'!
Sarah

Wednesday, March 15, 2017

For the Bride and Groom

Hi stampin' friends!
I know there are places in the country when weddings are common all year round but we live in a place where the pace definitely slows in the winter and picks up like crazy in the spring and summer!  I've been thinking I needed to focus on some wedding cards recently. I wanted to do one that featured some new products in the Occasions Catalog and also stuck with an extremely monochromatic color scheme - all off white!  Here's my card:


I think this card is just pretty and elegant. There's something classy about either all white or all cream in anything and I love it.  The card features new lace doilies  and new flower/diamond embellishments plus some pretty ribbon available as a Sale-A-Bration freebie.  I also used the Falling Petals embossing folder, which I think actually looks like little hearts - perfect for a wedding.

There is a whole suite of products in the Occasions Catalog called "Falling in Love" which is perfect for weddings, anniversaries, etc. I've featured the Designer Series Paper several times already in previous posts.

Sale-A-Bration is close to winding down!  Don't forget to get in any last minute orders to take advantage of the free offerings for every $50 you spend with Stampin'Up!  It only comes around once a year and now is the time to stock up and be rewarded for it!

Happy Stampin'!
Sarah

Tuesday, March 14, 2017

Birthday Queen

Hi stampers!
I'm back today with another birthday card. There is always someone having a birthday and that is by far the most common reason to send a card to those you love!  This card was born out of a desire to play with a new bundle and I really wasn't sure what the end product would like like. Here it is:


The bundle is from the annual catalog, "Biggest Birthday Ever".  I was intrigued by the slice of cake and what to put on those layers. I fiddled around with color, paper and finally settled on washi tape!  Quite a diversion from where I started. I taped the washi tape on a plain white piece of card stock, taking care to line up the layers perfectly so they would show through the open slots on the piece of cake die cut. I felt like this card needed something more so I added a sparkly crown with bling... just what every queen needs!  I finished it off with a Happy Birthday and EAT CAKE!

I'm a little conflicted on whether this card was right on the mark or slightly off. I think the color scheme was different and somewhat crazy with perhaps a little too much going on. What do you think?  I would love your feedback!!

There's a great surprise coming in April's Paper Pumpkin kit - it's a kit designed by Sara, Douglass, Stampin'Up!'s CEO!  You need to sign up by April 10th to receive it and then receive monthly kits with stamps, ink, projects and more. I've been a subscriber for 3 years now and am amazed at the creativity and ideas I've gotten through Paper Pumpkin.  Sign up here:

Paper Pumpkin link

I have a feeling this is really a great kit!

No automatic alt text available.

Happy Stampin'!
Sarah

Friday, March 10, 2017

Celebrate and Congrats!

Happy Friday stampin' friends!
I recently had a great idea for a celebratory card but did not carefully think through my color choices and ended up with a U of Montana Griz colored card - Oh NO!  That is not good, but I'll show you the card anyway.  I need to make another one and switch up the colors to blue and gold to proudly represent Montana State Bobcats!  I'm showing you the inside of the card first:


The center features a stand up star burst piece that really catches the eye. I made this card 1" longer, so it was 9-1/2" rather than 8-1/2". I scored in the center and then 1/2" on either side of the center so I had a little pop up piece to adhere my starburst piece to.  Obviously you could change the theme and pop up about anything that would fit inside a card.  The "Congrats" is a new fun shadow stamp set, U stamped the Rich Razzleberry first, then the Smokey Slate with a shadow stamp.

Here's the front of the card, simple and elegant:


Instead of embossing as most of our texture folders do, this particular folder "debosses"... the image is pressed into the paper, not popped up. The rest features a shiny silver motif on a black background and some silver ribbons to top it off.

I like the versatility of this card and the extra added "surprise" of the pop up starburst in the middle. This would be a great card for upcoming graduations, tailed to a particular school's colors.

I hope you have a great weekend ahead of you and some time to be creative!
Happy Stampin'!
Sarah

Thursday, March 9, 2017

TBT - Be the Star You Are

Hi Stampers!
I am jumping into Throw Back Thursday,  TBT, again for my post today.  I love going back to some favorite paper, stamps, ribbons, etc.  The stamp set is VERY current and VERY popular!  It's responsible for my all time most popular card  which has received over 1000 pins on Pinterest. I'll share that card at the end of this post in case you are curious, but here's a new one featuring the stamp set "Beautiful You".


So, other than the stamp set, the rest is retired product that perfectly suits my theme - STARS!  I used some Irresistably Embossed star patterned paper and 3 colors of blue ink to sponge my paper. I then stamped the dancing gal with Stazon ink which is necessary because of the embossing.  I grabbed an old stamp set featuring stars and found the awesome sentiment of "Be the Star You Are" and added some sparkly pool party ribbon. I love this card and the encouragement and hope it brings.

Here's my all-time most popular pin, which you have seen before!


If you don't have this set, be sure to look it over and get it if you like it!  It's available in wood mount (#143004) or clear mount (#143637). You won't be sorry!


Have a great Thursday!
Sarah

Wednesday, March 8, 2017

Classy Copper Congrats

Hi there!
Classy and simple is what I have for you today, featuring the copper foil paper from Stampin'Up! There are times when I need something great, but quick. This card fits the bill:


The background square of copper accented paper is from the Affectionately Yours set, released last June in the annual catalog. With all the new catalogs since (Holiday 2016 and Occasions 2017), it's easy to forget about the annual catalog. I've been revisiting it lately and enjoying using some favorites. I wanted to keep this card simple and be able to use it for anything... wedding, graduation, new job, etc. I will probably come back to this design for graduation cards as I could produce quite a few in a short amount of time!  The foil paper we have is lovely to work with and so striking when die cut or embossed.  The two sheets in each package of silver, gold or copper go a long way!

Off to more crafting adventures today!
Sarah

Tuesday, March 7, 2017

Sending Smiles Across the Miles

Hi stampin' friends!
Today I am returning to a theme I've used alot this winter... hot air balloons!  I've never actually ridden in one. I think I would like to do that (think...) because of the unique experience it would be. There is a hot air balloon operator in our valley and he's out quite early on nice days sharing the glorious views with his customers. Who knows, maybe some day....

The card I have for you was part of a card swap/challenge I recently participated in. The requirements were the card had to include an In Color, use of a framelit or thinlit and some ribbon.   Here's what I came up with:


I love the mountain/valley scene depicted in the Night of Navy Designer Series Paper on the left side of the card. There are a few hot air balloons there, but just for good measure and to declare my color scheme, I also used a narrower strip of colorful balloon paper on the right side.   I had purchased the tag framelit set from the Christmas catalog later in December and didn't have the opportunity to try it out until now. I put an extra "tag" on the front of the card with a message inside.  That left the inside of the actual card for any message I wanted to write.  This card is bright and happy because of the cheerful colors that were used. It's also a good example of adding an unexpected element to a card, like a tag.   Hope this gives you some inspiration today!

Sale-A-Bration is coming to an end in 3 weeks!  Have you gotten all the free product you wanted to?  It's not too late, but SAB freebies are only available while supplies last!  Don't forget the glimmer paper, that food truck stamp, those chicken stamps or the hot air balloon paper featured above!  Once they are gone, they are gone. All you have to do is spend $50 on any Stampin'Up! product to earn a free item!  Watch your total on an order, online or given to me directly, and add the freebies every time you hit a $50 point.

I hope your Tuesday is lovely!
Sarah

Monday, March 6, 2017

Glimmer Paper Galore!

Happy Monday!
We woke up to some snow this morning. Normally that wouldn't be worth mentioning because it is usually so commonplace, but we've not had snow for a month!  I actually had "scoop dog poop" on my list of things to do today but gee, now it's all covered up again... too bad!

I have a glitzy, sparkly card for you today!  It will bring out your inner bling:


One of our freebies with Sale-A-Bration is a wonderful pack of 12 6 x 6 sheets of glimmer paper in Sweet Sugarplum, Mint Macaron and Bermuda Bay. They are gorgeous!  I thought we needed a card that featured these lovely colors.  I've seen several variations on my idea, using the Stylish Stems Framelit dies, with a peek-a-boo feature. you cut out the flowers on a large piece and then place some other paper behind it. For this card, I used the Sweet Sugarplum glimmer paper. I then added some more glimmer paper with the leaves. I popped up the white piece with some dimensionals to give it some depth. As a side note, I used our shimmery white paper for some extra sparkle!  This was a fun and easy card to make. You could also add sentiments on the front or inside.

Want to get your own glimmer paper?  All you have to do is spend $50 on any Stampin'Up! product and choose that as your freebie - it's that easy!  There is also a stamp set that coordinates with these framelits, see that listed below in the supplies.

Hope you have a great start to your week and keep on crafting!
Sarah

Friday, March 3, 2017

Balloon Pop-up!

Hi friends,
Today I have a fun card we made at a recent card class that features a inside pop-up design! These are super easy to make with the right tools... framelits and a Big Shot! Here's my card:


The inside of the card is truly the star.  I cut a slightly smaller piece of white cardstock, ran it through the Big Shot with the balloon popup die and stamped before folding and adhering it to the inside of my card. There are lots of options for variety including stamping, adding die cuts over the balloons (which I did here), washi tape accents, more stamping, etc. Framelits make everything so easy because they are so easy to use. I've added a closeup picture of this bundle so you can see it better!


See, lots of options!  Celebrating birthdays never gets old (pun intended?) and the fun you'll have with this bundle won't either.

It promises to be a great weekend here in Montana!  Hope the same is true, wherever you are!
Happy Stampin'!
Sarah

Thursday, March 2, 2017

Life's a Journey - Enjoy the Ride!

Hi there stampers!
I'm back today with another card featuring a fun inking technique! This one is a little crazy but oh, so fun!  The idea was to create a brick wall as a backdrop for a great motorcycle image. Here's my card:


The stamp set is featured in the annual catalog and is sure to attract lots of love from fans of motorcycles.  I want to focus on the brick wall!  The background brick wall is a piece of watercolor paper that I got fairly wet with my Aqua Painter; just water, no color at first. When the paper was pretty wet, I applied 4-5 drops of Cajun Craze reinker to the paper. As you can imagine, the ink exploded into starbursts and ran all over because of the water that was already on the paper. I used my aqua painter to spread it around a little bit. Quickly, I then ground coarse Sea Salt over the whole surface. The Sea Salt did really fun things to the ink from crystalizing it a bit to making it darker. It have the paper some texture. I used my heat tool to dry the paper and then rubbed off the bigger flecks of Sea Salt. I then embossed the paper in my Big Shot with the Brick Wall embossing folder. There it was ... a perfect, aged brick wall. This technique is easy to adapt for any color or design, just water, reinkers and sea salt.  This was one of the most popular techniques I demonstrated at my recent "All About Ink" class. I'll be doing another one at the end of the month and due to popularity, will do many more!

Rubber stamping as a craft and industry has exploded in the last 5-10 years!  It's a hobby and art that can take many forms, be tailored to any budget and provide hours of entertainment, relaxation, creativity and therapy. Contact me if you are interested in learning more!

Happy Stampin'!
Sarah

Wednesday, March 1, 2017

hey chick!

Hey stampers!
I have something for you today that just makes me smile. I don't really resonate with it at all; I've never lived on a farm or owned any chickens, but this still gives me a warm and fuzzy feeling. Who knows why?!!  Curious?  Here it is:


Isn't that the greatest chicken ever?  Maybe I like it because it reminds me of my bad hair days!  Anyway, this is a sweet, fun stamp set available as a Sale-A-Bration freebie choice with any order over $50. There are other chickens as well, but this is the one I chose to use for this card. My background paper is not from Stampin'Up!, but something I had kicking around in the craft room and it fit the theme. I also really like this color scheme. I have been dabbling more with gray as opposed to brown, black or navy blue. I really like it paired with the pop of Watermelon Wonder. I colored the chicken with my watercolor pencils and then blended the color a bit with a blender pen. Once again, I'm featuring the Stitched Shapes framelits!

We are down to the third and final month of Sale-A-Bration! I hope you have had a chance to look over all our new products and make some fun choices to earn some freebies. Let me know if I can help in any way. It's a great time of year for stamping!

Happy Hump Day!
Sarah