Independent Stampin'Up! Demonstrator!

Hey friends!
I've been a demonstrator with Stampin'Up! since 2011. I'm located in Bozeman, Montana, but have customers all over the country. I have a very fun and active downline called "Big Sky Stamper Stars" and we get together in person and online to share what we love. My blog posts feature what I'm up to recently and I try to share new product information, tips and tricks and creative inspiration. You can shop from this site or find out more information about our products and becoming a demonstrator! Thanks for stopping by!

Friday, June 30, 2017

Time to get out the chairs and umbrellas!


Hi Stampin'Friends!
As we get closer and closer to the 4th of July, I'll bet many of you are heading out on an adventure of some kind this weekend!  The campgrounds, trails and lakes will be packed around here!  The weather forecast is for lots of heat and sun so that will definitely add to the fun!

I have a fun card today featuring a beach/lakefront/ballgame/concert in the park scene... you pick!  You've seen those comfy beach chairs and umbrellas to shade you and I decided to recreate that image! Here's my card:


I combined two popular stamp sets and framelits, "Colorful Seasons" and "Weather Together" .  I sponged some Crumb Cake ink on my Soft Sky background card stock to look like some sand. I then stamped the three chairs and matching umbrellas which were cut out with framelits.  There seemed to be something lacking so I added the stick on dot at the top of the umbrellas!  I thought this would be a great card to send to someone special that you've vacationed with or spent some relaxation time with.

It's fun to try and combine different sets. It makes the creativity go that much further ;)

Hope you have a great and safe weekend! Be sure to check back Monday when I'll have all the details of some special promotions coming up in July! You won't want to miss out!

Happy Stampin'!

Sarah

Thursday, June 29, 2017

The Light You Shine

Hi Stampers!
Do you ever find yourself drawn to something that really has no basis in your surroundings or reality?  That's the case for me with lighthouses!  I don't know why I think they are so cool, but I do. We traveled to the Oregon coast years ago and toured as many as we could. I think I've been fascinated with them since watching the old Disney version of "Pete's Dragon" at the movie theater. There is something about their role as marking the coast to weary travelers, signaling light for those in trouble and whatever other purpose they serve. I know with our technology these days, they are somewhat obsolete, but they are still very cool.

I have a card today creating a lighthouse scene that was a whole lot of fun stamping! Here it is:


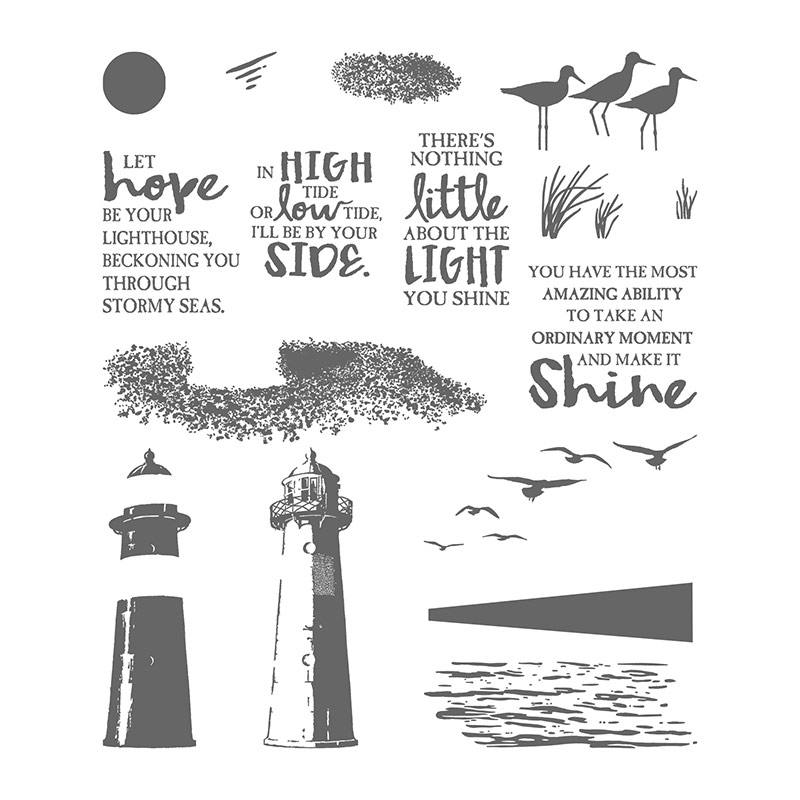
The stamp set is "High Tide" and has tons of elements to create a scene including water, land, lighthouses, birds, light, etc. I cut my lighthouse out after a stamped it and popped it up on dimensionals to give it some depth. It's a little hard to see, but I also added some Wink of Stella to my shining light for some glittery glow.

Here's a peek at the stamp set so you can see all the details:


I want to play with this some more and try the grasses and shore birds and maybe double stamping the light house with a lighter color first, then a darker color on top. I need to experiment with that one.

Thanks for joining me on my ocean-side adventure today. I've lived land-locked my whole life in SD, WY and MT so the ocean is a marvel to me, a little scary with a lot of intrigue!

Hope you are having a great week as we hurtle towards the 4th of July!
Happy Stampin'!
Sarah

Wednesday, June 28, 2017

Crate of flowers!

Hi Stampin' friends,
I'm sure you've noticed what a big deal wood crates are in DIY projects, wedding themes, storage and organization around the home, etc.  I really like the ideas I've seen and of course, why wouldn't we want that for our papercrafting themes?!  Stampin'Up! has two wonderful products that will help you create a wood crate, for either a card or a 3-D project such as party favors or gift holders. What could be better?  Here's a card we recently did at a class showcasing both products:


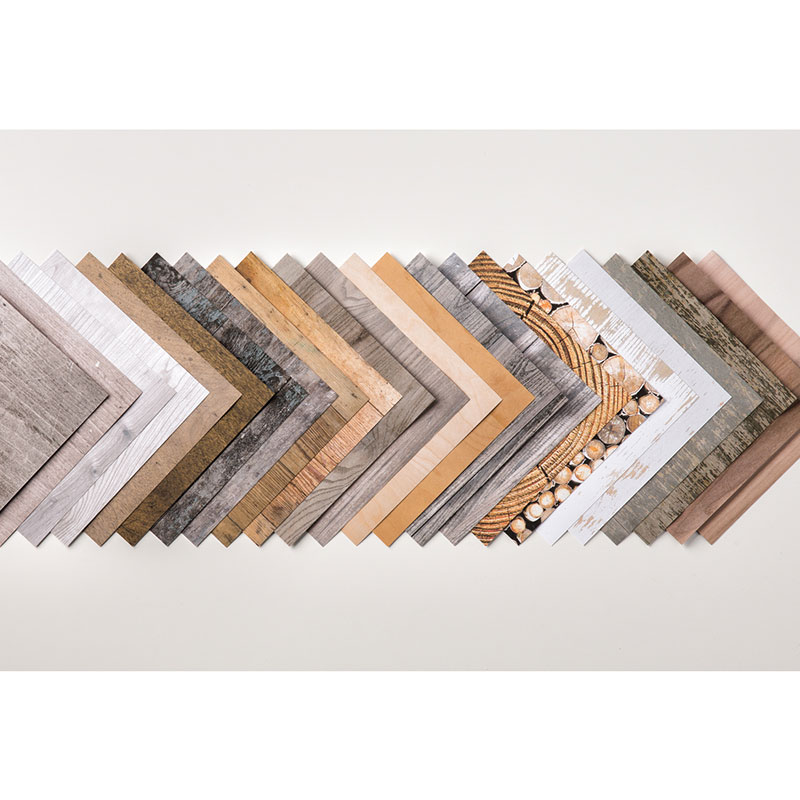
The first product is a 6 x 6" collection of different wood Designer Series Papers. They are all wood designs, but different colors, textures and woods.  I have already used this paper a bunch! Here's a closer look at it:
I'm sure you can see there are a bunch of possibilities with this terrific paper. Won't it be great for masculine-themed cards and projects especially?

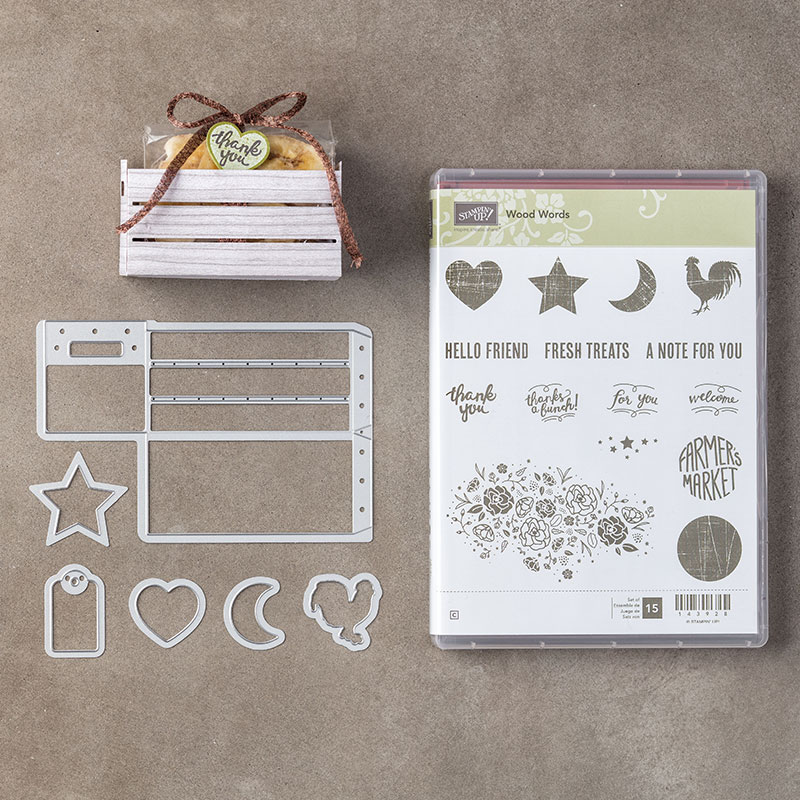
The second great product is the wood crate die and coordinating stamp set:


Again, there are tons of options. That flower background stamp is already a favorite of mine. Did you notice the rooster? How cute is that?!

Back to my card. We cut out one cutting of the wood crate die on some wood paper of our choice. We trimmed off the bottom section and just used the sides. We folded the crate piece where the corner would be and then glued it so that it "tented" a bit on the card, giving it a 3-D appearance. We then filled it up with flowers and leaves from the Falling Flowers bundle which is my current "go to" bundle for anything floral!  We added some new ribbon, the small grosgrain stripe that is available in all the 2016-2018 colors. It is really cute and added a little interest to the project. I hope you also noticed my background stamping!  We have a new background stamp of tree rings... I will be using this a ton too!

Let me know if you need some wood crate supplies in your stash!  This is a great bundle, at a great price and you save 10% when you purchase the stamp set and framelits as a bundle.  You can order online yourself by clicking on "shop now" just to the right ====>>>>>

Thanks for stopping by and taking a gander at what I've been up to!  I love this form of art and would love to get you hooked on it as well! All it takes is a little bit of paper, ink and rubber and you will be off on your own creative adventure!

Happy Stampin'!
Sarah

Tuesday, June 27, 2017

Thank You - CAS (Clean and Simple)

Hi Stampers!
I have a Clean and Simple card for you today. These are cards that don't require a lot of supplies to make or a lot of fuss to create. They are great for when you need something quick or want to maybe stamp with some friends for a fun get together. Here's my card:


I started with some Naturally Eclectic Designer Series Paper to determine my color scheme. It's bold and bright which I really wanted. I used a retired embossing folder with an arrow pattern on my card base and glued the DSP on top. I then grabbed a thank you stamp (from Background Bits hostess stap set) and stamped it in every color that is featured on the DSP. Here's a hint. Start with a good sized piece of Whisper White card stock, do your stamping and when you are done, trim it to the desired size. I wasn't sure how big this would be until after I had stamped all the colors. If you absolutely have to have perfection in lining up your stamp, use a Stampamajig but if you are okay with "close enough", eyeballing it works too. That's what I did, just eyeballed my placement of each stamp. I placed the colors in somewhat of a rainbow order.

Now and then, it's fun to just make it simple! This card could be reproduced in any colors you might have and with any stamp you might have. While I'm always buying new stuff, it is important to use what you have as well! I love giving a neglected stamp another try.

There are some great promotions coming in July with Stampin'Up!  One is for any new demonstrator that signs up in July. In addition to your Starter Kit that you select, you will get a free stamp set (a new Christmas set from the 2017 Holiday catalog) and a free stamping essentials gift pack. Watch my blog for more details! My team of demonstrators is called "Big Sky Stampers" and we would love to welcome you! We get together in person a few times a year for fun, talking shop, stamping, etc. We also have a private Facebook group to share ideas, ask questions, celebrate each other's accomplishments and encourage each other. Ask me for more details if you are interested.

Also, Bonus Days will be back in July!  For every $50 you spend, in July, you get a $5 coupon redeemable in August on any purchases!  Review your wish lists and see what you might want to buy to take advantage of this promotion!  There's always more around the corner with Stampin'Up!

I'll be blogging more about these special promotions in the future so watch for details!
Happy  Stampin'!
Sarah


Monday, June 26, 2017

Do Something Creative Every Day!


Happy Monday Stamper friends!
Are you ready for another week?  I started mine off by sleeping in unintentionally! I was having a terrible time with sneezing last time and took some of my husband's Zyrtec for allergies (which I never thought I had) and it konked me out for about 10 hours. I'll have to try that again some time !

I have a fun card today featuring a wonderful new stamp set with a crafty theme!  This set works well for seamstresses, quilters, writers, painters, stampers, etc. It celebrates the craftiness in most, if not all, of us! Here's my card:


I used a few tools to create this card. The ink color coming off the paint brushes was created by gently squeezing closed ink pads and pulling some ink up onto the lid of the pad. Then, I took ink from the lid with an Aqua Painter and brushed it from the paint brush bristles , in an upward motion. This is done on water color paper and it is really fun to get good, watercolor-like effects. I did all the same color strokes at once, flushed the Aqua Painter until clear water flowed again, then switched colors.  For the handle part of the brushes and the pot, I used my watercolor pencils and blended the color a bit with a blender pen. The whole thing was very satisfying as it was a card celebrating creativity and it used some additional processes to create besides rubber stamping alone.  I hope you'll give this a try sometime!

Here's a closer look at the stamp set I used to create this card:


This stamp set is important for another reason... It also complies with the requirement of Stampin'Up!'s Angel Policy. If you sell any projects with Stampin'Up!'s art work, you need to include the (c) Stampin'Up! on your work for copyright purposes.

I don't know about you, but I'm looking forward to another week of crafting forever and housework whenever! ;)

Happy Stampin'!
Sarah

Friday, June 23, 2017

A Pocketful of....

Hey friends!
So far, summer is bringing out the best in me.... I'm creating, exercising, biking, seeing new countryside, visiting with friends, getting a few chores done, etc. I no longer have a rigid schedule any time of the year, but summer still seems laid back and with more time to be spontaneous and flexible. I'm having some time to try some ideas that ruminate in my mind and are finally making it to paper and ink.  I wanted to feature a different set of stamps and framelits today that didn't catch my eye at first, but now that I've spent a little time with them, I think I'm a fan!  Have a look:


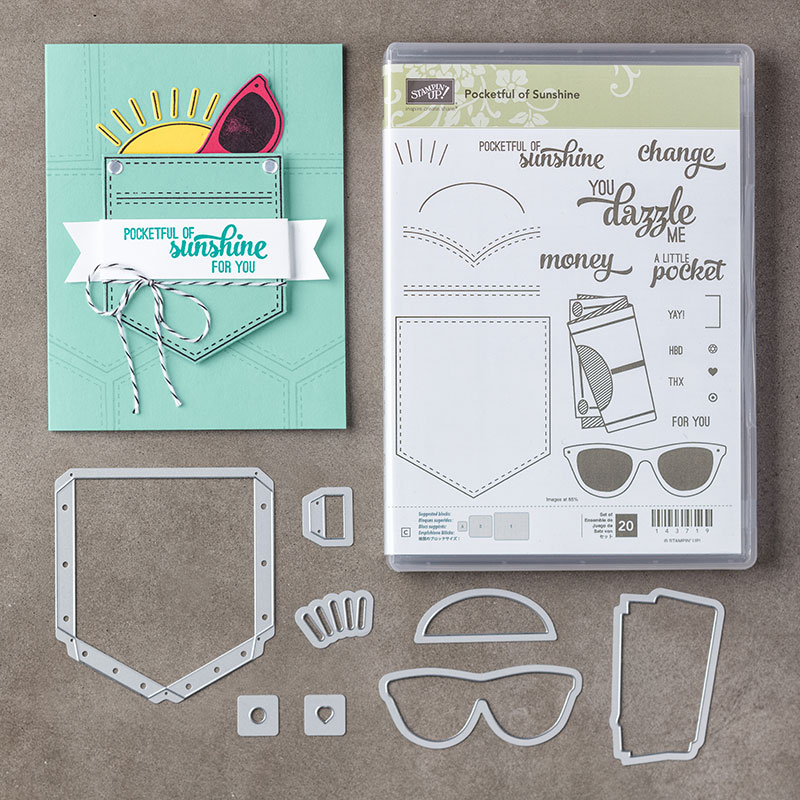
This is from the "Pocketful of Sunshine" set!  Since it's a pocket, I decided to put something in it including a tag, a stamped image of cash and I will add a gift card when I use it.  I wanted to be traditional with my color scheme and make a blue jeans "pocket" so I used "Dapper Denim" for my pocket piece, which was a no brainer. I then used some craft White ink to stamp the stitching on the pocket and of course added just a touch of bling.  I wanted to make this a bit more gender neutral so paired the Dapper Denim with Lemon Lime Twist and used pieces of Designer Series Paper from the Eastern Palace Suite.  I used Garden Green ink for my "cash" to try to make it look a little more realistic.

Here's a look at the bundle so you can see all the different options for creating a project:


I have some more ideas for this set and summer time is the perfect time for sunglasses and sun images!  So, back to the stamp room and drawing board!

I hope you have a fun weekend ahead of you. Summer time is something to savor but it sure goes by fast, especially when it is so short in Montana!

Happy Stampin'!
Sarah

Thursday, June 22, 2017

A Wonderful Life Together

Hi Stamper friends!
I'm back today with some new work from my stamping studio/craft room. I don't want to make it sound to pretentious... it's a spare bedroom where I can escape and create - haha!  Today I have a card that would serve double duty.. a wedding greeting or an anniversary card!  here it is:


I had a couple of goals with this card. I have been trying to design a card using our acetate sheets that have gold designs on one side and silver designs on the other. I was excited about them, thinking they would be super useful and it turns out they are harder to incorporate than I imagined!  I've made a few cards now that I haven't been crazy about but this one seemed to work. I chose the gold side of the polka dot acetate sheet.

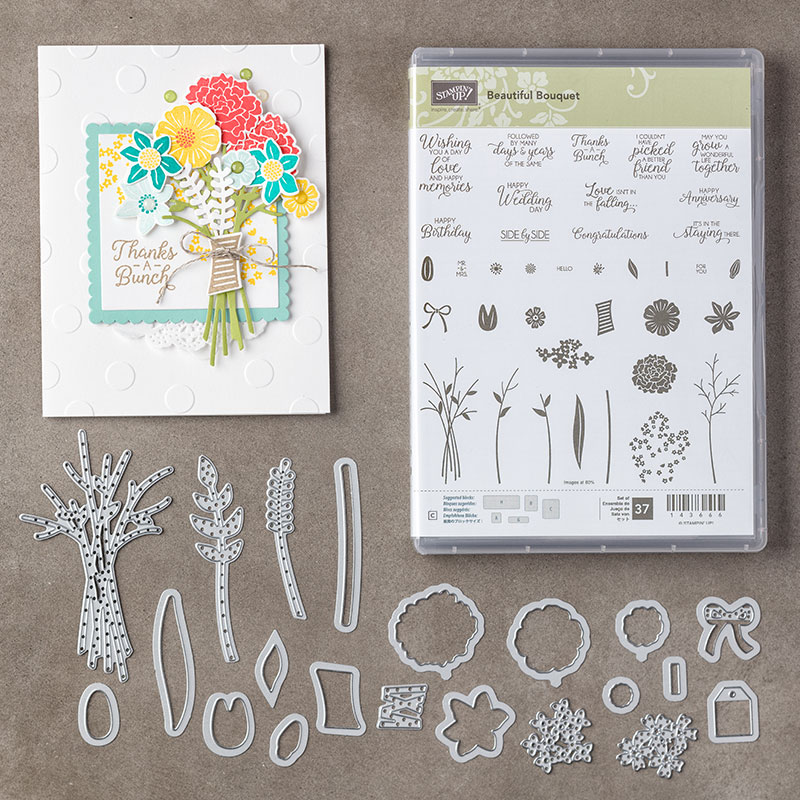
And the flowers... more flowers!  Can we ever get enough?! This is a new bundle called "Beautiful Bouquet". There are tons of flower, leaf and stem options between the stamps and the framelits but the true value of this set is the many versatile sentiments. If I was a new stamper with a big shot, this would be a must have set for that reason alone! Here's a peak at the set:


You can see what I mean about all the options! Obviously you can make any kind of bouquet in any color scheme.  I also used this set to stamp a card and here it is:


I was trying to capture the sense of a field of blue flowers that we see when we are out hiking or 4-wheeling in the mountains. They are prolific this time of year and so pretty.  Here's the real thing:


This picture doesn't do them justice and they look more purple than blue here, but they are blue! Speaking of nature, you sure see a lot of Lemon Lime Twist out there among the leaves!

If you like what you see and would love to create some projects with stamps and ink, contact me and I'll get you started!  It's not expensive to get going on a project and gradually grow your stash of supplies with some well thought out purchases or even our monthly craft kit called Paper Pumpkin. This is a sport that all can play! Think about it !

Happy Stampin'!
Sarah

Monday, June 19, 2017

Sunshine!!

Howdy Stampers!
It's summer and I'm sure the sun is shining on some beach somewhere!  I live in Montana so I have to pretend sometimes and imagine the warmth and awesomeness of it all. If I could be on a beach, I would want to be here:


I love the blue sky, the warm sand and the comfy chair!  I combined several things for this card and all are listed in the supplies!  When I stamped my chair frame partly on card stock and partly on real sandpaper, it didn't stamp the best so I took a Stampin'Write marker and went over the lines a little more thoroughly. I stamped and cut out the chair part separately to make it more 3D looking.

Don't forget to think outside the box and combine alot of framelits and stamps to create your perfect card!  There are so many possibilities! Have fun!!

Happy Stampin'!
Sarah

Friday, June 16, 2017

Leafy Thinking of You - CAS (Clean and Simple)

Happy Friday fellow Stampers!
Sometimes simple is just the ticket!  I got to looking at the "Colorful Seasons" stamp set and noticed the pretty leaves (they are maple I think). I usually associate really pretty leaves with autumn and the rich fall color tones. In a moment of clarity, I realized how fun it was to see all the trees in my yard pop out this spring in many shades of green. Duh... leaves on cards can be green too!  After that "aha" moment, I checked out the Color Theory paper and realized that it would be perfect to stamp on and then die cut. Here's my simple and leafy card:


I used some Color Theory Designer Series Paper (DSP) for the background as well as the leaves. I also used some new mini Chevron ribbon in Old Olive which is fabulous to work with and tie. My branch is a die cut out of Early Espresso but you could just as easily stamp it.  What a simple card and easy to make. After I stamped my sentiment, I thought about how great of a sympathy card this would make as well. Here's a picture of my stamping so you can see how I maximized the paper use.


So what do you do with leftovers?  Here's an idea!


Right away, after I had cut my leaves out with the framelit, I realized that because I had stamped in a line, I could use this piece as part of a card too. Just for fun, I daubed some brown ink around the edges and placed some of our new Wood Textures DSP behind it. I then used a Soft Suede card base and embossed it with our very popular Woodlands embossing folder. It was easy to grab a sentiment and finish up the card. In a way, I got two cards out of one idea!  Next time, before you toss that scrap in the wastebasket, take a close look at it and see if it can be repurposed into something else! You never know!

Here's to scraps and unintended leftovers that are repurposed into something wonderful!
Happy Stampin'
Sarah

Thursday, June 15, 2017

Background Bits Thank You

Hi Stampin' friends!
One of the things I'm always excited to check out are the Hostess Stamps in our catalogs. They are usually at the back of the catalog, require a minimum purchase to be able to order and are such a great value!  I think they are often some of the more unique and trendy stamps that Stampin'Up! comes up with!  You can get 1 or 2 of them with an order in the $150-$200 range!  My first choice was the "Background Bits" stamp set. I love anything with a vintage, collage feel to it and of course anything with a antique script. This stamp set had them all!  Here's my card:


I tried to work as many elements in as I could and used the Naturally Eclectic Designer Series Paper (DSP) to direct my color palette. Are you wondering about that new looking ribbon?  It's a great new ribbon offered in all of last year's In Colors (2016-2018). You can resist stripes and when the ribbon is narrow, even better!  I love this card. Here's a peek at my process/supplies:


It's easy to be inspired with such beautiful paper and stamps and colors. Contact me if you want to know how to get this stamp set for yourself!  It's a keeper ;)

Happy Stampin'!
Sarah

Wednesday, June 14, 2017

Embossing paste - Whoa... that's fun!

Hi there stampers!
I have a fun post today. I want to share my first experiment with our new Embossing Paste!  Here's my card and I've got lots of pics and details for you and a video!


I wasn't so sure about what embossing paste even was, but knew I wanted to try it!  It is a paste-like substance that is thick like a frosting but very spreadable. It dries really quickly and can be died with our reinkers to any color!  How's that for a fun new tool in your tool belt?

Here are some pics of my experiment:


The container of paste you can order is good sized. I think it will last for a lot of projects. You can also purchase knives (spreaders) and masks (like stencils) to use for your project.


There are several masks to choose from but any stencil will work. I've already decided the clouds and bricks will be my favorite before I even try them!


It's easy to put some paste on your knife and spread it around on the mask, which is over the card stock. If you are worried about your card stock or mask moving around too much, tape them down with some Washi tape temporarily.  As soon as you are done, wash the knife and mask off with warm soapy water so the paste doesn't dry on there!


Carefully peel off the mask and look at your embossing!  It's amazing!  It will dry relatively quickly but you can always speed the process up by using your heat tool for a few minutes.


That was so fun, I decided to try the clouds too!  The embossing gives a raised look that is really interesting and unlike heat embossing with embossing powder or dry embossing with embossing folders.


And you can finish it up into a card!  I can't wait to try coloring my embossing paste (use our silicone mat for best results with a dab or two of embossing paste and some reinker drops). I'm completely enamored with this new technique!  Here's a quick video I put together demonstrating this whole process. I apologize for having my phone "sideways" when I was videoing... learn something new everyday, right?


Interested in trying this for yourself?  My materials that I used are listed below and click on any of them to get you to the store!

Happy Stampin'!
Sarah

Tuesday, June 13, 2017

Life Happens, Coffee Helps

Hi stampers!
There were so many new products that caught my eye, it was a little difficult to choose where to start. You may be surprised that my first choice of suites was the Coffee Cafe. Why is that, you say?  Well I don't drink coffee for one thing!  I like the smell of it in a coffee shop, but haven't been able to develop the habit for myself. I tried really hard in college when I was first exposed to the "coolness" of drinking coffee, but blech.....couldn't do it. All this is to say there is something to love in this set for even the non-coffee drinkers like me!  I love the color scheme of pale blue, dark brown and rich green.  The Designer Series Paper set is creative and unique and the framelits, especially for the "to-go" cups are adorable!  Here's my first card with this fun set!


The best part of this card is the sentiment. I know many people who subscribe to this motto!  I added some fun details to my design as well. I used the coffee bean stamps and framelits as well as the little corrugated element tag in the corner. I especially want to draw your attention to the background, to a new product that would be easy to overlook on this card. It's the dynamic textured impressions embossing folder, "Pinewood Planks". These type of embossing folders are thicker than the standard ones and create an especially deep embossing texture. If you want to go even deeper, spritz your card stock lightly prior to embossing - that really bends the paper! After I had embossed, I used the coffee ring spill stamp from the "Timeless Textures" stamp set for some added interest. In spite of all that detail, the to-go coffee cup is my favorite design element!  There are so many possibilities with the cup and the hand cooler sleeve.  I've listed all my supplies below so you can see what I used. Click on the picture and you'll be directed right to the store!

I hope you have a great day today, especially if you are a coffee fan and are inspired by my card!
Happy Stampin'!
Sarah

Monday, June 12, 2017

Tranquil Tulips


Good Monday Morning, Stamping Friends!

Some weeks, it's a little rough to get going on Monday and I think this is one of them!  I woke up out of a dream I no longer remember but for some reason, I feel bogged down in spirit. I guess the subject of dreams is something I don't really want to talk about so I'll move on to stamping which always cheers me up!  One of the cheeriest things I can think of each spring are tulips!  I don't have any in my yard but many neighbors do and I love to see them pop out with the promise that summer is coming and the threat of snow is just about gone (never say never in Montana).

This year, in the new Annual Catalog, there is a great Hostess Set available to purchase with any order over $150. It's called Tranquil Tide and it's a two-step stamp set that features TULIPS!  Here's my card and also some pictures of the project along the way:


Here's a pic of the beginning of the stamping... I used Melon Mambo as my base color for the tulips and Old Olive for the stems and leaves:


With multi step stamping, you always want to use the lightest color for the stamp with the most coverage and then come back with a 2nd or 3rd stamp with progressively darker colors. I then added some Berry Burst with my second stamp/color:


And finally, I added some leaves. I hadn't used this stamp set before so I wasn't completely sure how far out to space my stems, but I did stamp those first and fill in the flowers. I was hoping it would look like a bouquet when I was done:


I then added a little bit of Designers Series Paper border on top and bottom and a sentiment and Bitty Bow from the new In Colors collection.


This was a fun card to make and I think the color scheme is bold and beautiful.  Multi-step stamping is so fun and not that scary at all. With our photopolymer stamps that are completely clear, placement of stamping is easy!  There are multiple stamp sets in the catalog that work this way. Contact me for details and I'll get you started on your own masterpiece!

By the way, in case you are wondering, my sentiment and "pennant" die cut are from the new Birthday Memories suite/bundle. I have used this exact piece on about 4 projects now so I'm guessing it will be a new favorite!  My supplies are listed below and clicking on them will take you right to the online store!

For now, Happy Stampin'!
Sarah

Friday, June 9, 2017

Friend ~ You're the Best!

Happy Friday Stamper Friends!
Man, the weeks go fast, don't they!  I always feel like the week is stretching out pretty long before me on Monday and Tuesday, then I turn around and it's about noon on Friday. What happens? If you figure that out, let me know please. I'll bet I could get a lot more done!

No matter how fast time flies, we should still take time to let a friend know how much they mean to us. I'm guilty of thinking about this way more often than taking the time to express it verbally or with a handmade card. I have a card today that would be just the ticket for a dear friend!


My card uses the new "Lovely Inside and Out" Bundle, however, I just used the framelits this time.  There are three of them which say "Friend", "Hugs" and "Lovely".  They come in an outer shape of a circle, oval and heart so you can add other framelits to cut outside and complete the circle, oval or heart if you want to, which is what I did. My "friend" piece on the front of the card actually used 3 framelits, the "friend" one from this set, an oval from the "Stitched Shapes" set and an oval from the previously retired ovals set for the white piece. I wanted the white card stock behind the "friend" die cut because my background paper was just busy enough that the word didn't pop like I wanted it to. I added a half doily, ribbon and some Fresh Florals Designer Series paper, all featuring the new In Color, Fresh Fig. Here's a peek at the framelits so you can get a better idea of how they work! This picture is taken from the Stampin'Up! website:


Are you curious about the inside, especially the leaves?  Believe it or not, that stamp comes from the
"Numbers of Years" set - a little obscure when you are thinking about leaf sets, but I love the stenciled look of it. I used Tranquil Tide for the ink, another new In Color. The punched out piece and sentiment are from a fabulous new bundle, "Label Me Pretty".  One of my favorite things is combining stamp sets and tools from a wide variety of styles and products. I think that is how you can get a unique design that perhaps no one else has thought of before. I love my art to be wonderful and wonderfully unique!

My supplies are listed below for convenient ordering if you're tempted!  Remember if your order tops $150 or more, you start earning Stampin' Rewards good for free product. Contact me for any questions or how to make the most of your order!

Hope you have a great weekend!
Blessings,
Sarah

Thursday, June 8, 2017

By the Shore - Just Breathe

Hi Stampers,
It doesn't take you long to realize that the "Colorful Seasons" bundle is going to be a big seller with Stampin'Up!.  What a marvelous combination of interesting stamps and framelits to make many different themes and scenes. I played with it extensively yesterday and want to show you my personal favorite today.  Here it is:


I combined the "Colorful Seasons" stamps with the "High Tide" set. Just Breathe is such a popular saying right now and can be used for so many reasons. We breathe all the time, but there are definitely times when we need to be reminded because of the hustle and bustle around us.  The birds and water are from the "High Tide" set.  I used a piece of Whisper White background and lightly daubed with some Marina Mist blue for the sky. I used Pacific Point for the water and Early Espresso for the birds.  My "Aha" moment came when I realized some sand paper would make a great beach!  After digging around in the garage for a bit, I found just want I needed. Sandpaper is easy to cut, but a little hard on your trimmer so use an older blade if you can!  The Adirondack chair is hands down the favorite thinlit so far!  I would love to sit here... how about you!

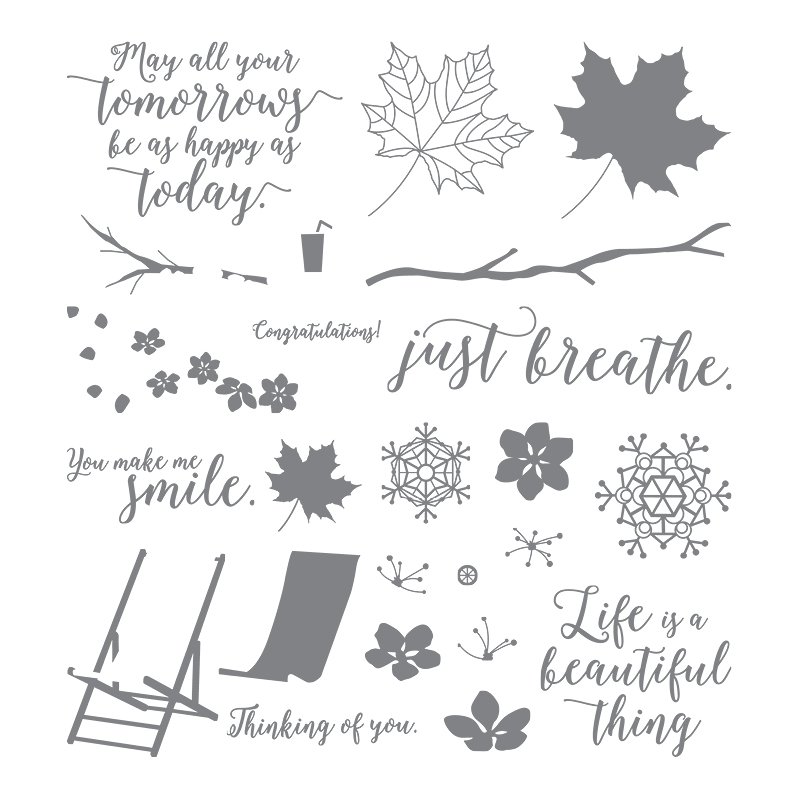
Here are closer looks at the stamp sets so you can see all the possibilities!


I made several different designs with these sets and I'm not done yet!  I have never lived by the ocean, but lighthouses seem really cool, don't they? What would be your ideas?

I can't wait to see what's next every day I sit down with paper, ink and rubber!  What a fun, therapeutic and creative hobby!  Let me know if you want more information. No particular skill or talent is required and it's something all ages will enjoy!

Happy Stampin'
Sarah

Wednesday, June 7, 2017

Featuring Fruit - Using up the last bit of Designer Series Paper

Hi stampin' friends!
I have a fun challenge for you today... Take a look at your paper stash and pick out a coordinating set of DSP that you only have a few dabs of left. You may have to search and search, or it may be right on top. What do you do with less than whole sheets of paper? Toss them out?  NO WAY!  Here's my idea!

Gather up the bits and pieces of what you have left of a DSP pack and somewhat sort according to size. Take the biggest piece and think about how you could cut it up for some cards (this is a great way to mass produce about 10-15 cards). Is it a full sheet or almost?  Can you get some large background pieces out of it?  Look at the other papers and once you have a number for # of cards in mind, think about how to cut the remaining pieces in about 5-6 smaller pieces and keep going.  Then, fiddle around with layering of different DSP's on a card. Add a sentiment, some ribbon or embellishments and you are done!

Here are the results of what I did a couple of days ago with the remaining dregs of my Fresh Fruit DSP stack.  I only purchased one of these so I didn't have a lot to work with but was shocked by what I ended up making. When done, I think I made 6-8 of each card:


Those of you who have been around Stampin'Up! for awhile will notice some retired product and some non-SU stamps but that is the fun of it... using up some dabs of this and that and creating some pretty cards.  Since these are all fruit related in theme, it would make a nice set of card to wrap up as a gift for a friend. I should do that!

Hope you like my idea of using the bits and pieces that remain after your grand project is over. If life depended on throwing things out, I would starve because I never do!

Have a great day of creativity!
Sarah

Tuesday, June 6, 2017

More Happy Birthday!

Hi Stampers!
Today I want to feature the stamp set that is bundled with the "Happy Birthday" thinlit I posted yesterday!  Together, they cover all the birthday bases in card making!  Here's my card:


This card was also part of a recent "In Colors" class that I did and I chose to use Powder Pink, Berry Burst and Tranquil Tide for my color scheme. I hope you notice the little bit of Early Espresso I added, including the tiny ticket border at the top. That was a new border punch and I wanted to incorporate it into my class. I'm trying to show as many new products as I can in each class and project!  The stamping for this card was fun and features a solid color flower with an outline petal stamp that is stamped on top.  It doesn't have to be stamped precisely, although there are notches on both stamps if you want to line them up. I think it looks good just random ;) What do you think of the new color scheme? My background Designer Series Paper is from the "Delightful Daisy" DSP set. Curious about all the new Designer Series Paper? Watch this short video for a closer up look at each set!


There's a lot of creative fun and color scheme ideas in there, right?  Watch my blog for more!  I have the Coffee Break paper and Birthday Memories paper on order and can't wait to see what I come up with when they get here!

Happy Stampin'!
Sarah


Monday, June 5, 2017

In-Color Tie-Dye birthday card, sorta!


Hi stampers!
I'm back for another week of fun with the new catalog!   I'm having so much fun with the products I've been able to obtain so far. I've purchased some and cashed in some freebies from Sale-A-Bration and either way, there's some new additions to the stash in the craft room!

I have several fun things to share today. My favorite are the new In-Colors for 2017-2018!  At first, I wasn't sure but now I'm a huge fan!  They really look well together and are fun to play with. Here's my card and then I'll explain some more:


I decided I wanted to use all the new colors in an equal way, not letting any one or two colors dominate too much. I thought maybe blotches of all the cards would be cool and that's what I ended up with. My technique included coloring "blobs" of color with markers on watercolor paper, one color at a time.  I left some white space in between my "blobs". I then used an Aqua Painter to spread the ink around some, again, one color at a time, with flushing the Aqua Painter out in between colors. It only took a few minutes to dry and while that was happening, I grabbed the new "Happy Birthday" thinlit and cut it out with black card stock. I glued it with my Fine Tip glue pen and added some retired sequins.  You'll see some Lemon Lime Twist card stock peeking out as a frame around the watercolor piece. I could have made several of these, they were so fun!

Have you started your wish list yet? Where to start, right?!! There's a hostess promotion going on the whole month of June so if you feel like hosting your own party at your house with your friends, let me know and I'll show up with all you need to have a great crafting experience!

Until tomorrow, Happy Monday!
Sarah

Thursday, June 1, 2017

NEW ANNUAL CATALOG PREMIERS TODAY!!

Hi Stampers!
I know I always get excited to share when there's a new catalog out and today's no exception!  I've gotten one into many of your hands and I'm sure you have at least a preliminary wish list started!  There is a link to the new catalog just to the right on my blog!  Click on it for a PDF file of the catalog or click on "shop now" to go directly to the store and start filling your shopping cart!  The best thing about annual catalogs is that we have a whole year to pick and choose!

Have a great day and have fun perusing all the new products!


MainAd_AC2017Launch_demo_060117_USCA


Happy Stampin'!
Sarah