Saturday, October 31, 2020

Gingerbread, Gift Cards, Paper Pumpkin, Oh My!

 Hey Friends!

I have a quick post today to remind you about Paper Pumpkin and a sneak peek at what they have lined up for November! Of course, with the holidays soon arriving, we are thinking about gifts and how many of you quickly reach for gift cards as your go-to present idea? I know I do because sometimes, people are just hard to shop for, aren't they!

Paper Pumpkin wants to help! This is our monthly stamping kit subscription that you sign up for and then receive each month, with the option to pause it or cancel it at any time. It's generally a surprise but they give us hints each month and this one is sure to be a winner.  I'll repeat this several times, but if you want one of these kits, you do need to sign up before November 11th!

November's kit will be all you need to make 15 adorable gift card holders, featuring a gingerbread theme. 


I can't wait to see the details! It looks like even the box is special!  Of course, they always include extra supplies and if you don't need gift card holders, you can easily use the kit supplies to make whatever you want. So often people turn the pieces of the kit into cards!  Here's a fun video to tempt you too:


My mouth is watering, how about yours?  I don't want you to miss out on the fun! Click here and follow the steps to sign up for your very own Paper Pumpkin!

Paper Pumpkin Sign-up!

Maybe I should do some baking this weekend?!! I'm sure in the mood now! Have a good one!

Sarah


Friday, October 30, 2020

A Fresh Look at Toile Tidings DSP

 Hey Stampers!

Hope you are sailing into a great weekend this Friday morning! Our weekend looks much more promising and warmer than the last with our early subzero temps last week....brrrrrr. It's not difficult to think about Christmas and snow when it's -20 degrees out! 

Last year, one of my favorite packs of Designer Series Paper was called "Toile Tidings". I've always been drawn to a "toile" style of fabric, paper, etc and actually looked it up on Wikipedia to find out more about it. It said 

"Toile de Jouy", sometimes abbreviated to simply "toile", is a type of decorating pattern consisting of a white or off-white background on which is a repeated pattern depicting a fairly complex scene, generally of a pastoral theme such as a couple having a picnic by a lake or an arrangement of flowers."

I've had toile plates, toile pajamas, toile bedding and thanks to Stampin'Up!, toile paper! The Christmas patterns are so gorgeous and lovely with Real Red and Garden Green on a Very Vanilla background. I grabbed my paper and played with it again this week. I've got several cards here that demonstrate all the different Toile designs and how well they pair with other Stampin'Up! products. 


This card features a snow village scene with the Wishes and Wonder Bundle used for my sleigh, sentiment  and branches.  Don't forget about the Ornate Frames dies as they make perfect detailed background pieces for cards!


This card makes use of the Celebration Tidings bundle of dies and sentiments.  Layering is a must for cards!


This card shows off the botanical version of Toile and a great sentiment from the Wrapped In Christmas stamp set. I keep my Stitched Shapes dies handy at all times and use them often as I did here. 


This card features a sentiment from the Wrapped In Christmas set and dies from the Tasteful Labels collection, another set I'm using at least once a day!  Do you recognize the dear from the Snow Globe bundle?


This paper is all about nature and I love it features lots of Montana critters! I stamped the fox from the Nature's Beauty stamp set and backed it with a piece of felt that I die cut using a Stitched Shapes oval die. The stitching detail even came through! My sentiment is from the "For Unto Us" stamp set. 


I used the "For Unto Us" stamp set again for this card and if you look closely, you'll see some carolers singing in the background paper amidst the trees and churches. 

This paper was so popular last year they brought it back for this year and I'm thrilled they did. It is fun to branch out with other products while keeping the color scheme fairly consistent. Any shade of brown pairs really nicely with Real Red and Garden Green. Each paper is the same design with red on one side and green on the other. And, special bonus, this paper is on sale for today and tomorrow at $9.78, which is a 15% savings off the regular price.  You can access the online store from the right side bar of the blog or click on one of the pictures below. There are several other paper packs on sale  so if you're a paper hoarder, this is your dream sale!

I want to thank you for checking out my blog! I would love to hear any comments you have and help with any questions! It's amazing how important our virtual connections have become since last winter. I hope you are well and enjoying some stamping in your life!

Happy Stampin'!

Sarah

Tuesday, October 27, 2020

Today's Tiles for a vintage look!

 Hi Stampin' Friends! 

I'm fresh off my weekly FB Live video and can't wait to show you the card I made tonite as well as some other samples with this bundle. The video tutorial features the "Today's Tiles" bundle which is surprisingly fun to use. It's a two-step stamping experience, best used with the Stamparatus. What I love about this set was how I could change up color schemes and sentiments and just play with it! Here are some results:


My first card uses three of the dies in this bundle and one of the sentiments. It's a fun, sunny color theme with Bumblebee and Mossy Meadow, featuring upcoming Dandy Garden Designer Series Paper!


For this card, I grabbed a piece of the "Magic of this Night" DSP for Halloween and used a generic design of Pretty Peacock which also has a tile/brocade look to it.  I used the single tile stamp and a sentiment stamp, along with some In Color Ribbon. When's the last time you used your corner rounder to round your corners? I think it's been a couple of years for me!


 I used a favorite color combination of Blackberry Bliss and Granite Gray to keep this card elegant and vintage.  My Stamparatus was invaluable for the two step stamping! I also used a die from the "Marvelous Dies" set and the "Tasteful Textile" 3D embossing folder for more texture. 


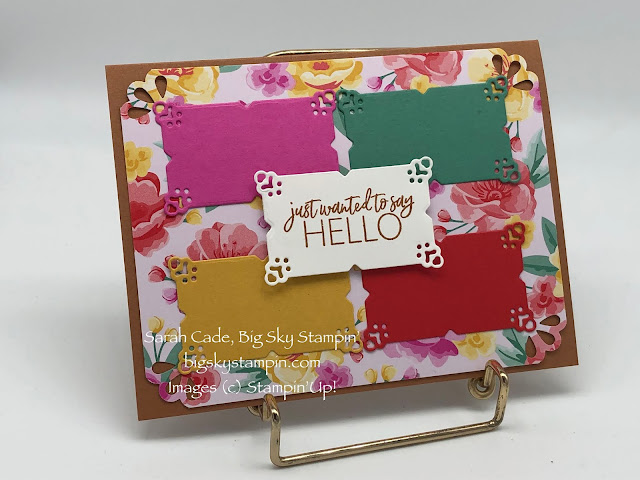
Honestly, not sure if I like this card. I think it's missing something. I used one of the dies in the bundle and cut some rectangles out of matching card stock for my "Flowers for Every Season" DSP background. It's ok, I don't just love it!


For my last card, I grabbed the "Forever Greenery" DSP and dies and tried to layer some more pieces with more dies from the "Today's Tile" bundle. Lots of layers here!

Here's a video of me making the 3rd card above. My video tutorials show you exactly how I make a card and especially the sequence I use. It does matter sometimes what order you do things in!


I'm trying to do FB Live's at least once a week and generally give several hours notice before I go Live. I'd love to have you join me. It's like a class, only shorter and you don't have to leave the comfort of your home! I welcome any questions or comments and also suggestions on future techniques or products you would like me to demonstrate!

It's awesome to share this fun hobby with you and I appreciate you stopping by to take a look. Have a great week and do some stamping!

Sarah

Friday, October 23, 2020

Snow Wonder bundle

Hey Stampers!

We got a fresh dump of snow here in Montana and that helps me introduce what I want to share today, lots of snowmen, trees and wreaths! It's not hard to get into the mood with these fun bundle. Inclement weather gives me lots of stamping time so I actually look forward to it! Here are some ideas for you:


My first card captures the essence of Purple Posy with my card stock, ribbon, "Feels Like Frost" DSP and snowflakes. Purple hues are a secondary color theme for the holidays but done right, they really make a statement. This looks like a beautiful day dawning on a snowy field with heavy branches of snow and a perky snowman to greet you!


For my second idea, I again used the snowman but added some trees from this bundle and put it all on a snowflake embossed background of Shimmery White card stock. I also have to point out the fabulous dies in this bundle as there are many that work for sentiments and background framing. I will be grabbing this set even after winter is long gone just to use for the dies!


My last idea features the Plush Poinsettia Specialty Paper which is a flocked vellum. I love the texture and it automatically draws your interest to the background of this card. I layered it on a piece of "Heartwarming Hugs" DSP and added a cheerful wreath and more trees. 

This is a good basic holiday set with some great sentiments and perfect images. I hope you'll want to add it to your collection. There's an easy way to get to the online store to shop for any or all of these products. You can click on any of the pictures below and it will take you there for an easy shopping experience.

I'm off to create some more fun... I hope you have a creative and relaxing weekend ahead of you!
Happy Stampin', 
Sarah


Wednesday, October 21, 2020

Shaker Card tutorial with "Still Scenes"

 Hi Stampers!

I hopped on FB Live last night and created a video tutorial making a shaker card with the "Still Scenes Bundle! Here's the card I made:


These are easier than they look because we have such fabulous supplies to help you out! Here's the video tutorial:


I've listed my supplies below if you're curious about exactly what I used!  You should try one today!

Happy Stampin'!

Sarah

Tuesday, October 20, 2020

So Much Happy Bundle

 Hi Stampin' Friends,

I hope you aren't struggling these days but if you are, I hop my post today will perk you up and chase away the blues. It can be a tough time to be happy, truly content, these days. I'm using my love of stamping to foster "happy" in my life and then sending out some cards to sew seeds of "happy" in other peoples' lives too. How about you? There's so much we can do much about, but I can choose my attitude and how I spend my time. I'm working on "happy". 

This is a fun bundle in our Annual Catalog. I appreciated the samples in the catalog to give me some help and inspiration. Here's what I ended up with after playing this morning:


It's no secret that dogs make me happy so my first card was a dog theme with the Playful Pets Designer Series Paper as my background. I die cut the "happy" with the easy to use die from the featured bundle and then had to do some extra cutting to angle it in between two pieces of DSP. You basically make a way oversized piece and then cut it down to what you need, if that makes sense. I grabbed a scrap of black foil paper and punched out my dog and then made some happy balloons, again with the dies included in the bundle. I hope you can see the Real Red banners. They are not real prominent but they are sure cute!


For this card, I grabbed the "happy" stamp and then used my Stamparatus and the hinge method to stamp my "happy" several times, in Coastal Cabana, Bermuda Bay and Pretty Peacock inks. I stamped and die cut some balloons with Poppy Parade and Mango Melody, hand drew the strings with a Stampin'Write marker and then added a ribbon and some sequins. As a dash of texture, I added some Shimmery Crystal Effects to the top of my balloons. That always adds a little pizazz and the only caution is let it dry! Don't try to touch it too soon!


I went back to the lovely "Flowers for Every Season" DSP for my next idea. I cut the 6"x 6" piece down to 4" x 5-1/2" and used the back of the remaining 2" strip to cut my "happy" out of.  That doesn't always work, but it worked great this time. I used the one of the "Prized Peony" stamps for my flower and attached some ribbon.  I stamped the flower in Misty Moonlight ink and then colored it with Stampin'Write markers, Seaside Spray and Just Jade.


I've been using a lot of the Plaid Tidings DSP lately and so that's what I went to next. This time, I adhered the plaid paper to a Seaside Spray card stock back and then ran it through the new Stampin' Cut & Emboss machine with one of the stitch border dies included in this bundle. I went horizontally and vertically and the plaid helped my align the die without any issues at all. I hope you can see the fabulous stitching in the background. I cut my "Happy" out of Melon Mambo card stock and added some bows, ribbon and a sentiment. This is a cheery card and the color scheme will be a hit with any friend that I send this to.

I love this bundle. It's fun for cards and would be perfect for party favors, tags and more. Because the main part of the theme is "happy" it's easy to morph it into weddings, anniversaries, a baby card, or anything where you want to express some happiness.  You can get the bundle and the rest of the supplies by clicking on the pictures below and it will take you to the online store.

I truly hope you have a few reasons to be happy right now and that you are thriving and not just merely surviving, though I acknowledge it is tough. I have noticed that my attitude goes up and down from week to week. I never thought this isolation would be going on 7 months later. Remember back when we thought it would be a couple of weeks? Well, that didn't pan out did it. Hang in there. I am having a few struggling days but stamping has become even more therapeutic than it ever was in the past. I invite you to join me and make a stamping investment in your happiness ;)

Keep Calm and Stamp On!
Sarah

Saturday, October 17, 2020

Plaid Tidings for Every Occasion!

 Hi Stampers!

Winter has finally arrived in Bozeman complete with snow, cold and wind. It's been the perfect day in my stamp room as I wasn't prepping for a class and could just fiddle. I have been wanting to revisit the "Plaid Tidings" Designer Series Paper for a few weeks now as I knew it was useable for any occasion. I challenged myself to pick some of the sheets I hadn't used yet and grab some stamp sets and see what happened. I can't wait to show you. I'd love to hear which is your favorite because I can't decide!


For this pretty card, I used the "Comfort and Hope" stamp set. It's a simple stamp set with some heartfelt sentiments and it lends itself to collage stamping really easy and a more vintage vibe. My color scheme was dictated by the unusual, vibrant plaid which includes Rich Razzleberry, Black and Mango Melody. I added in some Designer Series Paper "Brights" collection and a little ribbon from an old Paper Pumpkin kit that happened to be the right color. 


I absolutely love this rich Pretty Peacock and Shaded Spruce plaid, with a touch of Smoky Slate. I went for a Christmas theme with the "In The Pines" bundle and couldn't resist a little silver glimmer paper for snow.


One thing about plaid, you can always add more colors! The original piece was just white, gray and black. Using a ruler and my Cinnamon Cider Stampin'Write marker, I added some Cinnamon Cider to the plaid. I then grabbed the "Nature's Beauty" stamp set , my new "Curvy Celebrations" die and went to town. How great is this card?!! I love it, especially for a more masculine look. I hope I remember to add some extra stripes in a plaid design again, that was fun!


Finally, I had to try something with the "Whiskey Business" stamp set! I'm not much of a drinker but I applaud Stampin'Up! for consistently thinking about different themes and reasons to send a card or create a project. This is perfect for so many people I know! I paired the Cinnamon Cider color with Soft Seafoam Green, which actually is not in the plaid paper, but I co-opted it! I wanted my glass decanter and glass to be green and Soft Seafoam is the perfect green glass color.  I used my blends to color this beauty!

Guess what?! The "Plaid Tidings" DSP is on sale for the whole month of October. You really should have a pack and you might even need a couple! This gorgeous plaid with carry you through a whole year of card making with it's rich color scheme and eye-catching colors. I've listed my supplies below and clicking on any of them will direct you to the online store for an easy shopping experience. I'm happy to field any questions on orders or products so just let me know!

Hope you are safe, warm and healthy as we begin the season of hibernating, at least here in Montana!
Happy Stampin'!
Sarah

Wednesday, October 14, 2020

Freezin' Fun bundle - Wheeee!

 Hi Stampin' Friends!

I have to admit, I've had a smile on my face and joy in my heart the whole time I played with my latest featured stamp set, the Freezin' Fun bundle! I'm not always a big fan of cutesy or whimsy styles but these were so fun to play with. It wasn't hard at all to suspend reality and imagine a rabbit skiing, a raccoon sledding and a seal snowboarding! Why not? They deserve to have some winter fun too!

Ready to see some really cute ideas?  Here ya go!


One of the first things you have to settle on with a design is your color scheme. I went several different directions with this bundle, the first example being somewhat predictable. Blues and greens are perfect for winter, snowy cards and I grabbed Misty Moonlight, Seaside Spray and Mint Macaron for my colors this time. What a great color combination!  I used our Stampin' Blends alcohol markers on all of these cards as they are my coloring tool of choice. I used the stitched die included in the bundle to create my snowy hills and also embossed my background with our snowflake embossing folder. Those cute little snowflakes are adhesive, iridescent doodads that sparkle all the time!


This card features my favorite piece of paper from the "Feels Like Frost" Designer Series Pack. I love the purple tones and had a lot of fun with these two cute critters!  Highland Heather is the perfect purple!


Who can't help by smile with glee at these seals?!!  They are having a blast snowboarding on that gorgeous white glimmer paper snow. I used some of the "Snowflake Splendor" DSP and chose the green/blue colors of Pool Party, Coastal Cabana and Bermuda Bay for my color scheme. I also did a video showing how I colored the seals with only 3 different Blends markers, trying to make them each look unique.  Check it out here:


I decided for my last card it would be fun to get more "girly" and go for pink - pink plaid and Melon Mambo all the way! This plaid paper is adorable and obviously, these guys are having a blast. I used the upcoming "Curvy Celebrations" die for my snow hills and featured pinks and light blues for my color theme.  

I would love for you to have some fun with this set! You can see it all in the online store by clicking on my supply list below and get started on your own fun.  This will be great for a whole winter season of whimsy and charm. 

Thanks for joining me! I love showing you what I'm up to and sharing what I love.  I would love to help you jump into your own stamping adventures!

Happy Stampin'!
Sarah

Tuesday, October 13, 2020

Autumn Greetings bundle fun

 Hi Stampers!

I'm back today with an autumn theme. Our weather changed in a hurry and it actually feels more like winter outside but the snow isn't flying so I'm still in a pumpkin spice mood, how about you? I'm wondering if you noticed the "Autumn Greetings" bundle in the Aug-Dec Mini Catalog? It didn't grab my attention immediately but I eventually wanted to play with it and so ended up getting it. If you love to color, need some "weed" dies or love pumpkins, you might want to take a closer look!  Here are some initial ideas I've had:


This fun bundle comes with a huge floral spray of autumn delights. It was fun to color with my Stampin' Blends alcohol markers and easy to cut out with a coordinating die. I added a scrap of Designer Series Paper for the background and some ribbon. I wanted the background to be a little more interesting so I embossed it with the 3D Brick embossing folder. My "hello" sentiment is from the "Borders Around" stamp set. 


For my second project, I stamped the large floral stamp on a wood background piece of DSP from the "In Good Taste" supersized paper pack. I was curious what the pumpkin dies would look like so cut those out using Terracotta Tile card stock for the main area of the pumpkin and Cajun Craze card stock for the "lines" on the pumpkins.  They are easy to cut and adhere to each other. 


For this card, I used the Saddle Brown Stazon ink for my stamping and then used watercolor pencils and a blender pen for coloring. It's a more muted vibe than the alcohol markers, but also a fun technique. It works best if you use watercolor paper. After I was done with my coloring, I embossed the whole piece with the 3D Tasteful Textile embossing folder. It makes anything look like a fabric or canvas and I just love it! You can also see I used the "weed" dies in this card using various shades of card stock.  The brown in this card is a new In Color, Cinnamon Cider, which is perfect for autumn.


For my last card, I wanted to try something a little more monochromatic with Pretty Peacock, not exactly an autumn color but still a deep, rich tone. I used the big floral stamp again on a different piece of "In Good Taste" DSP and added a die cut edge and a little lace. You'll also see a tiny bit of DSP from the Halloween paper set this year, "Magic In This Night". 

Here's a look at the bundle, which I think helps you see what you could do with this set!


This is a bundle with a good mix of images, sentiments and dies that are versatile, the perfect set! If you'd like to see more or get one for yourself, click on the supply list below and you'll be directed to the online store. 

I hope you've had a chance to try Stampin'Up! products if you are into papercrafting. The quality is unparalleled and the unique designs and images are so fun and on trend.  I think you could find a theme that will work for anyone in our line of products!

Thanks for stopping by! I'd love to chat with you if you want to know more and am always up for brainstorming some ideas. You'll find my contact information on the right sidebar or you can leave a comment on the blog and I'll see it and respond.

Happy Stampin'!
Sarah


Monday, October 5, 2020

Wishes and Wonder Bundle of Fun

 Hi Stampers!

How did your weekend go? We are having the kind of October we usually only get to dream about! Gorgeous weather, pretty leaves, blue skies and mild temperatures - I hope it lasts for a few more weeks at least! Even though there's no snow in sight right now, I'm still in a festive mood and having fun with so many of our amazing Christmas-themed products from the Aug-Dec mini catalog. The set I'm sharing today is full of nostalgia and memories featuring a reindeer, the North Pole, Christmas greenery and a magical sleigh! Let's get started and I'll tell you about some of my ideas!


I'm sharing my favorite card first as it showcases almost all of the products! There are stamps and dies in this bundle and they really work well together. I started with inking up my background with the new "Stacked Stone" background stamp in a light Sahara Sand ink. I then stamped, colored and die cut the reindeer, sleigh and North Pole badge. The coordinating dies make cutting these a breeze and there some nice greenery sprig dies that I used behind my sleigh. I really love the vintage feel of this card. 


For my next idea, I incorporated some stamps and dies from the "Mountain Air" bundle. It's always a win/win when you can combine products and get more mileage out of them!  Instead of coloring the reindeer, I just stamped him on Soft Suede card stock and cut him out! I used some shadow stamping on my mountains to create a little more depth. 


This card features one of the sentiments of our featured stamp set as well as a greenery bundle that is easy to color with our Stampin' Blends and then die cut. If you look close, you will notice that my red triangles in the corners are actually die cut from felt! What a great texture addition to a project! For this card, I also incorporated some "Tis the Season" Designer Series Paper which happens to be on sale all month!


My last project was a quick tag that features the embossing die included in this bundle. It's a larger reindeer than the stamped one and the die embosses and cuts a perfect image.  There is also a tag die and you can see I used it for my background. I love the zigzag edge and stitching detail.

It's fun to share some ideas with you to help with your holiday crafting and especially papercrafting! I have more ideas then time but hope to get going on some more things this week so keep checking back!

As always, my supplies are listed below and a click on any of them will direct you to the online store for easy shopping. Let me know if you have any questions and I'd be happy to help.
Happy Stampin'!
Sarah


Thursday, October 1, 2020

Magic In This Night Designer Series Paper and more SALE!

 Hi Stampin' Friends,

Or should I say "BOO"! Without young children in my life, Halloween has lost it's excitement and fun for me but this year, I was totally enchanted by the "Magic In This Night" Designer Series Paper Stampin'Up created for it's Halloween theme. First, I absolutely love the color scheme of Pretty Peacock, Blackberry Bliss, Cajun Craze and Black. I discovered that there was much more I could do with it besides Halloween but then I had some fun with Halloween too. Our DSP is all double sided and the designers of this pack did an excellent job of muting the Halloween theme and bringing out other things with their designs.  I'll share some Halloween ideas first and then show you what I did to make a wonderful Thanksgiving card!


Here you can see the rich color palette of these colors in a leaf/floral type of design. The colors are dark and rich with the unexpected blue tones of Pretty Peacock in my background paper. I used the Ornate Frames dies to create my Cajun Craze piece and then stamped on it with the "Festive Corners" stamp set, a "must have" that includes images for Christmas, Halloween and Valentine's Day!


This card features the gorgeous Blackberry Bliss. I used the word "Spooky" from the Festive Corners set and then grabbed the brooms stamp from the "Festive Post" set, another three holiday set! This is a gate fold card and I used some back twine to keep the flaps closed!


Cajun Craze is featured in this card as well as the "A Wish for Everything" die and stamp set featured in the Annual Catalog. You can also spot some of the black glimmer paper in this card, which is part of the Magic In This Night suite.


And now for my Thanksgiving card idea! The backs of the "Magic In This Night" DSP sheets are mostly shades of black and white with flowers, stripes, etc. I took a floral piece, a rose pattern and daubed it with Pumpkin Pie, Crushed Curry and Old Olive ink. The DSP takes the ink so well and the colors show right through. I then cut some sprigs and greenery from the dies of the Forever Fern bundle. My Happy Thanksgiving sentiment is from the "Banner Year" stamp set. 


Here's a glimpse of what the daubing process looks like. It's easy, very forgiving and you can't mess it up! Obviously, any color scheme would work wonderfully with this technique and paper. 

Have I convinced you to take a look at the "Magic In This Night" DSP? Well, guess what!  A bunch of our DSP is on sale for the month of October, starting today!  Here's a link to see all the packs that are on sale and you'll find this one on the top row!


Paper is one of my favorite components in papercrafting and it often gives my inspiration for my color scheme or my design theme. Our paper quality is top of the line and very reasonably priced, even better when it's on sale! Stock up today!

It was fun to share these designs with you and I hope you feel inspired!  I'd love to answer any questions you have or hear any comments as well!

Happy Stampin'!
Sarah