Thursday, February 28, 2019

All That You Are

Hi Stampers!
I ended up playing around with my other social media endeavors, doing some stamping and mostly shoveling snow yesterday so didn't get to my blog.  It's good to be back!  It's fun to decide what to share every morning. Usually it's a challenge because there is so much great stuff that deserves a mention!

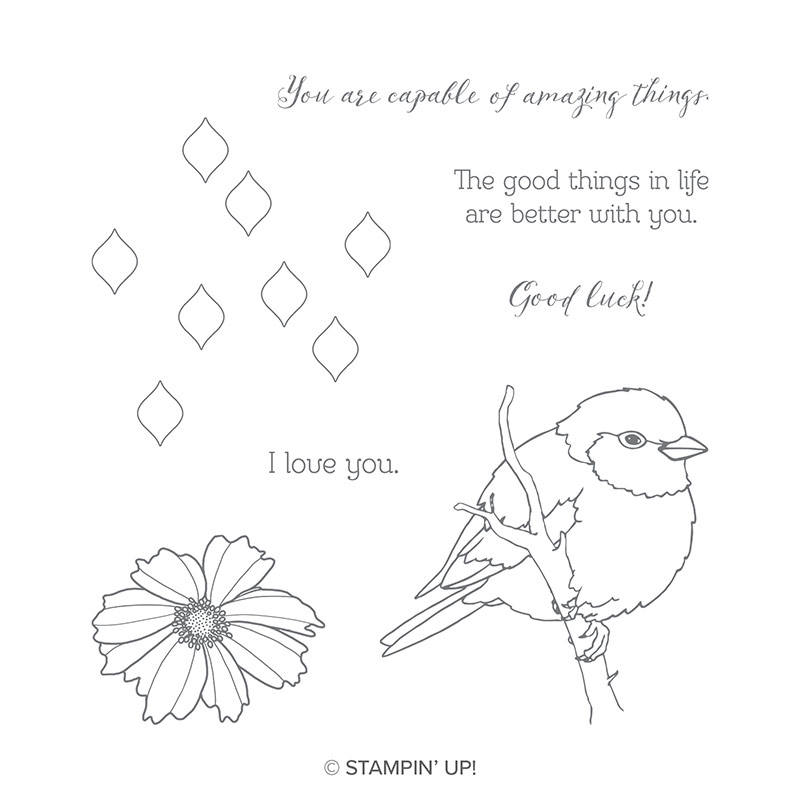
Today, I have the "All That You Are" stamp set to show off. You actually might have missed it in the 2019 Occasions Catalog because it is featured on the inside cover of the catalog! If you like to color, or even if you don't, this is a really fun set!  I tried several different techniques with it and loved them all.  Want to see some ideas?


For my first attempt, I colored the large floral stamp with my Stampin' Blends Alcohol markers. The shading was fun and the more I do it, the more I learn about blending colors.  I focused my color theme on Calypso Coral and Mossy Meadow.


When I saw this stamp, I knew one thing I wanted to try was heat embossing, especially a dramatic choice like gold on black or silver on Night of Navy. I chose the gold on black and made 10 of these cards for a recent swap my demonstrator team and I had.  They all loved the dramatic effect of shiny gold on black cardstock. I chose a multipurpose greeting so this card could be used for a wedding, birthday, anniversary, etc.   Don't forget about all our wonderful ribbons and accessories like sequins!


For this card, I wanted to use two separate flower images that come in the set and coordinate with the "Frosted Bouquet" framelit dies from the 2018 Holiday catalog (this bundle was carried over and is still available). I popped the flowers up on dimensionals and then after seeing how much blank "pink" space I had left, I added some Tranquil Tide Velvet ribbon at angles across the top and bottom corners and then cut the card stock just on the other side of the ribbon. I'm not sure I've thought of that before, but I loved the effect and how it set off the ribbon more.


For my final card, I went back to coloring, but chose different colors. This time my color palette focused on Lovely Lipstick and Shaded Spruce.  I did all the coloring and blending and then grabbed the wonderful "Spackled" background stamp, inked up with Crumb Cake and stamped the whole piece.  You can stamp a background like this before or after you do your coloring and stamping, but I like to do it afterwards!  This automatically creates an antique look to this card. You NEED that background stamp!

Tomorrow is March 1st and there are some handy and fun coordinating products that will be available for purchase to go along with our Sale-A-Bration freebies!  I'll share more info tomorrow - you'll be excited!

We have a few hour respite of no active snowing right now but are supposed to get up to 7 more inches by tonite. I think I will stamp now, knowing that I'll be shoveling again soon.

Stay warm and keep Stampin'!
Sarah

Wednesday, February 27, 2019

Pop On By video tutorial

Hey Stampers!
I'm trying my hands at another YouTube video this afternoon... here it is!  I'll create a separate post about these cards with all the specific details soon!


Tuesday, February 26, 2019

Animal Outing

Hi there Stampin' Friends!
Well, the question is no longer "Is it going to snow?", now it's "How much?"  My shoveling skills got some needed practice yesterday and my husband still spent 2 hours snowblowing everything I couldn't get. We did a crazy thing 3 years ago.  We moved from our home of 27 years to a new place out in the country with twice as much yard to mow and 3-4 times as much driveway, deck, patio to shovel. People our age usually go to a condo but not us! While we love it out here, it is definitely more upkeep.  All that makes for some fresh air, good exercise and a true appreciation for a warm and cozy house when we re done.

I recently shared that our family took a trip to Cincinnati to  spend some time with our son-in-law as he is pursuing a Doctorate in Voice Performance. We were so thrilled to go to two performances of his and see him where he lives for a couple of years. It was fun to go to Ohio too!  One of the attractions of Cincinnati is the Zoo and we had a lovely day there. It was too cold for many of the animals to actually be outside but we got to see many of them in their "indoor" quarters. A couple of my favorites were the elephants and giraffes. They are so graceful as they eat and move around.

All of that reminded me of a stamp set bundle in the Annual catalog featuring wild animals. I had done some cards before but decided to go back to this fun set and especially focus on the coordinating framelits.  The first card is my favorite, probably because I just spent a little time watching some giraffes!


I tried to include many elements in this card just for fun!  The background is embossed with our Petal folder as a perfect backdrop. I then used the giraffe patterned die for another background layer. I stamped my giraffes in Soft Suede and then grabbed three different green card stock colors for leaves. This card has a lot going on but by keeping the color scheme pretty simple, it isn't overwhelmed by the layers and details.


Kangaroos are pretty hard to be in the "adorable" category and using them for a baby card is perfect! I used my Stampin' Blends alcohol markers to color the mama and baby and then cut them out with the framelits.  For layering, this time I used my Stitched Squares framelits. I have seen others make a frame with the squares and then interlock them for a cool effect.  What a simple and fun was to add some interest!  To get the frame, just lay two square framelits nesting together and run through the Big Shot. You'll not only get a small square from the center of the smaller one but have a nice frame as well. I used the small center square as a background for my sentiment - perfect!


For my final card, I wanted to use some of the Animal Expedition Designer Series Paper. This is a little harder to use as it has lots of animals that you just hate to cut up!  Some of them even coordinate with the framelits.  This is a simple card but still cute with a rhino and bird.

Most of us grab the puppy and kitten stamps when we want an animal theme but I would urge you to take another look at this Animal Outing bundle!  These would be great for anyone but especially kid projects.  It's featured on page 27 of the Annual catalog and you can also click on my supply list below to see more about it!

I thought you'd like to see some cards I made last summer... this was before I had the framelits as I had "won" the stamp set at OnStage in Las Vegas last April.


Stay warm and keep on Stampin'!
Sarah


Monday, February 25, 2019

Colorful Seasons

Happy snowy, blowy, cold Monday!
Well, winter found SW Montana and decided it's such a great place to hang out that it's going to stay for at least a couple more weeks. We are getting all of our snow now... all of it! Of course, that's assuming I know what I'm talking about and let's get real... nobody is great at weather haha~!  All my planned activities have been canceled for today so I'm inside unless I'm outside shoveling. I looked at my cards today and wondered what to blog about. There are all kinds of springy, pretty themes among them but all I can think about is snow.

So, I'm going back to one of the most popular stamps and framelit bundles SU has every produced called "Colorful Seasons". It's still available in the annual catalog and I spent some time with it a few weeks ago. It was like visiting an old friend and we picked up right where we left off. I don't know how much longer this bundle will be available but you really should get it if you don't already have it! I had some fun with the winter, spring and summer motifs and wanted to share those with you today.


Nothing evokes winter like bare tree branches and snow... lots of it. The one thing I did that is kinda fun is I embossed my card with the Subtle embossing folder. It gives the card stock a textured appearance that is awesome!


Spring is a good time for blossoms to peek out and green grass to emerge. I love the embossing details of the flowers that are part of the dies that I used to cut them. No extra work... the Big Shot just does its thing. I could sit in that chair for awhile, how about you.... BUT, not today!


Ok, I have to admit the whole reason I wanted this bundle so bad was for these Adirondack chairs! They couldn't be any sweeter!  I decided a beach scene was perfect including a picturesque sky and a couple of happy butterflies. The Softly Falling embossing folder makes great sand as well as snow!

I'm hosting one class this week, as long as the weather doesn't object. It's on Wednesday, open house style, from 11 a.m. to 3 p.m.  It's called "Punch Party" and will be all about the huge lineup of Stampin'Up!'s punches. Let me know if you are interested in coming and I'll shoot you the details!

Okay... I've stalled long enough. It's time to shovel at least some of the white stuff until my husband can get home and blast it all with the snowblower. Have a wonderful Monday wherever you are!  Drop me a comment! I'd love to connect through the power of blogging and technology!

Happy Stampin'!
Sarah

Sunday, February 24, 2019

Another look at Paper Pumpkin!

Happy Sunday Stampers!
I thought I would hop on my blog real quick this morning and share some excitement about Paper Pumpkin. In case you haven't heard of that and wonder if you harvest it, bake with it or carve it, I'll set the record straight!

Paper Pumpkin is the name of the monthly kit Stampin'Up! produces and sends to tens of thousands of customers every month. It's a complete papercrafting kit including all you need to make a specific project such as cards, treat holders, gift accessories, home decor, etc. You receive the kit including ink, stamps and adhesives all for the price of $19.95 per month, which includes shipping. It's a great deal as you usually will have left over pieces and can start accumulating a collection of ink and stamps to use over and over again.

Paper Pumpkin was launched six years ago in March so they are celebrating with an extra special kit in March!  Sign up before March 10th, and you will get this kit which includes 2 stamp sets!  That's right, an extra stamp set with every kit.  Once you sign up, you will receive Paper Pumpkin automatically every month unless you pause it or cancel it altogether. It's easy to manage your subscription and you are not signing up for a specific time period like six months or one year.

To make Paper Pumpkin even sweeter, you can purchase prepaid subscriptions for 3, 6 or 12 months and save a little bit of money off each kit as well as qualify for Sale-A-Bration rewards with your purchase. Interested?  Here's a place to go to find out more as well as sign up.

PAPER PUMPKIN SIGN UP

I've been a subscriber for all six years now and have enjoyed the variety, seasonal-themed projects. I go back and use the stamps quite a bit in other projects as well. The kits also come from Stampin'Up! so they use our colors and styles and easily coordinate with other products you might have on hand. It's a great way to have several quick cards or other items ready to give and send to your family and friends. I hope you'll take a look at it and see if it's for you. If you previously subscribed to Paper Pumpkin, consider coming back!  The kits just get better and better!


Let me know if you have any questions!  If enough of us do it, maybe we can even get a Paper Pumpkin club going where we get together and make our kits once a month!  I'm always up for a Ladies Night Out!

Happy Stampin'!
Sarah

Friday, February 22, 2019

Better With You

Hi Stampers!
Have you ever wondered about the titles of my blog posts?  I try to use the name of the stamp set or bundle I want to feature on that post as a way to make it pop up if you were to search for it. Have any of you ever tried searching with Google or another platform for a particular stamp set, to get ideas?  I know it works really well with Pinterest for example.  Sometimes if you have a product that you are somewhat stumped with, how to use it, etc, a search will give you lots of great ideas to get you started.

The set I want to share today I got for one reason... the bird!  I don't even like birds all that much but they are fascinating to me and very fun to color with different mediums.  I wanted to show you an example of different techniques today.

My first card uses my favorite medium, our alcohol markers called Stampin' Blends.


Isn't this bird amazing?  I actually used 8 different markers for him, two shades each of Black, Smoky Slate, Mango Melody and Daffodil Delight. I then used two shades of Pool Party for the background and two shades of Crumb Cake for the branch. I had a blast coloring him. I'm not sure he is exactly like any real bird, but I still thought he was gorgeous!  I used some of our Laser-Cut speciality paper for my background as well.

For my next card, I used our regular Classic ink pads and an Aqua Painter.


I was going for a robin here. I stamped the bird on watercolor paper with Stazon ink. It's important to use Stazon if you are going to use an Aqua Painter (full of water) so your outlined image doesn't smear as you "paint".  I like to squeeze the lid of the ink pad between both my hands to draw some ink up into the inside of the lid and then take the ink from there with the Aqua Painter. You can use as much or as little water as you want to get different saturations of color. I used Calypso Coral, Crumb Cake, Soft Suede and Early Espresso for the bird and branch and a little bit of Crushed Curry for his beak.

My last example involves coloring with watercolor pencils and then using a Blender Pen to smooth out the color.


I decided to try blues this time and used Night of Navy, Pacific Point and Balmy Blue pencils. The color really pops when you use the blender pen after coloring with the pencils. For added sparkle, I then used the Wink of Stella pen for some shimmer and shine on the bird. 

This was a super fun experiment - trying a different way to color on the same bird and getting fairly dramatically different results.  Here's a look at the stamp set itself. I completely ignored the flower this time around... maybe next time!


The diamond background pattern was fun to add as an accent. You can see it on a couple of the cards above.   In the past year or so, I have really discovered how much I like to color as a technique with stamping. You will have great results if you have the right tools!  I've listed my supplies below in case you are curious about any of them. A click on any product will take you to the online store.

And just like that, it's Friday again!  What are your plans for this weekend?  My Stampin'Up! demo team, the Big Sky Stampin' Stars has a get together tomorrow that I'm really looking forward to. We have a great time eating, sharing ideas, training and sharing swaps that we make for each other. Stamping doesn't have to be a solo hobby. You can join up with a team of fun women who share your passion and love to create with ink, paper and stamps. If the thought of being part of a group is scary, you can still join and participate only when and if you want to. Stampin'Up! is all about doing things your way and I like that about it. There are some great incentives to joining now, during Sale-A-Bration, so contact me if you are even slightly interested!  You won't get any pressure, just answers to your questions so you can make a choice that works for you.  If you were to take a poll among current demonstrators, they would tell you they are so glad they took the plunge and wish they had done it sooner!

Have a fabulous weekend!  I may be back before Monday with a post or two so stay tuned!
Blessings,
Sarah

Thursday, February 21, 2019

By the Bay

Happy Thursday, Stampers!
I hope you've been enjoying all the samples I've made from the 2019 Occasions Catalog and the Sale-a-Bration freebies!  It's pretty easy to be inspired and creative when you have such great stamps and accessories to work with!

I'm back today with an interesting stamp set from the Sale-A-Bration brochure. You can get get one for free with a $50 purchase of any Stampin'Up! products. It's called "By The Bay" and I love the coloring/scenery potential this set has.  I'll talk about it as I share some ideas.


For my first idea, I wanted to color the main stamp set. I used my Stampin' Blends alcohol markers (if you don't have any of these, you want some!) and kept my color palette somewhat simple. I've seen buildings like this where I live in Montana, but obviously, they are not situated on a rock wall, by the bay.  This was fun to color and I left my edges somewhat "unfinished" looking on purpose. For the background, I chose a sheet from the "Tea Room" Designer Series Paper that picked up the Bermuda Bay and Crushed Curry colors.


For my second idea, I wanted to focus in on the shorebirds that are included in this set. They remind me of other birds such as those in the retired "Wetlands" set. I highlighted them by stamping them on white, cutting them out with a stitched oval framelit and then coloring with the Stampin' Blends.  I also used an infrequent technique on my background. You can stamp and then emboss!  It does work!  It usually doesn't work to stamp on an already embossed piece of card stock, but if you stamp first, you will have good results.  Do you like that "Tufted" embossing folder?  I think it's really sweet!


For my final card, I was curious about a monochromatic look in all black. The black gingham check paper is from the Sale-A-Bration paper "Botanical Butterfly" DSP. All of the back sides of that paper are black and white patterns which is a great thing to have in your inventory. You can color it or use it as is, which is what I did. I also embossed my black card stock piece with one of the "Petal Pair" embossing folders.

Since I made these, I've seen some more ideas out there that include interesting coloring ideas and make use of the shorebirds and seashell stamp. I want to get back to this set and come up with some more ways to use it. While this style of sketch is very detailed, it isn't that difficult to color. Think of it as coloring "areas" and not coloring specific objects like a tree or a house. That will help you. I also spent some time just looking at it closely to see what was what. It also helps to color the things you are sure of first, like the house or the water in this case.   We have lots of coloring mediums in our product inventory including two different kinds of markers, Aqua Painters, Blender pens and watercolor pencils. All of these would work well with this stamp set.

You can see this stamp set and more by going to the online store (click on "shop now"). All the categories of products are listed on the left side of the online store page and it's easy to click on a product, check out the features and then add it to your shopping cart. You can also get an order to me and I'll take care of it for you!

Have a wonderful day and do something creative today!
Sarah

Wednesday, February 20, 2019

Lasting Lily - Sign Up Special!

Hello Stampin' Friends,
I'm watching some snow lightly fall down out my window with no sign of the mountains today. They are covered up by a gray, overcast sky. It is the definition of winter still. It's a good thing I can pretend otherwise when I'm stamping and that's what I'm doing today!  Have you seen the calla lily stamp set in the Sale-A-Bration brochure?   It's a substantial stamp set with oodles of sentiments to go with the pretty lilies.  Recently, Stampin'Up! made it even better by announcing they are going to offer framelits to cut out the lilies, beginning March 31st!  When I first got my set, I did some fun stamping but the fun just got easier with the framelits!  I thought you would like to see this set in action today. Here are a few examples for you:


The first thing you might note is that the lily stamps are part of Stampin'Up!'s "Distinktive" stamp collection and are carved from the photopolymer in a way to give great definition to lines and shading.  These stamps work best with a ink pad that is not completely saturated with ink, in other words, a little less is more.  If your ink pad is too "inky", take a plastic spoon or bone folder and gently push some ink to the other edges of the ink pad and keep practice stamping until your lily looks just like you want it.  The fonts and sentiments with this set are timeless and beautiful.


With the new purple colors that were released last spring, I wanted to see what they would look like with this set. Again, even though I stamped Gorgeous Grape ink on Highland Heather card stock, you can still see the delicate line definition in the lilies.


This card was fun to make as I tried to fit as many lilies as I could on a card and so used the horizontal orientation.  This subtle color scheme seemed perfect for a sympathy card.


And, here are the framelits for the lilies and stems, put to use. There is a learning curve with these!  The stamps are made from photopolymer so can stretch and not be the perfect shape when you mount them on the acrylic block. In order to get the stamp shape and curve to line up with the framelit, it was easiest for me to place my framelit on my desk, blade side up, then lay the stamp on top to line it up with the framelit, then place the acrylic block on top of the stamp.  This was not necessary for the lilies but was extremely necessary for the stems and leaves. The framelits also include the cute sentiment cut out shapes that I used on this card.


This ended up being a favorite one with the deep red tones. I used Merry Merlot for my lilies. It reminded me of the wedding flowers my daughter chose for her wedding!  On this one, I didn't stamp the leaves and stems but just cut them out and they worked just fine without stamping.   I also wanted to see what an embossed background would look like!

Interested in getting this set for yourself?  Well, since it's a Sale-A-Bration freebie, it's relatively easy to get!  The "Lasting Lily" stamp set can be redeemed for free with a $100 order of any Stampin'Up! product, including prepaid Paper Pumpkin subscriptions.  The coordinating framelits will be available for sale March 1-31st .  Contact me for any questions or you can simply order online and get your free stamp set after filling your shopping cart with at least $100 worth of product.  We are heading into the last month of Sale-A-Bration soon so some freebies are starting to run out. If there's something you really want, be sure to act soon!

12.05.18_TH_SHAREABLE_JOIN_SAB_PREEARN_NA

It's so fun to share what I'm up to. I'm grateful for this blog forum and that people are checking it out. I'd love to chat more about stamping so contact me if you want to know more about the products, the techniques or even becoming a demonstrator. It is easier than you think with no further commitment - the ultimate try it and see if you like it opportunity! A "Starter Kit" costs $99 and you can choose $175 worth of products. You will enjoy a 20% discount on any further orders you place and can continue as a demonstrator with a $300 quarterly minimum purchase, or not continue with no further obligation.  If you were to join now, you have until June 30th to meet your first $300 minimum. That won't be difficult with more to love in the 2019 Occasions Catalog and the new Annual Catalog coming in June. As a demonstrator, you get the catalogs a month early and also are able to preorder many of the new products. You have access to the Stampin'Up! website which is full of tutorials and help, as well as Stampin' Connection, a demo-only forum full of inspiration and samples, plus several Facebook groups, etc.  My personal team of demonstrators are called the "Big Sky Stampin' Stars" and we have a private FB group, frequent email training and monthly get togethers. We would love to have you join us and you don't have to be located in Montana to be part of the group!  With this age of technology, almost anything can be "local"!  Let me know if you want to know more about the option of joining Stampin'Up! I'll help you thru the process or you can do it yourself by clicking "Join the Fun" on the right side bar of the blog. Don't delay if you are interested! This special sign up offer ends March 31st!

Hope you have a wonderful Wednesday and stay warm!
Sarah


Tuesday, February 19, 2019

Life Is Grand

Good Morning Stampin' Friends!
Did you have a nice long weekend?  I sure did, with my family!  We all traveled to Cincinnati, OH to see our son-in-law perform in a voice recital as part of his doctoral degree he is pursuing at the University of Cincinnati and then were also treated to another multi-choir extravaganza he participated in. We took in some sights including the Cincinnati Zoo and The Creation Museum and ate all the food, haha!  Overall, it was a really a fun trip with a surprisingly easy flight connection from Montana. We arrived home last night 50 minutes ahead of schedule - when does that happen?!!

When I go away like this, I don't think a lot about Stampin'Up! or things related so it feels like I've been absent for a lot longer this morning. I almost had to remind myself I have a blog and I also have two card classes today, so I'm hitting the ground running (or stumbling, we will see). I decided to go with sorta simple today, featuring a stamp set with a lovely font and the Distinktive type rubber stamps that create some dimension and texture by the way they are carved.   Here are some examples:


All the greetings in this set are the main thing. They are bold and attention-getting. For this card, I wanted to use some more of my Valentine paper from the "All My Love" DSP.  It has an interesting color scheme with the Calypso Coral, Flirty Flamingo and Soft Sea Foam Green.  I used a doily framelit and my sprig  punch for some background details. Can you see that I cut four rectangles from the DSP and placed them in a windowpane fashion on the base of the card?  I also used my Stitched Framelits oval for the sentiment.


For this second Idea, I wanted to feature a favorite Designer Series Paper of mine from the "Share What You Love" bundle. It has a shimmer to it that is really pretty. Almost anything using the color of Mint Macaron is really pretty, right?! I kept this simple to emphasize the pretty paper, with just a few sequins added for some bling.


I like this card for the simple reason that using a darker color for my sentiment, such as Lovely Lipstick, really shows off what I mean about the shading, texture and dimension of the stamps. It looks like a almost double stamped it with two different colors, but I didn't. This idea also gave me a chance to use some Lemon Lime Twist card stock, which I rarely reach for, as well as the "Broadway Bound" Designer Series Paper.

If you need a stamp set with some bold sentiments, this is certainly a good choice!  I enjoyed working with it and will reach for it again soon. I plan to make some birthday cards with different color schemes and also use up some DSP that haunts my shelves longer than it should!

Thanks for stopping by today.  We are still in the midst of Sale-A-Bration which is a perfect time to shop, host or join Stampin'Up!  There are several promotions going on and I'd love to chat with you about what works for you and your budget! Contact me via email, phone or text and we'll start a conversation!

Happy Stampin'!
Sarah

Monday, February 18, 2019

Beach Happy

Hi Stampin' Friends!
Have you realized we are getting tantalizing close to the "spring break" time of year?  For so many people, that means hitting the road or the air and getting away from their everyday life. I know a lot of people also associate spring break with somewhere warm, sunny and sandy!  My daughter and I are going to head to Oregon and Washington which may be sunny, won't be warm and not very sandy either, but it always feels good to get away, doesn't it!

I'm not sure why I got the stamp set I am sharing with you today. It really doesn't resonate with me at all as I've lived my whole life in the tri-state area of western South Dakota, Wyoming and Montana. We have some sandy beaches around a few lakes but no palm trees, etc. I guess I thought it would be fun to think about it and dream a little. I did have fun imagining what it would be like to be on a warm, sandy beach rather than foot deep in snow, haha~!

Here are some ideas to inspire you!


I used stamps from three different sets for this first card!  I used "Beach Happy", "Painted Harvest" for the sun and "High Tide" for my sand, birds, water and grass.  It's fun to see what you have in your stamp collection and combine some ideas for the perfect look.


For this card, I decided to stamp several images separately and frame them in black card stock and place them randomly on a card. I actually really like how this turned out! I made good use of my stitched shape framelits!


This was my first card. I daubed the edges of the sand before I embossed them with the "Gently Falling" embossing folder. That is supposed to be snow but I use it all the time for many other things besides snow.  I used my Stamparatus to stamp the chair and umbrella. It's always a little tricky to line up double stamping, but I was pretty happy with it.

Although that was a very quick trip through some beach scenes, I hope it warmed your heart and gave you some creative ideas. If you have any friends or family that live on a coast, this would be a fun set to have.

Hope your Monday is off to a good start!  I'll be back tomorrow with some more fun and ideas.
Happy Stampin',
Sarah

Friday, February 15, 2019

2nd Release of Sale-A-Bration Freebies!

Hi Stampin' Friends!
Just when you think this is the best Sale-A-Bration Stampin'Up! has ever had, they add more fun to the party and you are in awe!  Starting today, February 15th, you can get new freebies with a $50 or $100 purchase!  Demonstrators are able to get their hands on these goodies early so I've already had some fun!  Curious?  Want to see some samples of these products?  Here ya go!

There are two new stamp sets, an embossing folder and new paper!


Aren't those gorgeous! I know you'll want to add these to your goodie stash this winter. Remember, these are only available until March 31st, or while supplies last!  If there's something you really want, be sure to put in an order and get your freebie!

Go to the online store using the "shop now" link to the right ------>>.  On the left side bar of the store, you'll see  a link for "Sale-A-Bration". There's also a big banner to click on at the top of the page. Be sure to contact me if you have any questions but our online store is fairly easy to navigate!

Have fun!  I can't wait to see what you do with your new freebies!

Sarah

Fable Friends

Hi Stampers!
Now that Valentine's Day is over, we can look forward to spring coming on the horizon and the Easter season!  I'll have much more to post about Easter in the future, but I wanted to share what I've been doing with the "Fable Friends" stamp set in the 2019 Occasions Catalog. It is so adorable. It will remind you of the illustrations in your favorite childhood story books and you will be inspired in so many different directions! There is something timeless about these drawn images and I couldn't way to play with them! Here's some ideas for you!


I decided I had to make a card featuring the mama duck and baby ducks. Next time I will take the time to color them, but for now, I simply stamped them.  They are so cute!  I wanted to fiddle around with a new floral stamp and punch bundle that I recently got out of the Annual Catalog, called "Pop of Petals" bundle. There are several stamps to make different flowers and even one stamp to make a butterfly!  I used a bit of Wink of Stella on the flowers too to jazz them up a bit. I grabbed one of my new rectangle framelits for the sentiment. It's the perfect size!


When I saw the "Fable Friends" stamp set, I immediately wanted to pair it with some of the new Gingham Gala paper. There are five wonderful colors and your hardest decision will be which color to choose!  I chose the Balmy Blue to make this card. I again used the rectangle framelits for some of my cutting and Stampin' Blends for my coloring. I don't think this bunny could be any cuter!


I loved the bunny so much, I had to use it again!  This time I chose a Grapefruit Grove palette and used some of the foil paper (a SAB freebie) for my background. I used the quilt embossing folder, added a doily and used some more stitched framelits to accent my layers.


For the last one, I decided to tackle the squirrel and use my watercolor pencils and blender pen to see if I could get something I liked!  I stuck with blues and yellows so I could use the background paper out of the "Garden Impressions" DSP pack.  The circle stitched framelits were perfect to use for this card.

I am sure you are already thinking of more ways to use this fun set!  Sometimes it's fun to do something simpler that focuses on the stamping, getting back to basics a bit!  This stamp set would be a perfect go-to for baby cards, children's birthdays or Easter as well. Add it to your wish list today!

Check back with my blog again today when I will be sharing all the details of the new 2nd release of Sale-A-Bration freebies!  There's lots more to love during Sale-A-Bration!

Happy Stampin'!,
Sarah

Thursday, February 14, 2019

Celebrating Love on Valentine's Day

Happy Valentine's Day Stampers!
This is such a fun holiday that is a longstanding tradition in our world. For many, it means a time of celebrating your sweetheart but for all of us, it is a time to spoil and cherish all the people we love. Kids especially love Valentine's Day from decorating Valentine boxes for their cards they receive in school, to treats and candy and maybe even a small gift from mom and dad. A big part of the holiday is giving out a Valentine card to those you love. I had fun this year making some cards from current Stampin'Up! products as well as diving back into some of my favorites. You've seen a few of these before, but I decided to load up my blog today with pictures... lots of them!  I hope you enjoy the inspiration and maybe even a few memories!


That's my favorite way to say "Happy Valentine's Day" to you!  I truly love our friendship and connection over the shared hobby of stamping. Have a wonderful day, hopefully spending it with those you love!

💕💕💕
Sarah