Thursday, January 31, 2019

So Hoppy Together

Hey Stampin' Friends,
Sometimes you just have to jump on the bandwagon, right?!  I'm talking about frogs. I don't particularly like them, especially real ones. I didn't think I needed any frog stamps either but then.... In the Sale-A-Bration brochure, one of the freebies is a pretty cute frog stamp set. I got the other freebies that I wanted first, then finally got the frogs. I've seen a lot of cute ideas on Pinterest and a particularly memorable moment at OnStage in Orlando stands out (you had to be there)!

Anyway, I had a chance to ink this set up yesterday afternoon and here's what happened!


I decided I'm not especially good at coloring frogs!  I should have probably reversed the light and dark areas. I used my "Call Me Clover" Stampin' Blends alcohol markers to color. One thing I really enjoyed trying out was the leaf ribbon on the left. It's in the main catalog and was surprisingly easy to adhere. I love the texture and dimension it gives the card.


For this idea, I wanted to use some of the "Animal Expedition" paper that is in the Annual Catalog. Do you see the small frog sitting on the branch?  I colored my stamped frog with Granny Apple Green markers this time.  This is a simple card so I used two pieces of coordinating cardstock underneath the frog to highlight it a little better.


This was actually the first card I made. I kept this one pretty simple as far as the stamping and coloring but then put in a wilder background from the Bloom by Bloom Designer Series Paper. That Night of Navy ribbon is actually a retired corduroy ribbon which I'm currently hoarding  and don't use very often ;)

I think I've just shown you that you can have fun anytime you put ink to rubber and stamp on paper, even if you aren't a huge fan of the stamp or theme, like frogs.  One of my daughter's was obsessed with frogs in middle school so she will be getting most of these cards haha!

I'm excited for February 1st to get here as the SU demonstrators will learn what the 2nd batch of Sale-A-Bration freebies will be. There will be some new additions to the freebie line up for customers starting February 15th. I'll share what I find out tomorrow when I blog.  Things are always staying fresh and new. Sometimes it's hard to keep up but it's always exciting!

Feel free to contact me with any questions. You can shop to your heart's content in the online store or scroll through my blog for ideas and inspiration. I love card making so much for the artistic release it gives me as well as the act of blessing others with a handmade card that lets them know they are special to you.

Happy, er, Hoppy Stampin'!
Sarah

Wednesday, January 30, 2019

Dear Doily

Hi Stampers!
Brrrrrrr.... I hope you are staying warm!  We haven't gotten the brunt of this latest cold front, but it is still colder than usual. I may have to change my normal breakfast fare. I usually drink smoothies, but they are chilling me to the bone right now!  Seems a little unhelpful to burrow under blankets in front of the fireplace and drink a ice cold smoothie, right?!!

I have a fun bundle to share today that will hopefully warm us all up. It's a motif that we are drawn to, but really don't use much in our homes these days and that is doilies!  I have several that were crocheted from relatives in years gone by. They are exquisite in the delicate stitches and patterns. I used to scatter some of them about in my home but have gradually gotten away from that as I've tried to de-clutter the look just a bit. The stamp set I want to show you is much less involved than the real thing which no doubt took hours and hours to make!  This bundle is a wonderful combination of stamping and die cutting to create some beautiful doily motifs for your crafty projects. Here's what I came up with yesterday as I was playing with this set:


I wanted to use our wonderful two new purple shades for this card. I used the lighter one, "Highland Heather" and stamped off on grid paper first to make my doily image even lighter.  I randomly stamped on my background paper.  I then used the darker purple, "Gorgeous Grape" for my sentiments. So separate the two halves of the sentiment, I punched one out and popped it up with dimensionals. You could also put the second part of the sentiment on the inside of the card. For the flower sprig, I colored my stamp with Stampin'Write markers and cut it out with the coordinating die. There is also a fabulous little bow framelit that I really liked!


This card was a creation of leftovers.  I had previously embossed this Powder Pink cardstock with the leaf folder and then ended up not using it for something else.  I decided to pair the pink with Basic Gray. I tried out some of the doily framelits in Very Vanilla card stock and then added a simple sentiment. I decided my background need something so I used pink on pink with the Buffalo Plaid stamp. I also added a bit of the Powder Pink ruffled ribbon to each edge.  For being such a random set of ideas, it did come together in the end!


I wanted to see what one of the larger doily dies would do so I cut it on some Whisper White card stock. As I suspected, it cut out the center and left a round border edge of doily. I backed this with some Bermuda Bay card stock to go with my Frosted Floral Designer Series Paper and then used a punch for my sentiment.


This was actually the first card I made with this bundle. I wanted to see what the largest doily would do. It's in two pieces which allows you to cut out the entire doily or just cut a doily edge and leave the middle part intact. I cut the entire doily out of Grapefruit Grove foil paper, then inked up the floral sprigs with Stampin'Write markers and again cut a bow. I thought the "Nature's Poem" was the perfect background with it's soft colors.

I was glad I purchased this bundle. We have had similar doily bundles in the past that I've passed on so I'm glad I got this one. I think there are a lot of things you could do with it. I'm anxious to spend some more time with it soon!

I have some custom work to keep me busy the rest of this week. My veterinarian would like some pet sympathy cards and another new business in the Gallatin Valley would like some custom cards to include in their orders to customers.  I do some custom work each year and really enjoy it. I recently finished 80 cards for my local ophthalmology clinic which included birthday cards, sympathy cards and "good job" cards for their employees.  Please contact me if you would be interested in some custom cards for your organization or business. I'd love to brainstorm with you and see if we can come up with something perfect.

Meanwhile, stay warm and stamp often!
Sarah


Tuesday, January 29, 2019

Incredible Like You

Happy Tuesday stampin' friends!
This "polar vortex" we are experiencing this week finally arrived deep in my bones! I can't get warm this morning so maybe if I get my fingers flying across the keyboard at least they will warm up!  Winter and cold weather force my inside most days and that's not a bad thing because then I can stamp and play for at least part of my day. The "to-do" piles on my desk are soooo big right now, but I'd rather talk stamping.

The stamp set I want to share today is called "Incredible Like You" and is found on page 21 of the 2019 Occasions Catalog. It's a sweet set that has a few features that are slightly different from other floral/botanical sets. Let me share some cards with you and I'll talk about the features I like!


The stand-up leaves make great stems for flowers. They provide almost a stenciled look when used just by themselves. I used various lengths to create the different size of stems. I wanted my flowers to be in a stair step height fashion, so the best way to do this is to stamp the flowers first and then add the stems. I used the lighter color, Mango Melody, for the large background floral stamp and Pumpkin Pie for the flower petal detail and the sentiment.


One fun stamp in this set is a bunch of drawn lines. Here I stamped them both vertically and horizontally to create a border of sorts in one corner of my card. I'm also showing off two other favorite stamps, the branch and little blossoms that coordinate with it.  I used our Wood Designer Series Paper for my background. Don't forget you can stamp on DSP as well as card stock. It's one of my "go-to" techniques.


For this card, I used the entire branch/stem in Mint Macaron and then added the leaves from the first card in Soft Sea Foam. I knew the light color wouldn't show up if I had stamped by reversing the colors. My colors in general are softer in this card. I used the line stamp to create the idea of ground under the stems. I played with the single leaf stamp as well, underneath the flowers.

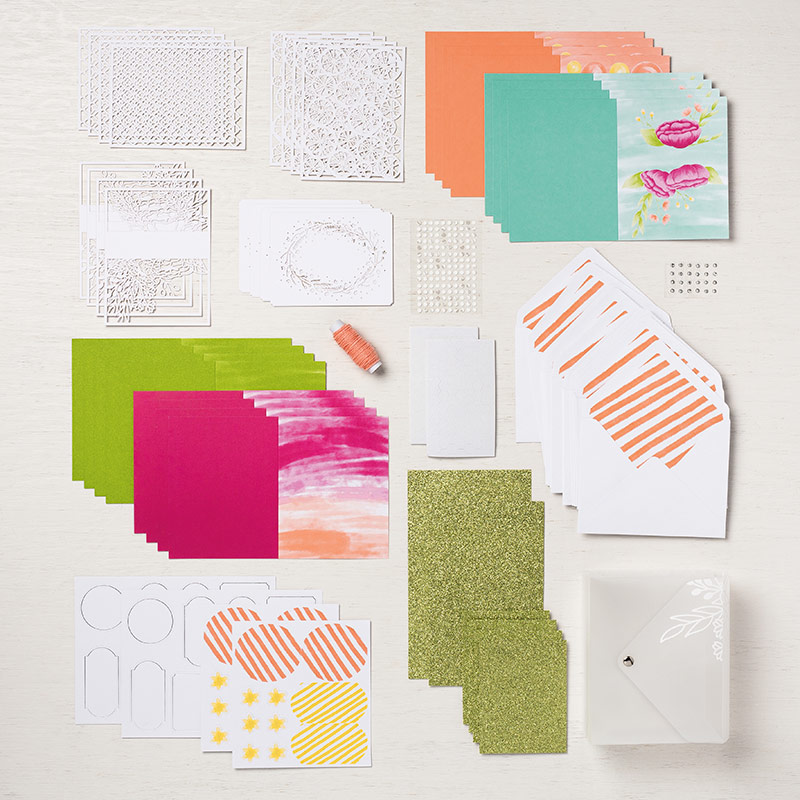
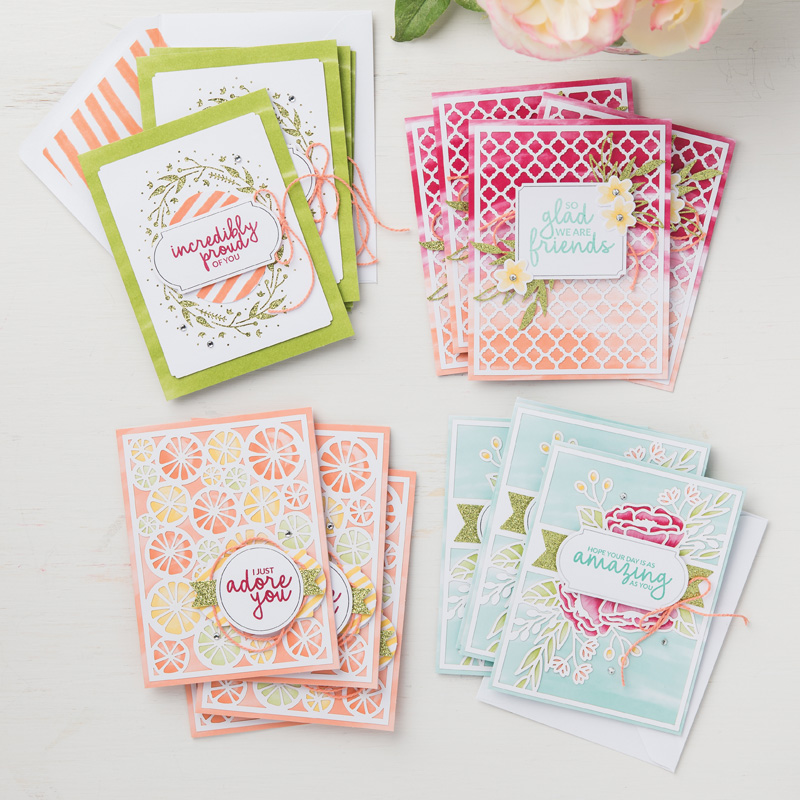
To make this stamp set even more attractive, there is a card kit paired with it that makes 16 cards, four each of four different designs.  It would be a fun idea to gather some friends, purchase the stamp set to share and then each buy the card kit, get together and assemble it!  This gives you a stash of cards for many different occasions, which is always handy to have around.   Here's a picture of the kit, as I haven't bought it yet, but it's definitely on my list!


And here's a picture of the finished cards!


I love that Stampin'Up! makes products suitable for any level of crafter and also any level of budget and stash supplies. You don't have to have "everything" to get started with stamping and during Sale-A-Bration, you get free product for every $50 increment in your purchases. It's an easy way to save and have your dollar go further.  Be sure to ask me for all the details or check out the various links on the right side bar of this blog. Crafting has never been so accessible!

I holding a "masculine cards" class today so I'm off to set up for that. I'm slowly filling out my calendar for February and March so be sure to check that out as well. You'll find it under my SU website and just scroll down past my picture for the calendar!

Hope you have a great Tuesday and stay warm!
Sarah

Monday, January 28, 2019

Humming Along

Hi Stampers!
I'm back from a wonderful weekend in Billings filled with music, family, new friends and stamping!  I realized that is pretty much most of my favorite things right there!  We are back home now and ready to roll out another week. I honestly can't believe we are at the end of January, that seems almost impossible!

I've been working my way through the 2019 Occasions Catalog and Sale-A-Bration brochure the last few weeks because it's fun to explore some of the new products and see what I can do with them. It's a personal challenge of mine to try to make 3-4 cards with a set, completely different styles or color themes and then see what I liked best.  Today I'm working with the "Humming Along" bundle which features stamps and framelits. The humingbird is very fun to color and the flower in the set is gorgeous.  Here are some ideas:


For my first attempt, I used watercolor paper and Stazon Ink. I use Stazon when I'm using any water method because the ink is permanent and won't bleed.  I used an Aqua Painter for this beauty. If you squeeze a closed ink pad together, somewhat gently, you can get some ink into the lid of the ink pad and then take the ink from the lid with the Aqua Painter. That way you avoid touching your ink pad directly with the Aqua Painter. Another method would be to squeeze a drop of reinker on your silicone mat and take them ink from there with your Aqua Painter. I tried to limit the amount of water flowing through the Aqua Painter so it didn't get to messy. A little embossing for the background, a few sequins and I was done!


This striking card features the flower in the set. This time, I colored with my Stampin' Blends alcohol markers and went for a very vivid image on a more subtle background. I cut the flower out with the framelit, after I colored it. I stamped "thank you" freehand, but if you don't trust yourself, this would be a great use for the Stamparatus, using the hinge method of moving the Stamparatus plate down one notch for each stamp of the "thank you". A few colored pearls were the perfect accent for this card.

My last card was my least favorite but I learned some stuff!  I was curious what the net-like framelit would do. It's a little tricky to release the inside from the outside of this piece, but then I decided to use both of them. Still not sure exactly what they are, but they provide some interesting texture for the background. I think my color scheme ended up being the problem. Just not sure about it. What do you think?

This was a fun set to play with and there are several more ideas percolating in my head for the next time I come back to it. Even after all the stamping I've done, I'm still honing my skills with design, color, artistic appeal, etc. I doubt I'll ever decide that I've learned it all and you definitely learn by trying different things, even if you don't love the results.

I've listed my supplies below so you have easy access to the online store and more information. I'm also available for any questions or order advice. If hummingbirds fascinate you, you might want to check out this fun bundle!

Happy Stampin'!
Sarah

Sunday, January 27, 2019

What we do at a Stampin'Up! party!

Hi Stamper friends,
I just got back from a wonderful weekend in Billings, MT, about 2 hours east of Bozeman. I have a son and daughter that live there, as well as son-in-law and 2 grand dogs!  We get over there to visit when we can and this weekend was packed full!  On Friday night, we went to a fundraiser dinner for the Billings Studio Theater group which our daughter performed in. There's nothing quite so heart warming than seeing your kids live out their dreams, talents and fun!  On Saturday night, we attended church at Faith Chapel where our son works. He happened to be in charge of sound this week and we spent the entire service in the sound booth... that was incredible!

On Saturday afternoon, my daughter hosted a Stampin'Up! party for her friends!  I had not met most of these people before and really didn't know their interest or level of crafting ability. They were very enthusiastic and we had a ball.  I thought I would share what I did, in hopes that it would help others host a party some day!

First, I got a head count from my daughter and then added 3 to that so I had plenty of supplies for all you came. I didn't want to be short!  I set up the table with grid paper, a Valentine treat, a brown paper lunch bag for their finished cards, pens, Snail tape runners, dimensionals, etc. It's pretty safe to assume that no one will bring any supplies with them so you need to provide what they need. I also added a door prize sheet to gather their contact information. (This is very important in order to add them to your mailing list).


Next, I set up another table with some card samples to look at, catalogs, Sale-A-Bration brochures, Paper Pumpkin kit and brochures, etc. I had enough catalogs that anyone who wanted to take one could.

Next, we started stamping.  I started with a simple card that only required stamping. I talked about how to ink up a stamp (tapping versus submerging into the ink pad) and they could practice on their grid paper or just go for it. We passed around each step and I purposely did this in a mellow, unrushed manner so no one would feel like there was pressure to hurry. I reminded them they could also flip their paper over if they made a "mistake" they couldn't live with.  I also assured them that stamping is a learned art and there is a knack to it that is picked up with practice. Here's the first card they made. We used the "Sheltering Tree" stamp set and I talked about other color schemes or ideas that would work as well.


The second card I purposely stepped up by adding an embossing folder element and two punches. We used the "Hello Cupcake" set from Sale-A-Bration as well as the Grapefruit Grove foil paper.


I first had them stamp their cupcake and then we went through the rest of the steps. Of course, the embossing folder on foil paper was a huge hit!  It gave the Big Shot some great attention as well.

The last card I tried to incorporate the Big Shot and used the "Hold On to Hope" bundle. This was a more complicated card, but by now, they were confident in their stamping and really enjoyed lining up the framelits and using the Big Shot. I think they saw the flow of stamping, cutting, assembling easily with this card.


We kept the atmosphere friendly, cheery and fun. We provided coffee, wine and other drinks, some mixed nuts and a little chocolate. It was such a fun afternoon and several of the women said they had stamped some in the past but this really piqued their interest in stamping again. They had no idea about the more recent innovations such as clear blocks to mount photopolymer stamps, embossing folders, framelits etc.  They could readily see how fun this hobby is!  I am hopeful that several will consider ordering but no matter, we had a great time and I shared what I love. (A quick note about cost - My daughter and I discussed whether or not there should be a class fee. Obviously, if the class was completely free, we probably would have made only the first card and I would have shown them examples of the other two and talked about it. She felt that these particular ladies wouldn't have any problem with a fee as they are used to that with paint parties, etc. so I had a $10 fee to help defray my costs.)

One of my Stampin'Up! goals this year is to throw more parties and try to increase my customer base that way. I have a couple more on my calendar in February and I'm excited about doing more of these. This was a perfect format for me and the guests!

Happy Stampin'!
Sarah

Saturday, January 26, 2019

I'm on YouTube and other Social Media!


Image result for social media image

Hey Stampers!
Did you know I have a YouTube channel?  Well I do! It's still in its infancy but one of my goals for 2019 was to do a video of some kind every week. This is my social media "weak spot" so I'm trying to improve by practice, practice, practice.  You can help but checking my channel out and subscribing to it if you like. You'll be notified when I post a video and can save it or comment on it as well.

Here's a link to the one I did yesterday!

YouTube video on sponging

Are there some specific topics or products you would like me to demonstrate?  I would love some suggestions. I know there are a lot of things I take for granted with papercrafting and have to remind myself that people aren't "born" with this body of knowledge, they have to learn it and it's best learned from watching others.

My other social medial opportunities include a new Instagram account called "Big Sky Stampin" which is all about my papercrafting hobby/business.   You can see that here and start following me:

Instagram - Big Sky Stampin

I also recently started a Facebook group just for customers and other SU addicts!  I try to share pertinent information about products and upcoming promotions or specials.   It's a closed group but it's easy to request to join and I'll add you to the group!  Go here for that:

FB group - Big Sky Stampers

I also update Pinterest whenever I blog about new card ideas. I'm discovering that people LOVE Pinterest and it's often the first place they look for inspiration on everything. You'll see my cards as well as other people's cards that I especially like.  Here's the link for that:

Sarah Cade - Big Sky Stampin - Pinterest 

I think Social Media is here to stay and although there are a lot of problems with it, it can be used for good and connect us with our mutual interests, especially in the arts!  I hope you'll check these links out and follow me, subscribe or save them in your favorites on your computer or Ipad.  I will do my best to keep you inspired!

thanks!
Sarah

Friday, January 25, 2019

More and More Hearts with Forever Lovely

Happy Friday Stampers!
I want to share the rest of my Valentine ideas that I've designed so far, as I've had fun playing with the two bundles in the 2019 Occasions Catalog.  It was a little hard for me to decide which is my favorite, so I purchased both! This second bundle is called "Forever Lovely" and while it has a few hearts, it mostly focuses on a flower motif with some really interesting framelits to accompany the stamp set.  This is one of those sets that you have to play with a little to really appreciate.  Here are some of my ideas:


 Isn't this gorgeous?!  I tried to incorporate a little bit of everything in this card!  The two-step stamping was easy with the Stamparatus to help me position my stamps. I wanted the flowers and lives to be vivid so I used Lovely Lipstick and Granny Apple Green for my colors.  To give the card some texture, I used the new "Lace Dynamic Texture Embossing" folder. This lovely embossing folder looks great on either side, embossed or de-bossed.  i wanted some sheen and shine so added a thin strip of the Lovely Lipstick foil paper available as a Sale-A-Bration freebie with a $50 order.  I used my sprig punch to add some extra greenery and finally some gold pearls for bling.


My second card is just about the exact opposite in terms of detail!  It's simple stamping with a tad of Designer Series Paper thrown in!  It always have to remind myself that a card doesn't have to be "over the top" to be effective.


I wanted to play with some of the other framelits, so I used this smaller rose and leaf die in the corners of my cardstock piece. It cuts out the rose and leaves and the cut out outline is what remains. I added some silver glimmer paper to highlight it. If you look closely, you'll see where I stamped a rose with Flirty Flamingo ink on the card stock as well, just to create some texture and depth. I even added a little bit of our rose metallic thread!

The other thing I've enjoyed over the past couple of weeks is pulling out some old favorite Valentine stamp sets and combining them with some new product, because they were the perfect fit. As soon as I saw the "Buffalo Plaid" background stamp, I remember the lumber jack stamp from a few years ago!  I love this set and card!!


One customer reminded me of her favorite Valentine that I had made in the past, from the "I Dig You" set!  I updated it here by combining Real Red with our new Gray Granite.  Believe it or not, I colored in the red dots with my Real Red Stampin'Write marker!


And of course, there are those cute hedgehogs that pop up every now and then!  This time I was able to color them with my Stampin' Blends alcohol markers. My son no longer has his hedgehog, but it still makes me smile to think of Miko and hedgehogs in general!


I think I like making Valentine cards so much because of the whimsy and humor that can be included. It's fun to feed off the inside jokes and shared funny experiences we have with people and translate that to paper and ink for the perfect Valentine card!

I hope you have a fun weekend planned!  I have another Stampin'Up! party scheduled this weekend with all new people and I'm so excited to share what I love.

Until next time,
Sarah

Thursday, January 24, 2019

Meant to Be - More Valentines!

Hi Stampers,
After sharing those adorable animal Valentines yesterday, I'm back with some more traditional style cards for that special holiday. There are two Valentine bundles in the 2019 Occasions Catalog and it can be hard to choose a favorite, but I decided mine was the "Meant to Be" bundle. The stamps and framelits feature hearts, all kinds. Some of the framelits cut out a frame of a heart as well as the heart and others leave a stitching imprint on paper, but don't cut. The sentiments seem fresh and not overdone, which I appreciate. I feel like with Valentine's Day, sometimes it is hard to be very original!

I wanted to show you some of the ideas I had while playing with the fun bundle.


I added a lot of elements to this first card!  The floral die cut is from the other Valentine Bundle, which I will feature tomorrow.  I wanted you to see some of the hearts. The cut out heart borders are really lovely, especially with the gold foil paper. When you use these framelits, you will have some extra pieces that are fun to play with as well.


This is a similar concept but I used the framelits that just leave a stitching line and "cut them out" by tugging the paper away from the stitching line. It worked ok, but it would be cut as a background design with just a bunch of stitched hearts.


This card features one of my favorite framelits, the grouping of hearts at the bottom of the card. I ended up cutting several of these and even cut some of them apart for a more narrow tag I was making. Some of the framelits in this set feature an elongated heart that I ended up really liking because it's different. I kept this card simple with some background stamping to help highlight the raised, larger heart.


The most eye-catching heart in the framelit set is this lacy detailed heart. I was able to cut it out of card stock and foil paper, but foil paper ended up being the most dramatic.  In case you are wondering, I used some left over Valentine paper from last year's bundle that I still had left. This is a very different color scheme of Calypso Coral and Petal Pink but I think it's gorgeous.


This was my quick and easy idea. All I had to do is run some paper through the Big Shot with heart dies and arrange them on a background (last year's paper again).  I have already used the "Just for You" stamp on several ideas, not related to Valentine's Day. It's a bold and larger sized font that I really love!


For this card, I used my retired heart punch for the hearts but wanted to show the "Meant to Be" Stamp cut out of a framelit from the "Wonderful Romance" bundle. I plan on using this oval framelit alot!  I love the simple edge detail.

I have a supply list showcase just below so you can see the colors I used and the products. A click on any of them will take you into the online store. It's an easy way to gather up some supplies for your next project! I'm going to feature the other Valentine bundle tomorrow so I hope you'll come back to see some ideas with that set as well. There's plenty of time to start a project of making some Valentine's this year!  They're fun to do and are sure to delight your friends and family.

Stay warm and Happy Stampin'!
Sarah

Wednesday, January 23, 2019

Hey Love - You Animal You!

Hi Stampers!
Even though we are getting pounded with snow the last couple of days, I have Valentine's Day on my mind lately!  I want to share some of the fun with you today and the next couple of days. I recently had a Valentine Card buffet which was quite fun. Valentine's cards are fun to make and appropriate for everyone, not just your sweetheart. In fact, I think the ones you give to other people are even more fun to make because you can tailor make them to suit someone's personality or your relationship with them. Kids adore Valentine's Day as they look forward to possibly making a card box to collect the ones they receive and then carefully writing out their own sweet wishes on the ones they give.

This year, the the 2019 Occasions Catalog, Stampin'Up! has a super cute set featuring some adorable animals to convey your Valentine Greetings. I had a ball playing with these!


The first animal I wanted to ink up was the gorilla. I just thought he was especially cute and I figured he would be perfect to color with the Stampin' Blends alcohol markers. I embossed the background with the "Layered Leaves" embossing folder and added some Washi tape from the recent Christmas like of products. My punch is from the Christmas Tin which was also recently featured in the Holiday Catalog.


My second card went straight to the otter!  I know in real life they can be mean buggers, but this one is all cute and sweet.  I've been using my new rectangle framelits quite a bit too, a new product in the 2019 Occasions Catalog.  I grabbed some "Tranquil Textures" background paper because I thought it gave the sense of movement and water.


Most kids love a good dinosaur and so of course, this set had to have one of those.  I kept this card pretty simple but added some punched out red glimmer paper hearts where there were originally just some stamped hearts, for antennae.  One interesting element I added was the white background I embossed with the Corrugated embossing folder.  I actually used the white cardboard that is included in all our Designer Series Paper packs. It's quite thick and stiff and can handle a sturdy embossing folder without any problems!  My background paper is from the "Frosted Florals" suite, again featured in the Holiday Catalog.


My final card featured the skunk. He was trickier to color as I knew if I made him a true black, you be unable to see his face, which was pretty cute. I kept this simple with some background paper accents and the "Maps Etc" embossing folder.

All of these were quite fun to make and actually would be pretty easy to mass produce. The Big Shot was used only for embossing and the rest is coloring. Do you have some kids in your life that would love to receive one of these "animals" for Valentine's Day?  You can get the set and some supplies to make your set of cards by clicking on any of the supplies listed below.  Don't delay! Valentine's Day is just around the corner!

I'll be back tomorrow with more Valentine ideas. It's the perfect time of year to let those you love know how much you mean to them!

Happy Stampin'!
Sarah

Tuesday, January 22, 2019

Hello Cupcake - a Sale-A-Bration stamp set!

Hi friends,
I want to share some of the wonderful Sale-A-Bration products from time to time so you have some ideas of what to do with them, once you earn them!  Sale-A-Bration is a favorite time of year for seasoned stampers. We know that with every $50 purchase of any SU products, we can earn a free SAB product. They variety is great as there are stamps, embellishments like wooden butterflies and ribbon, framelits, paper and more! I love to check out all the possibilities and then plot a spending strategy for the three months that SAB lasts to get what I want.

Today I wanted to share a cute stamp set that is perfect for birthdays but would work for any occasions using cupcakes to celebrate with!  It's got some great sentiments as well!


For my first project, I was super anxious to try embossing another of the free SAB products, the Grapefruit Grove foil paper. This paper is a real attention-getter and I used the Dot to Dot embossing folder featured in the new 2019 Occasions Catalog.  I chose the colors I did because of course, most people would choose a chocolate cupcake if they could!  I added some extra interest with the Tailored Tag punch for my sentiment and a couple of "sprig" punches out of Grapefruit Grove cardstock and a button.


For this card, I wanted a more "girlie" color scheme so went with the obvious pink and purple!  In this example, you can see that the frosting actually has 2 stamps to use, so you can switch up the colors if you want, or stamp them the same color.  Did you notice the "sprinkles" stamp that I scattered around the background?


This was actually the first card I made and my least favorite. I think the problem ended up being the color scheme. I thought Rich Razzleberry and Lemon Lime Twist would be really striking together, but I'm not so sure now.... It's okay, just not what I had pictured in my head. Does that ever happen to you?  I try to learn from these experiments and improve my design instincts based on what I don't like sometimes. I'm also not sure where I got that background Designer Series Paper... I'll update my blog once I figure it out haha!

If you are a beginning stamper, this would be a good Sale-A-Bration pick for you as you probably need a birthday stamp set of some kind and this is simple to wrap your head around.  If you live in the United States and don't already have a demonstrator, I would love to be yours!  I offer one-on-one coaching, product advice and training and classes in the Bozeman, Montana area.  You can contact me anytime or simply go to the online store and start shopping. I love to share what I love about stamping. It has become a passion and even a way to escape some days. There was an old commercial back in the day that featured a bubble bath sort of product named Calgon. The tag line was "Calgon, take me away".  I could say "Stamping, take me away"!! If you would like to be "taken away", if only for a few minutes each week, I'd love to talk to you!

Until next time,
Sarah


Monday, January 21, 2019

Love You To Pieces

Hi Stampin' Friends!
I'm taking a one-day break from all the new excitement of the 2019 Occasions Catalog and Sale-A-Bration today. I want to share with you a fun bundle I recently discovered in the Annual Catalog. It turned out to be a complete delight to play with and even comes in handy for any upcoming Valentine's ideas you might need. It's called "Love You to Pieces" and features a jigsaw puzzle theme. What's especially cool about the overall puzzle framelit is that you can use it to cut or add your Big Shot Embossing mats and use it to just make an impression on your paper. Here's some examples of what I'm talking about!


My first card features a couple of the puzzle pieces that include wonderful sentiments, hence the title of the bundle!  I designed this card to be part of my Valentine card buffet which I held this week. I paired Flirty Flamingo ink and paper with Poppy Parade ink and paper. There is a framelit to cut the puzzle pieces and I used my heart punch for the heart. 


For my next card, I wanted to use the "let's get together soon" sentiment, perfect for a dear friend that you haven't seen in awhile. I used the large jigsaw puzzle framelit to cut some pieces of Blueberry Bushel cardstock and then grabbed some "En Route" Designer Series paper to work with my color scheme. I love the inherent humor in this sentiment combined with random puzzle pieces.


For this card, I was curious what it would look like if I inked up the puzzle framelit. It didn't leave a very dark line, but you can still see it in the background.  I went back to my old standby DSP, "Tranquil Textures". I love the combination of Rich Razzleberry and Night of Navy cardstocks and ink.


This card features the jigsaw puzzle die used with embossing mats so it didn't actually cut, just made an impression.  Again, the completed puzzle fits with the sentiment just perfectly!


This card features the final die in the set, one that is heart shaped and then cuts the heart into four pieces. You need to stamp first, then cut. I put the pieces back together on my card and raised each piece up with a dimensional. I added a couple more loose puzzle pieces for an accent and then a background of the entire puzzle die, again, just embossed with the Big Shot embossing mats.

What a fun set to play with and use!  I'm so glad I took another look at the annual catalog and noticed something that didn't get my attention the first time through. The puzzle die would be fun to use with kids and could be placed on top of any paper such as a random picture from a magazine. They would have so much fun putting the puzzle together.  A super out of the box idea would be to create invitations or how about even a marriage proposal on paper, then puzzle cut it and give it to the recipient for some fun and mystery!

The first month hasn't even ended yet and many of you are excited about Sale-A-Bration!  You can place an order anytime online or contact me for help and I'll get you your stamping supplies. Winter is an especially great time for this hobby as you are already staying inside and trying to keep occupied and warm!

I encourage you to take another look through the Annual Catalog and see what you didn't notice your first few times through!  It may surprise you, as it did me!

Happy Stampin'!
Sarah

Friday, January 18, 2019

Best Catch

Howdy Stampers!
It's good to be back with a new product post. There is so much to love about the new 2019 Occasions Catalog and if you or your family like to fish, this is one of the best sets around!  It's called "Best Catch" and includes some wonderful stamp images as well as framelit dies so you can avoid fussy cutting. Who doesn't love that?!!

I feel I should apologize if my fish are not colored exactly like they would look in a river. I just played with my Stampin' Blends alcohol markers and didn't stop to research what fish actually look like for real, haha!  I did have fun, however!  Here's what I came up with:


For my background of this card, I went back to some favorite background paper, "Nature's Poem" Designer Series Paper. Next to the "Tranquil Textures" DSP, I have used this more than any other DSP this past year.  I purposely wanted to vary my coloring so I used watercolor pencils for the creel (basket) and fly. You can see the results are a bit understated. I did use a blender pen to enhance the color a bit. For the fish, I used variations of the Calypso Coral and Old Olive Stampin' Blends. the color is much more vibrant.  When I need to raise up my sentiment, I often reach for my "Tailored Tag" punch, perfect especially for a non-frilly card.


For my second card, I wanted to use one of the framelits that is a stand alone, meaning there is not a stamp that coordinates with it. It cuts some wonderful reeds and cattails. I switched up my coloring of the fish with shades of Shaded Spruce and Soft Suede. To create the water, I used some Pacific Point blue ink that I captured off the lid of my ink pad by squeezing the lid down on the ink pad itself, while it is still shut. I used an Aqua Painter with almost no water because I wasn't using watercolor paper, just regular Whisper White card stock.  I love everything about this card!


This wonderful set also includes suitable "Dad" sentiments so it can easily be made into a Father's Day card or masculine birthday card. On my last card, I played with the fun fish framelits that come with this set. There are two sizes and I switched up my colors between Soft Suede, Mossy Meadow and Old Olive. I used the same Aqua Painter technique on this card as I did above, but not as much coloring.  Next time, I will heat emboss the fisherman image and try to make it stand out a little more. By the way, my weeds in this card are made from a stamp in the "Home to Roost" set, a favorite Sale-A-Bration freebie!

Where I live in SW Montana, we have major rivers surrounding us and blue ribbon fly fishing abounds. In less than a half hour, you can be fishing in the world class Yellowstone, Gallatin and Madison rivers. I keep thinking that is a sport I may take up some day. My husband loves it and it would be fun to join him on these gorgeous rivers. Catching anything would be a bonus!

If you purchase this "Best Catch" bundle, you are almost at $50 which qualifies you for a Sale-A-Bration freebie. Now is the best time to shop with Stampin'Up!, host a party or even join as a demo if your wish list is really long!  Ask me for details and I'll be happy to steer you in the right direction.

I hope you have a great weekend ahead of you!  I have a Valentine Card buffet tomorrow, from 10 a.m. to 1 p.m. so if you're in the area and want to stop by, please do!  I'll come back later this weekend and share some of the cards and pics from that fun event!

Happy Stampin',
Sarah

Tuesday, January 15, 2019

Golden Afternoon

Hi Stamper Friends,
I hope you are doing well as you continue on in another week in January. I enjoy getting back to a routine but I also really loaded up my calendar with Stampin'Up!-related events, classes and fun so I'm busier than I thought I would be. I've had some wonderful new customers come to a workshop as well as two local businesses interested in my cards for their clients. It's so gratifying and also humbling to work hard on a hobby or art form and have other people think it's great.

In every catalog, there are new stamp sets introduced that can be classified as "sleeper sets". This is my term, not really anything official. What I mean by that is that there are stamp sets that don't get a lot of notice or publicity. You won't see them much on Pinterest initially (until they go viral) and you tend to flip right by the page they are on. Their beauty is possibly understated or not as obvious at first glance. Today, I'm excited to show you one of those sets. It's called "Golden Afternoon" and it's the perfect pastoral theme that you can use for so many reasons. The sentiments are tender and touching, just what you need for special times and special people. I had some fun playing with this recently and wanted to show you my cards:


For this first one, I wanted to use some Designer Series Paper that featured leaves so I grabbed this sheet from the "Nature's Poem" paper set. I knew it would be hard for the tree design to stand out on such a busy background with just stamping so I embossed the image on with Versamark Ink and some retired Early Espresso embossing powder. That gave the image enough depth and color saturation that it showed up nicely on this background.  The color scheme of Mint Macaron and Early Espresso go great together!


This card is taking the tree stamp in a different direction. I stamped with Black Momento ink, then colored the leaves and trunk with our watercolor pencils, then blended the color with a blender pen. I am almost always using a blender pen with my watercolor pencils. It spreads the color around nicely and also makes the color brighter and more visible. It takes away any unwanted pencil lines as well. I actually colored this fairly quickly, not working about staying in the lines too much because I knew the blender pen would make it "okay".  Don't you love the birds stamp?  I kept this card extremely uncluttered with no extra embellishments or paper. The "Tailored Tag" punch is a real favorite for sentiments and popping that up with dimensionals makes it stand out.


For my last card, I used the other tree image in the set, which is a much smaller scale. I wanted to go with a non-obvious color scheme so I chose blue. I used a Balmy Blue piece of Designer Series Paper from the Tranquil Textures set and stamped right on it with Night of Navy. I again added the birds and dressed this card up a bit with a doily and some Night of Navy retired ribbon.  This card could easily be made into a sympathy card as well by changing the sentiment.

I love giving these kind of stamp sets some love and attention. They quite often end up being a favorite that I hang on to for years.  I've listed my supplies below so you can order what you need to make these cards or some of your own designs. It's always a good time to start stamping but it's especially good timing now during Sale-A-Bration!  Check out the website for all the details - there's a link on the right side bar.

I'm off to register for OnStage which will be held in April, as well as teach two card classes today. Already it's a great day!

Happy Stampin',
Sarah