Saturday, October 27, 2018

Season of Blessing

Hi Weekend Warriors!
I usually don't post on the weekend because I'm otherwise distracted but today I have some extra time on my hands. We are currently embarking on a kitchen/great room remodel and I have about 45 minutes before the next phase of demo commences. Many of the kitchen cabinets are coming out today, then continued work on getting out the old flooring. We will have the professionals come in and put the new stuff in but we figured we can demo with the best of them! I have to say... pulling staples out of the subfloor is not a fun job - yuck!

Let's change the subject!  I think almost everyone I know loves fall. While they don't necessarily appreciate that winter comes soonish after fall, they do love the colors, the scents, the beauty etc. It's fun to decorate with a fall theme, cook those comfort food meals and craft with fall in mind.  I have some fun cards to show you today that scream "It's Fall Y'All"!  I actually never say "Y'All" but it rhymes - haha!

My first card uses a fun technique with blue painters' tape.  You tear off a piece of tape that is longer than the area you want to ink up. You lay it gently on an open ink pad and press down on the tape lightly with your fingers. You may want to use a disposable glove if you are particular about not getting messy!  Then, you lift up the tape from the ink pad, place the tape on your paper and press it down, rubbing back and forth. You then peel up the tape and voila, ink on your paper. You can repeat this same step with the same piece of tape if you are making more than one card. Be sure to tear off a new piece of tape for each different color of ink you want to use. 


Since my card was wood-themed, I used the "Hardwood" background stamp on the background of my card.  The trees are to die for, right?  They are from the new "Winter Woods" set.

My next card features a new set from the 2018 Holiday Catalog called "Pleasant Pheasants". I didn't use the pheasant stamp for this card, but used the other images that evoke a wonderful fall theme of pumpkins, harvest, wheelbarrows, etc.  This was a straightforward card to make with a slight twist at the end. I did my stamping with Momento black ink and then colored with our Stampin'Up! watercolor pencils. I used a blender pen to blend in my coloring which always makes the colors seem a little brighter.  The scary part at the end is taking the "Burlap" background stamp and stamping over the entire piece with very light Crumb Cake ink. If you Crumb Cake ink pad is recently inked, you'll want to stamp off once on some scrap paper before you stamp on your card piece. I was trying to create a linen-like look that made this look a bit like it was stitched rather than rubber stamped.


For this last card, I grabbed an old favorite from last year, the "Painted Harvest" set. The sunflower images are so fun to create. I also wanted to create some texture on this card so I used the "Springtime Impressions" floral die and created a "white on white" look with Very Vanilla card stock. It has the look of lace and I loved the effect. I adhered the floral die cut to my card BEFORE I did my stamping and then let some of my stamping overlap onto the die cut.  What do you think?


I hope you've been inspired on a dreary, rainy fall day, at least here in Montana. It's a perfect day to huddle in the craft room or tear up your house for a remodel - either way, win/win! It's fun to share my ideas with you and I often pretend you are right in front of my and I'm telling you about my projects, step by step.  Don't be afraid to dive into rubber stamping! It's a great hobby and past time and I promise you won't gain unwanted pounds, waste your time or regret it!  Contact me for more details and I'll help you get started, no matter what your experience level is your or budget.

Thanks for stopping by!
Sarah

Thursday, October 25, 2018

Beautiful Blizzard

Hi Stamper Friends (and others!),
I'm back at it today after spending some time with a "tricky" set. This bundle is gorgeous but I wasn't completely sure what to do with it!  I like some of the catalog ideas, but I wanted to see what I could come up with. The bundle is called "Beautiful Blizzard and it features some snow-related stamps and one big thinlit die full of snowflakes.  I wanted to try cutting the whole thing out first and see what I ended up with.  Hence, my first two cards:


I cut a 4" x 5-1/2" piece of Balmy Blue card stock and ran it through the big shot, using the Precision Cutting Base and it did a great job of cutting out a whole bunch of "blue" snowflakes. I set those aside and adhered the background (what wasn't cut out by the snowflakes) to a sheet of Whisper White card stock. That is how I got white snowflakes, which is usually how you see them! I added a sentiment with some more stamping. The gray tone I chose for this card was Gray Granite.

With the leftover snowflakes, I wanted to create a diagonal line going from the upper left corner to the lower right corner.  Before I glued them on anything, I decided I wanted to try and create a special background. I mixed a little bit of Shimmer White paint in a Stampin' Spritzer with some rubbing alcohol.  I sprayed (fairly heavily) the front of a black card. I masked off the back of the card so it wouldn't get sprayed. Because I used alcohol, the spraying dried fairly quickly and didn't warp my card stock. I hope you can see it with my photograph. After it was dry, I adhered the snowflakes with dabs of Snail tape runner and then added a sentiment.


I also wanted to see what the thinlit die would look like if I tried to just emboss it, using our Big Shot embossing pads.  I discovered you don't need much for this die to emboss!  I layered the regular Big Shot platform, the white and blue embossing mats and then my silver foil paper and the die. I was really happy with the results. To finish off this card, I used some iridescent boxwood wreath embellishments.


For my last card, I wanted to play with just the stamps and not worry about the die. The big "stormy cloud" like stamp was a challenge, but I liked how it turned out. For this card, I used Pool Party and Smokey Slate inks and card stock.


 This set was fun and challenging to play with!  I hope to have some more fun with it soon!  Hope you are enjoying the fall, knowing that winter is coming soon and with it, some beautiful blizzards of the "real" variety!

Happy Stampin'!
Sarah
Tuesday, October 23, 2018

24 hour Birthday Sale from Stampin'Up!


Great news! Stampin'Up! is 30 years old and to celebrate, they are having a 24 hour stamp sale on select stamps!  You don't want to miss it!  Place an order online or get an order to me and I'll submit it before 11:30 tonight!  Check out all the details here:

24 HOUR BIRTHDAY STAMP SALE!!

Thursday, October 18, 2018

Making Christmas Bright

Hi Friends,
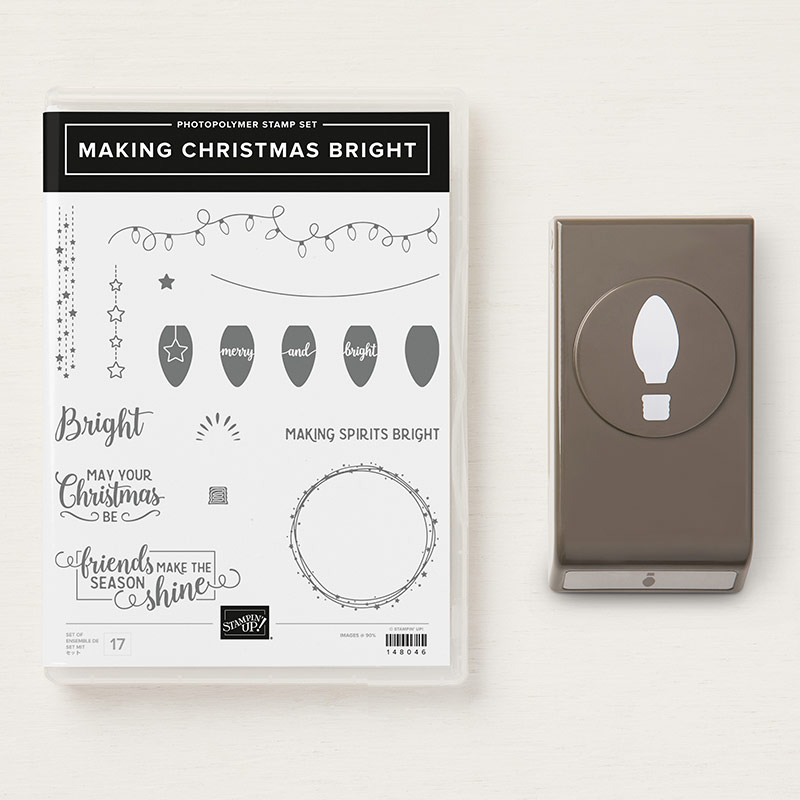
I'm coming to you today with a post featuring another Christmas suite from the 2018 Holiday Catalog. This suite features a great stamp set and a coordinating punch to help you quickly put your idea to paper. It features the old-fashioned Christmas light bulbs!  I really had fun playing with it and punching away. Here are some ideas I came up with, all pretty easy to assemble and adding different elements of Designer Series Paper, embossing and embellishments.


This first card features lovely photographic quality DSP and some gold and red glimmer paper.  It's so easy to punch your light bulbs and make a string with some kind of ribbon or string.


This card also features the "Swirls and Curls" embossing folder in the background. That's a new embossing folder that's introduced in the Holiday Catalog.


For this card, I used the stamp set which features "merry and bright" as a sentiment. You do have to experiment a little with color when the stamps feature the background stamped and the words "unstamped". It can be hard to read with some colors but these turned out great. The snow people are from the "Spirited Snowmen" set that I used for a blog post a week ago or so. The clear epoxy "snowballs" are from a retired embellishment feature.


For this card, I simply copied the DSP!  I also had a smallish piece of gold foil paper, already embossed with the basketweave embossing folder, that I used to frame my stamping.


And this final card features more of the stamping.  I initially made 3 of each color bulbs and then used them on the various cards, with a couple left over. I grew up with these kind of lights on the Christmas tree and it was very nostalgic to spend some time with them.

Curious about the bundle?  Here's a great image of it so you can see what you get when you purchase this set.


I'm anxious to try out the wreath image and see what I can come up with. It's nondescript enough that it wouldn't have to be used just for Christmas.

Thanks for stopping by and seeing what I'm up to!  I'm spending some of my days reorganizing my stamp room as it has become quite messy. This week I was frustrated by not being able to actually find a couple of things so it's time!  I hope you are enjoying our lovely fall and getting a good start on some of your holiday projects. Let me know if I can help answer any questions or guide you towards what products you need to complete your idea!

Happy Stampin'!
Sarah
Monday, October 15, 2018

Top Ten List of What I love about being a Stampin'Up! Demonstrator

Top Ten List of What I love about being a Stampin'Up! Demonstrator:


10) Have a ready supply of cards on hand to send out when I need them.
9) Feel like an accomplished artist even though I can’t draw, paint or sketch.
8) Redirects my attention and spirit on difficult days.
7) Always at the forefront of new products coming out and getting them early!
6) Love being able to help others reach their goals and dreams.
5) The discounts, promotions and special deals reserved for demos!
4) Making my hobby and passion self-funding through classes and recruiting others.
3) Being part of a great company with worthy business practices and goals.
2) Getting to attend the SU events like OnStage and more.
1) People!  All of them, customers, fellow demos, downline, corporate people and more.
They have all enriched my life in more ways than I can express!


This is my 30 second (written) commercial for why it's so great to sign up to be a Stampin'Up!
demonstrator! I've signed up a couple of dozen people so far to my Big Sky Stampers team
and while several have opted out after a few months, many have stayed and boy do we have
fun! Want to chat more about it? Contact me for a one-on-one session in person or by phone
and I'll share with you more about it! You can live anywhere in the United States and still be
part of my team. With technology advances and the Internet, we can connect like we live right
next door. There's no way to lose... try and see if you like it!

Happy Stampin'!
Sarah

Wednesday, October 10, 2018

Spirited Snowmen

Hi Stampin Friends!
I'm here to talk about something you may not want to face. It happens every year and so many people dread its arrival while others relish every minute of it. No, it's not Halloween, it's WINTER!  We have looooong winters up here in Big Sky Country and we know that while we've already had some snow flurries this fall, one of these days, the snow is here to stay and stay and stay. Sometimes it's stays until May. We never know what kind of year we are going to have, but last year was a doozy!

Most of us have learned to deal with it and a lot of us even embrace winter and the snow. Can you say skiing, snowmobiling, snowshoeing, ice skating, ice climbing, sledding?  Those poor people on beaches have no idea of the fun they are missing, right?!!

A new "snowy" set caught my eye in the 2018 Holiday Catalog, called "Spirited Snowmen". I thought it was great because a) it's cute, b) it features images I can color, c) the sentiments are especially cute with wonderful fonts!  I had some fun the other day and here's what I created:


In the card above, I tried to use the happy snowman image to create a sense of cartwheels and over the top excitement for snow! I also purposely didn't want to use red and green Christmas colors. This would make a fun birthday card for one of those winter birthdays! In case you are wondering, I free-hand stamped the snowmen and colored them with my Stampin' Blends alcohol markers.


For the second card, I was most drawn to the sentiment that "love never melts". I thought that was a sweet idea, especially with the cute snow people hugging each other. I searched through all my current Designer Series Paper to figure out the perfect background and found a sheet of a night sky in the "Twinkle, Twinkle" DSP. It was meant for our baby related suite, but it worked perfect for my purposes in this card!


For my last card, I wanted to feature the 3rd snowman, an ice skater. I used some silver foil paper to mimic ice and then colored his body with some white shimmer paint. I used a pretty fine tipped brush so I could try to paint around the coal buttons and facial features. I then went back with a black marker and filled the buttons and face back in. After I was all done coloring, I embossed the entire piece with the "Softly Falling" embossing folder.

This was a fun set to play with and I'm sure at least one of these cards will make it into a class something this winter!  One of my favorite personal challenges is to take a stamp set and see if I can make at least 3 totally different looking cards with it. That's what I did here and I enjoyed every minute of it! My supplies are listed below and you are welcome to check out the online store and order anything you see here or any of out other fabulous Stampin'Up! products!  Winter is a great time to play outside in the snow and play inside with some rubber stamps, ink and paper!

Happy Stampin'!
Sarah

Tuesday, October 2, 2018

Holiday Card Buffet Fun

Hi there friends,
I wanted to share some recent projects (all cards) from a Holiday Card Buffet I had last week. I have these every now and then, more often in the fall, as a way to offer my customers a chance to make some cards that aren't offered in a regular class. I try to make the cards a little less complicated so everyone can work on their own with minimal help.  The idea is to come and grab a shoebox full of supplies for a particular card, make it, then return the box and grab another one. It's my most popular style of event because people like to work at their own pace and make as many cards as they want. I'm always available to answer any questions and help with the various steps.

I thought you would like to see what some of our choices were last week at my latest card buffet. All of these cards feature current product located in the Annual Catalog or the Holiday Catalog.


If you have any questions about a particular card or product, contact me and I'll steer you in the right direction. My goal with these buffets is to offer use of the Big Shot and related products like framelits, embossing folders, etc, as well as Stampin' Blends markers, punches and different papers. I'll be having another holiday card buffet the end of October so watch for more information!  It's always fun to have people over that enjoy being creative!


Until next time,
Sarah

Monday, October 1, 2018

World Card Making Day - All Week!


Hi there Stampin' Friends!
Does it seem to you that every day is some kind of world wide celebratory day for some cause or reason?  I know sometimes the occasions strike me as absurd or funny but this one is totally serious! There is actually a "World Card Making Day"!  I have never been able to make a big deal about it because for some reason, I've been gone or otherwise occupied. I'm going to be around this week so watch for some extra fun and specials from me!

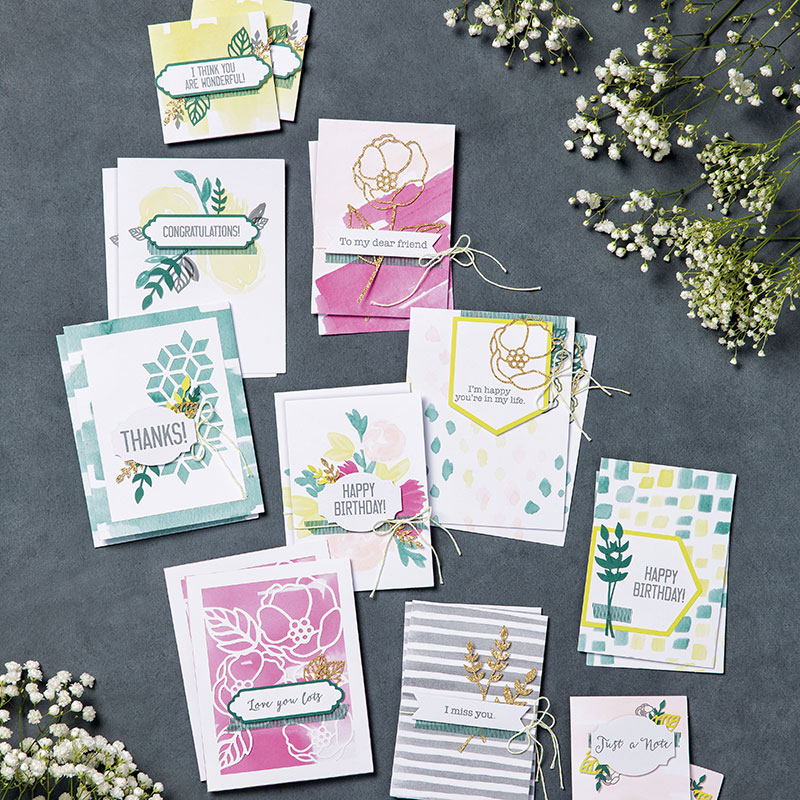
To celebrate, Stampin'Up! has put several products on sale that will help you get into card making, especially if you are new at it! There are several stamp sets, adhesives and lots of kits/card options that will make it easy for you to try it on your own. I'm especially excited about the card kits that are on sale. They are beautiful and will make card making and sending a breeze!  Here they are:

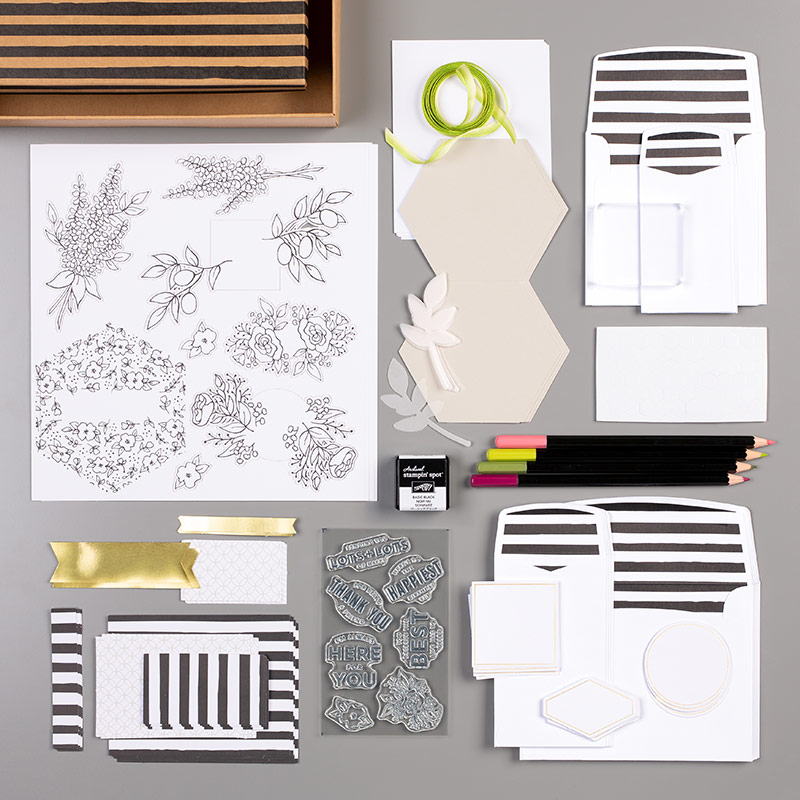
LOTS OF HAPPY CARD KIT


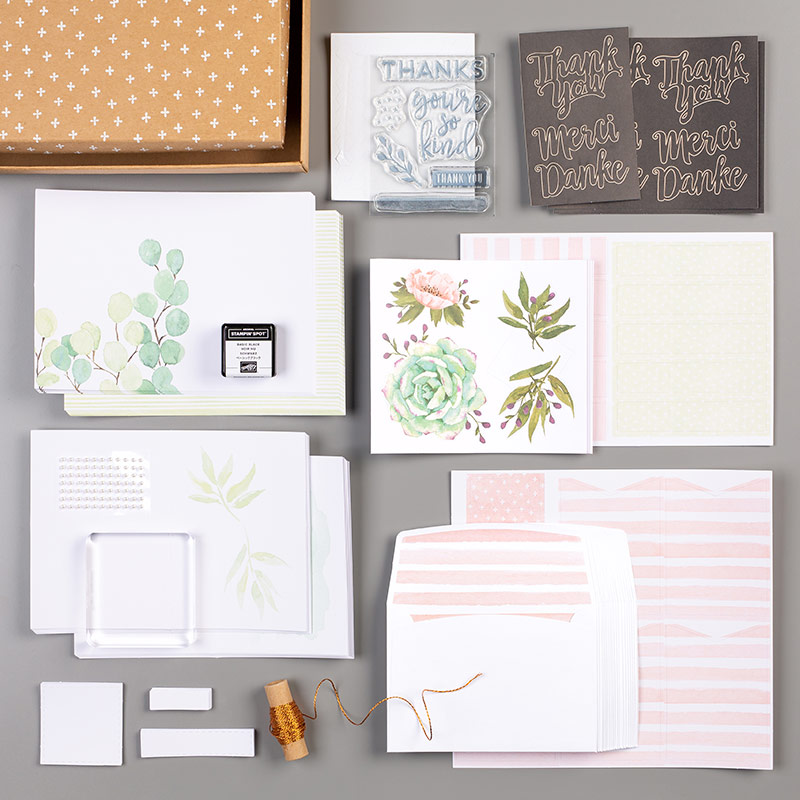
NOTES OF KINDNESS CARD KIT


SOFT SAYINGS CARD KIT


Aren't those kits amazing?  They include everything you need to make what you see and you will have several cards on hand to send when you need one quick. For this whole week, if you order a kit through me, I will add an extra ink spot (different color) to your kit so you have more choice when stamping.  These kits are stunning and if you're new stamping, you won't believe you created all these lovely cards, even though you know you did!  The prices and ordering links are listed below. Click on any of them and it will take you to the online store. You can also contact me directly and I will place an order for you.

Curious about what else is on sale?  For you seasoned stampers, who can't use some more paper and adhesives?  Check out everything that is on sale all week here:

WORLD CARD MAKING DAY SALE !!!!

I hope you'll check this out and consider the art of card making. It's a terrific and somewhat bygone way of blessing people you know and love. I'm old enough to remember when there was no email or texts and I miss the personal touch of snail mail, especially at birthdays and when those life events occur like weddings, babies and deaths. I feel extra loved when I receive such a card in the mail.

Let me know if you have questions!  I'm here to help. My goal is to flood my blog this week so stay tuned for more ideas and encouragement to make cards!

Happy Stampin',
Sarah