Friday, October 28, 2016

This Elf is not on a shelf, but is having trouble with his hat!

I hope my catchy title sparked your curiosity!  Some of my stampin' friends made a cute card this week in class that features the spinner design.  It's a mechanical card with a moving part. Here's my card and then I'll talk some more about it!


It's always hard to see moving parts in a still picture, but I'll try to explain it!  The elf is glued down to the background piece of paper, which is adhered to the card with Foam Adhesive Strips.  I made a penny sandwich with 2 pennies and a round adhesive dimensional in the middle and adhered the elf's hat to that. I carefully tucked the hat into the slot created by a framelit. The hat rolls back and forth along the slot and spins as it rolls. It's a fun concept and such a great idea for kids especially. Stampin'Up! has the framelits with coordinating stamps to create your own spinner card or you can do what I did and use the framelits with some Christmas stamps to create a seasonal look.

Here's a really helpful video from Stampin'Up! that explains the whole thing!

Spinner/Slider card

I hope you can find some time and a couple of pennies and create your own spinner card soon! They will bring a smile to anyone's face ;)

Have a fabulous weekend!
Sarah


Thursday, October 27, 2016

Stained Glass Leaves

I am really excited about the card I want to share with you today. It is one of those "I dreamt"... I love when that happens. Many of my dreams are extremely forgettable but when I dream up a card idea, I try to quickly try it out and see if it has possibilities. This one certainly did!  I'll share the technique with you after I show you the card:


Step one is cutting a 4 x 5.25" piece of shimmer white card stock. I then sponged it using daubers with Always Artichoke, Cajun Craze and Crushed Curry. I made sure that now white card stock was peeking through anywhere.  Once I was done with that, I lightly inked up the non-leaf side of my embossing folder, in other words, the space between the leaves, with Early Espresso (emphasis on lightly inking!).  I then inserted my sponged card stock and ran the whole thing through the Big Shot. While the card stock was embossed, the brown ink was transferred to the paper, in between the leaves. I actually whooped out loud when I saw the results!  This technique has far-reaching applications with a change of embossing folder and color choices such as spring, Christmas, girl princess party, school colors, etc.

For the wreath, I used the largest swirly circle framelit and topped it off with some pine boughs and a bow. I love the whole season and theme of blessings and thanksgiving and this card will help me celebrate by showing others how much they mean to me.

Thanks for stopping by!  I would love to know who's out there! Leave a comment and tell me what you think!

Happy Stampin'!
Sarah

Wednesday, October 26, 2016

Old Fashioned Santa

Over the few years I've been doing this, I've been trying to figure out what my style is. I'm still not there as I like so many different looks and techniques, but one thing I come back to is a vintage look with stained edges, old fashioned sketching, etc.  Of course, this was easy this time around with this Santa stamp!  Here's my card:


I also used one of my favorite techniques lately, inking up the embossing folder!  I inked up the raised side of the pine branches before I embossed it and then inked up the edges as well just a tad for a weathered, old look. The Victorian lace looks just right and for fun, I added one of our cute pine cone charms.   This card is another card available to make at my card buffet!  I'm up to 17 choices so far and the fun starts tomorrow morning at 9 a.m.! I hope you can come ;)

Happy Stampin'
Sarah

Tuesday, October 25, 2016

The stockings were hung by the fireplace with care.....

Wow! My head almost explodes trying to cover every Christmas base!  There is the birth of Jesus, Santa Claus, The Night Before Christmas, cookies, presents, ornaments, snowflakes, etc, etc!  What's a crafty person to do?  I guess you just keep plugging away and make more cards and projects so all your ideas have some sort of outlet!  The stamp/framelit set I'm featuring today was not on the top of my list but it has risen to that point after I played with it awhile!  The "Hang Your Stocking" bundle is chalk full of stockings, ways to decorate them and more!  The framelits also include embossing type framelits that don't require stamping. More on that in another post... Here's my card today:


I wanted to try and create a simple fireplace idea but not spend so much time on that to the detriment of the stockings. I embossed a 5.25 x 4" piece of crumb cake card stock with our brick folder and then lightly daubed the grout area with some White Craft ink and a dauber.   I then used a old Big Shot die, "Top Note" (everyone's favorite I think) to cut out a chunk of the middle for the fireplace. I toyed with trying to create a fire image, but decided to stamp my sentiment instead.  I raised up the brick piece on dimensionals and put it on another piece of crumb cake. I stamped and die cut my stockings, wrapped some Baker's twine on the card and BOOM... done!  These stamp designs are great and definitely feed my Nordic soul.

Hanging stockings is still a big deal in our family and probably always will be. One year I skipped it thinking the kids wouldn't notice... WRONG!  Apparently that is really a big deal even if they only get pens, highlighters, mascara, candy and misc.

What are your favorite stocking stuffers?  Leave a comment and you'll hear back from me with a special offer!

Happy Tuesday!
Sarah

Monday, October 24, 2016

Christmas Trees!

I like to think out of the box... not always with my life decisions, but definitely with stamping!  The Holiday catalog has a wonderful tree stamp set that definitely is not Christmas oriented, but with picking the right color scheme, it is!  Here's my card:


This combined some of the fun products from the Christmas catalog as well... the red metallic thread, the music paper, etc.  It's an easy card and by changing up the background "blob" colors of the tree, you can make it reflect any season!  Here's another one I made for fall:


It's not the greatest  quality picture, but you get the idea!  Here's a look at the stamp set itself for you to get a look at all the tree variations:


You could even go with the palm tree for summer or a Christmas related card. Don't forget about the "blob" stamps... see a popsicle?  See a sucker?  See a snowman?  That's right... out of the box!

This card and many more are available to make at my October Christmas Card Buffet, this week on Thursday, 10/17/16. There are two sessions and it is an open house event, come when you can and make as many cards as you want.  The morning session is from 9 to 12 and the evening session is from 5 to 8 p.m.  Let me know if you need more details!  Cards are $3 each and include all the supplies and envelopes!

Happy Monday!
Sarah

Wednesday, October 19, 2016

Eskimos Anyone?

Hey Stampin' Buddies,
I have a favorite card for you today out of all my experiments with the new Holiday Catalog products!  This is definitely one I'm proud of!  Here's the card:


How cute is that?!!  This fun card used a lot of tools but was super easy to make. For the igloo, I embossed some white card stock with the brick folder, then cut it out into a circle and then punched an opening to the igloo with a smaller circle punch. I used dimensionals to pop up the igloo and used some left over brick-embossed paper  for inside the igloo. I then used the Cookie Cutter Christmas stamps and punch for my Eskimo. I added a candy cane for him to hang on to and a sentiment and even some white snowballs and silver cord on the top.  This would make a fun birthday card for a winter birthday person! It's hard to see in the picture, but I used a little wink of Stella ink on the igloo for some sparkle and shimmer... lots of fun details for a unique card!

I hope these ideas I share inspire you!  Leave me a comment if you like so I can get some feedback and improve my creative efforts!

Happy Stampin'!
Sarah

Monday, October 17, 2016

Merry Medley

And a rainy good Monday morning to you!  With hardly any encouragement, our rain could easily turn to snow so I'll keep the Christmas cards coming on my blog!  Here's another card featuring the same sentiment as yesterday but everything else is different. 


This card proudly features one of Stampin'Up!'s latest trends~~ stamps and coordinating framelits to cut them out with!  This ups your creativity potential by making some of these intricate cuts for you and allowing you to add more to a card!  I simply stamped the tree and deer and cut them with the Big Shot using the framelits that go with them and then cut out a bow for the deer since this is a Christmas card afterall haha!   Please note the wonderful background stamp that features many versions of Christmas greetings. I always love that kind of background stamp and actually really like background stamps of any kind!

October is quickly fleeing!  Think about what you would like to do this fall for your crafting project, check out our online store and contact me with an order. It's not too late!

Happy Monday!
 Sarah

Thursday, October 13, 2016

Jolly Moose

After our 6"+ of snow earlier this week, everyone is digging out the mittens, hats and scarves!  We went from 70 degree days to 14 degree nights and to say the least, that killed off the straggling flowers I still had around the patio!  While weather does not really impact me day to day (very grateful to not have an outside job that is severely contingent upon the weather!), it is interesting to say the least!  

Stampin'Up!'s Holiday catalog features so many fun things, but one of the cutest is a stamp set/punch bundle featuring some cute characters and stocking caps. Here's my card:


My idea for this card came from the sentiment which actually belongs to another set, Santa's Sleigh. When I saw "Hope your season brings one good thing on top of another", I immediately thought of a bunch of stocking caps on top of a head. To make it even that much cuter, I decided to make the head a moose!  It's really fun to combine different sets, be sort of whimsical and every once in awhile go fo the look that makes no sense in real life. I've seen moose in the wild and have never seen one with a stocking cap. They are tough dudes!  When I was all done, I felt the edges of the card were a little "meh" so I added some washi tape which usually fixes that!  Hope this gives you some fun ideas. Check out this stamp/punch bundle, it is adorable!

You can click on the supply items below to order or check out everything we have in the online store link, to the right.

Happy Stampin!
Sarah

Wednesday, October 12, 2016

Noel!

I have to admit that when a new catalog comes out with Stampin'Up! and I start getting some of the new products, I am almost paralyzed with where to start! It all looks so good and fun to work with. I'm still sifting through some of my products and was reminded I bought an Ombre Stampin' Pad. These are pads with 5 shades of a color, dark to light. I think it works best with a more solid image but I like the look! Here's my card:


This ended up being a simple appearing card but there are a lot of layers and and elements here. It could also be jazzed up with some bling or our awesome mini pine cones for a little pizzazz.  The main green color is Emerald Envy and it looks really sharp with Cherry Cobbler. They are both bold and rich enough colors to tangle with each other and not dominate ;)  We also carry the Ombre ink pads in Rich Razzleberry, Bermuda Bay and Calypso Coral. I think I will be buying those as well after I saw how much fun the Emerald Envy pad is!

I've listed my supplies below so you can see what I used to create this special card. Christmas is coming and there's still time to make some cards!  I have a card buffet coming up again on October 20th, from 9 to noon and 5 to 8. I hope you can drop by! It's an Open House format and you are free to make the cards you want to make at the pace you want to go!  I'll remind you again next week!

Happy Stampin'!
Sarah

Tuesday, October 11, 2016

Bear Hugs for You!

Although it wasn't a big surprise, because the weathermen called it, we got about 6" of snow last night and this morning I am living in a winter wonderland!  This will be our first snow fall in our new house so we will be dealing with snow removal... lots of it!  Good exercise, right?

Of course there is a nip in the air so it reminded me of sweaters, one of life's simple pleasures!  The card I have for you today has two sweater  elements, the bear's sweater and the background cable knit embossing folder! Here's the card:


The bear stamp is from our Occasions catalog last year and Stampin'Up! repeated the design, only this time with a sweater on him!  I love it! He's already for winter now.   This was easy to make. I stamped the bear once in Early Espresso ink for his body and then stamped him again in Cherry Cobbler and hand cut the sweater out and then placed it on his body with dimensionals. When in doubt, it usually works to add some Washi tape to a card to spice it up a bit!  The cable knit embossing folder is a must have from the Holiday Catalog. It is deeper embossing than usual and so gorgeous! You could switch up the sentiment and this would make a great birthday card as well.

Hope you like my card!  See the supplies below and be sure to check out the whole catalog for more great ideas. Snow time is crafting time!

Happy Stampin'!
Sarah

Monday, October 10, 2016

Woodland scene

Happy Monday Morning!  We are going to have a gorgeous day today and then SNOW!  Guess that is not a big shocker this time of year and I enjoy all four seasons, so it's all good!  I have my monthly October classes this week and I wanted to finally do a card that I have had sitting around for over a year. It will not exactly look like this but will use this technique! Here's the idea:


I did not come up with this idea, but to my knowledge, none of my customers have tried this. The secret technique to this card is to do all your stamping on the embossing folder, the non-raised side. You then insert your paper and emboss and the ink you have stamped on the folder is transferred to the paper, "behind" the foreground of the raised embossing. It's alot of fun, a little stressful but super exciting to see the results.  I'll post the cards we made later so you can see an updated version of this technique!

Let me know if you are interested in attending a class. They are not intimidating and you don't need any prior experience, just a willingness to try something fun!

Hope you have a great Monday!
Sarah

Thursday, October 6, 2016

Keep Warm and Snuggle Up!

I love when cool ideas in my head translate to paper and ink. It doesn't always work out, but I sure love it when it does!  When I saw the new cable knit embossing folder in the Holiday Catalog, I thought of a sweater and another favorite hobby of mine, knitting!  Here's my card:


Stampin' Up! suites of paper, stamps, embellishments take alot of the guesswork out of what to use for a design. This was easy to imagine and even more fun to make. You might be wondering how I came up with the sweater?  I hand drew a template on a scrap piece of paper, cut it out and traced it on some crumb cake cardstock. I then embossed it with the folder, taking care to place the cable design where I wanted it.  The card also features a lovely, mostly plaid and Nordic design "sweater" paper pad that couldn't be cuter!  There's even a rope trim that looks like some bulky weight yarn. Everything I needed was all on one page!  See the supplies below to try out this card!

Don't forget I'm holding a blog comment contest!  Please give me your comments and you will be automatically entered for a chance to win my contest in  October! I'm trying to generate some more interest in my blog and thought this would be a good way to try ;)

Have a warm and snuggly day!
Sarah

Wednesday, October 5, 2016

Feather Together

HI friends,
I thought I would take a break from Christmas today and show you a card I had fun dreaming up. Stampin'Up! has had a couple of feather stamp sets over the years and this is the current one:


I wanted to try as many of the feather stamps as possible, with some fall color tones and also stamp on a printed background. I like how this turned out!  I did the same stamping on the top left and bottom right corner, just kept turning my paper. So, I first stamped both green feathers, then the rust colored ones, then gold, etc.  When I was done with the stamping, I thought it needed a little zing so I added a scribble of gold foil paper that really catches the eye. Overall, I was happy with my experiment. What do you think? Don't forget to comment below and you'll automatically be entered into my Blog Candy giveaway the end of October!

After a gorgeous day yesterday, we are back to rain and clouds. Guess I will just have to spend some time stampin'!
Have a great Wednesday!
Sarah

Tuesday, October 4, 2016

Star of Wonder, Star of Night

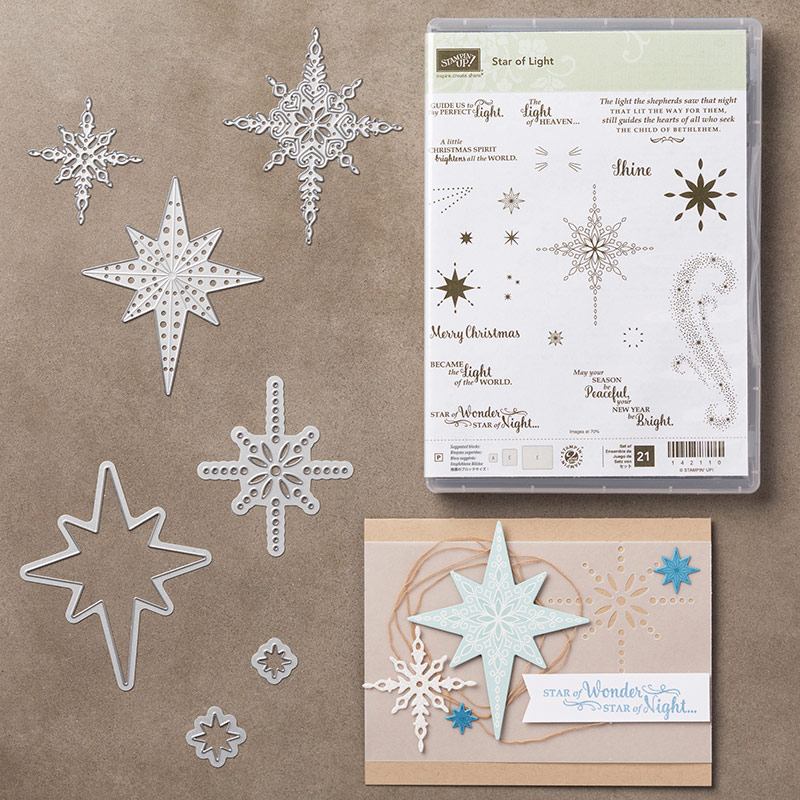
I'm sure many of you know most of the lyrics to most of the Christmas carols sung at that special time of year. One that is very famous is "We Three Kings" which recounts the journey of the Wise Men to see Baby Jesus, the newborn King.  Stampin'Up! has captured the essence of that famous carol in their new stamp set, "Star of LIght". It comes with coordinating Thinlit dies, many star stamps and tons of sentiments!  I just love it!  I've already made several cards featuring it and will have them on the blog as well in the coming weeks.  Here is the card we made at a recent card buffet:


For some reason, every time I create a card with a purple color scheme, people flock to it!  So many of you love purple!  I used Elegant Eggplant and combined it with elements of silver and glimmery, shimmery white. This card features heat embossing as well with some silver embossing powder for the words and some iridescent embossing powder for the starry swirl. Unfortunately, the iridescent powder is retired, but I happened to have a couple containers which I stocked up on a couple of years ago. White or clear powder would be a good substitute or even glitter (if you can stand the mess!).

This bundle would be a great place to start for a Christmas card project this year!  You need minimal ink, some paper and the bundle and then embellish as you wish. My supplies are listed below and you could easily substitute for a different color or even switch to gold rather than silver.  What suits your fancy?!! Here's a peek at the bundle itself:


October 1st starts a new year with Stampin'Up! and also my 5th anniversary! I'm very excited about that and where this fun adventure has taken me. I have met friends and fellow stampers I don't think I would have met otherwise, I've been to some fun conventions and trips, I've grown incredibly as an artist and have mentored a few others along the way. Thank you so much for whatever part you have played in helping me get this far! I truly appreciate the business but even more, the friendship.  To celebrate, I'm offering a Blog Candy Giveaway!  I will have a 1st, 2nd and 3rd prize of SU products to give away to the winners. How do you win? All you have to do is comment on my blog in October! I will keep track of the number of times you have commented and those you comment the most will win!  Comments can be questions, comments, whatever!  READY, SET, GO!!

Happy Stampin'
Sarah

Monday, October 3, 2016

Joy!

Hi stampin' friends!
I hope you are enjoying the first few days of October!  My husband and I ushered the month in with a "bucket list" 4-wheeler ride as far as the trail goes up the Boulder River, south of Big Timber, MT. My grandparents were residents of Big Timber most of their lives and I have so many memories of that town, their house and the Boulder! I was overwhelmed with warm fuzzies and sentiment this past weekend as we rumbled up the trail. As with most of our jaunts into the high country, we always see abandoned cabins. I think most of the time these are associated with some sort of mining operation from the 1800's or early 1900's but I am always amazed that anyone thought it was a great idea to live so remotely. I kept thinking how spoiled I am, we all are, with the modern convenience we have and how quickly our mood goes south when things are perfect, like no cell service or being out of something we can easily get at the grocery store. I think all their time was focused on survival and probably very little was devoted to pleasure, let alone "art" or "crafting". I guess I just got a heavy dose of perspective this past weekend!

I do have a card today!  This was a popular one at a recent card buffet I just held. It features a great stamp set from the Annual Catalog and the reverse side of some Christmas Designer Series Paper from the Holiday Catalog. Don't be afraid to stamp on DSP!  If it's light enough and your ink color is dark enough, it produces lovely results! Here's my card:


This card is simple and focused on Joy and the birth of Jesus.  I love that in a Christmas card!

Speaking of Designer Series Paper, there is a promotion going on for the month of October!

B3G1DSP_DemoHeader_NA

That's right!  Buy three packs and get one free! Our DSP is top quality, designs on both sides and you get 2 sheets of six different designs in each pack. Check out the store to see all the options.  For this promotion, Specialty Designer Series Paper and Paper stacks do not qualify.

You can order yourself online (the order will come directly to you) or you can place an order with me-- your choice!  You can also take advantage of this offer as many times as you would like in October!

I'll leave you with a couple of pictures of the end of the trail that so inspired me this weekend!


Have a great Monday!
Sarah